Applies to:
- Revu 21
- Revu 20
- Revu 2019
- Revu 2018
Jump to other versions:
The Revu Alignment toolbar includes many different tools with similar names and icons, so it may be difficult to keep them all straight if you’re unfamiliar with them. This article discusses the different types of alignment tools and how to use them to resize and arrange your markups.
About alignment tools
Nearly every alignment tool is dependent on the primary markup, designated by yellow control points, while all other markups will have green control points. Revu will reposition secondary markups relative to the primary markup.
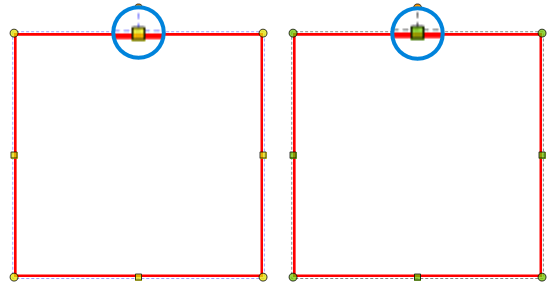
To designate a primary markup, select multiple markups. The first markup you select will become the primary markup by default. To learn more about how to select multiple markups, check out Easy ways to master markup selection.
To change the primary markup, select a markup with green control points. The control points become yellow to show the current primary markup.
To access the alignment tools, either right-click the markup and select one of the tools in the Alignment dropdown, or use the Alignment toolbar.
Positional alignment tools
These tools affect the position of the markups relative to the primary markup, or the center of the document.
 Align Left: Aligns the left edges of two or more markups to the left edge of the primary markup.
 Align Top: Aligns the top edges of two or more markups to the top edge of the primary markup.
 Align Right: Aligns the right edges of two or more markups to the right edge of the primary markup.
 Align Bottom: Aligns the bottom edges of two or more markups to the bottom edge of the primary markup.
 Align Middle: Aligns the vertical middle of two or more markups to the horizontal middle of the primary markup.
 Align Center: Aligns the horizontal center of two or more markups to the vertical center of the primary markup.
 Center in Document: Aligns the centers of one or more markups to the center of the page.
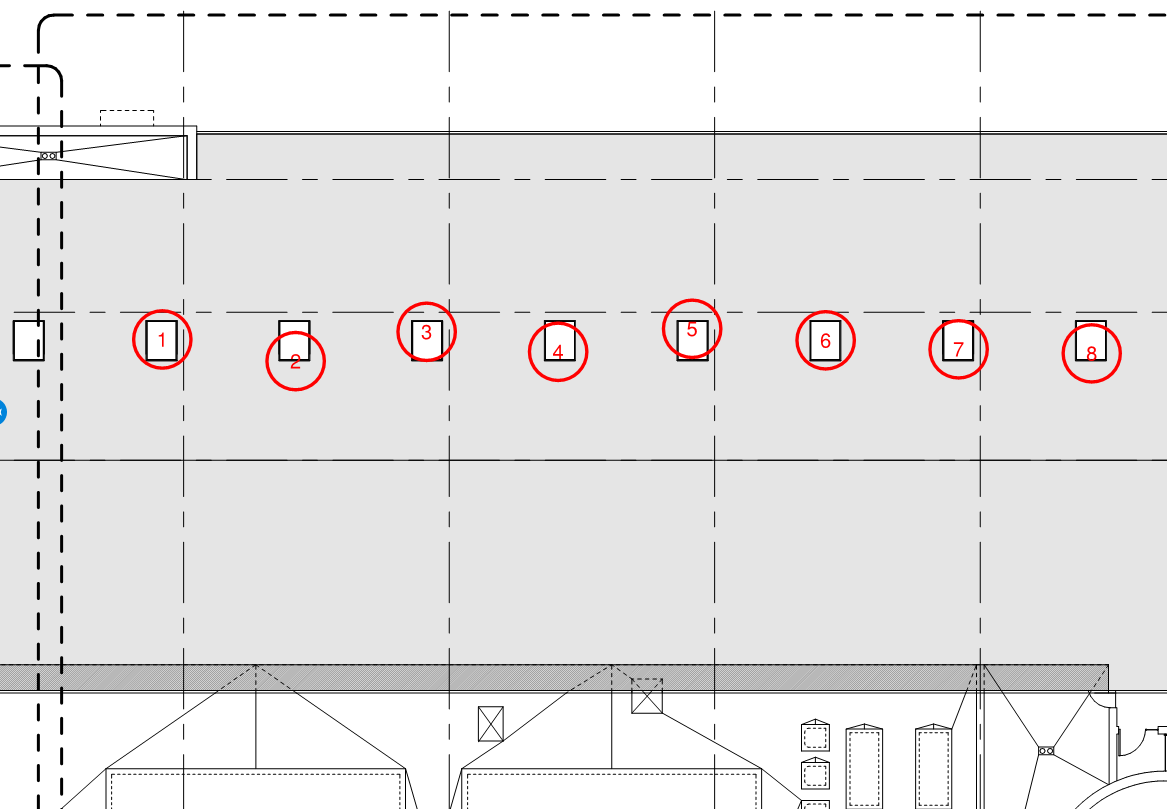
How to place markups in a straight line
Placing markups on a straight line can be useful for a variety of purposes, such as placing several markups along a wall on a floorplan.
- Select the markups that you want to align.
- Right-click the markup you want to set as the primary markup, and perform one of the following:
- Select Alignment > Align Middle.
- Select Alignment > Align Center.
- Select Alignment >
Resizing tools
These tools allow you to copy the exact width and/or height from a primary markup and apply them to the other selected markups even if they aren’t the same shape.
 Align Width: Makes two or more markups the same width as the primary markup.
 Align Height: Makes two or more markups the same height as the primary markup.
 Align Size: Makes two or more markups the same height and width as the primary markup.
How to align markup size
- Select your markups.
- Right-click the markup you want to set as the primary markup, and perform one of the following:
- Select Alignment > Align Width.
- Select Alignment > Align Height.
- Select Alignment > Align Size.
- Select Alignment >
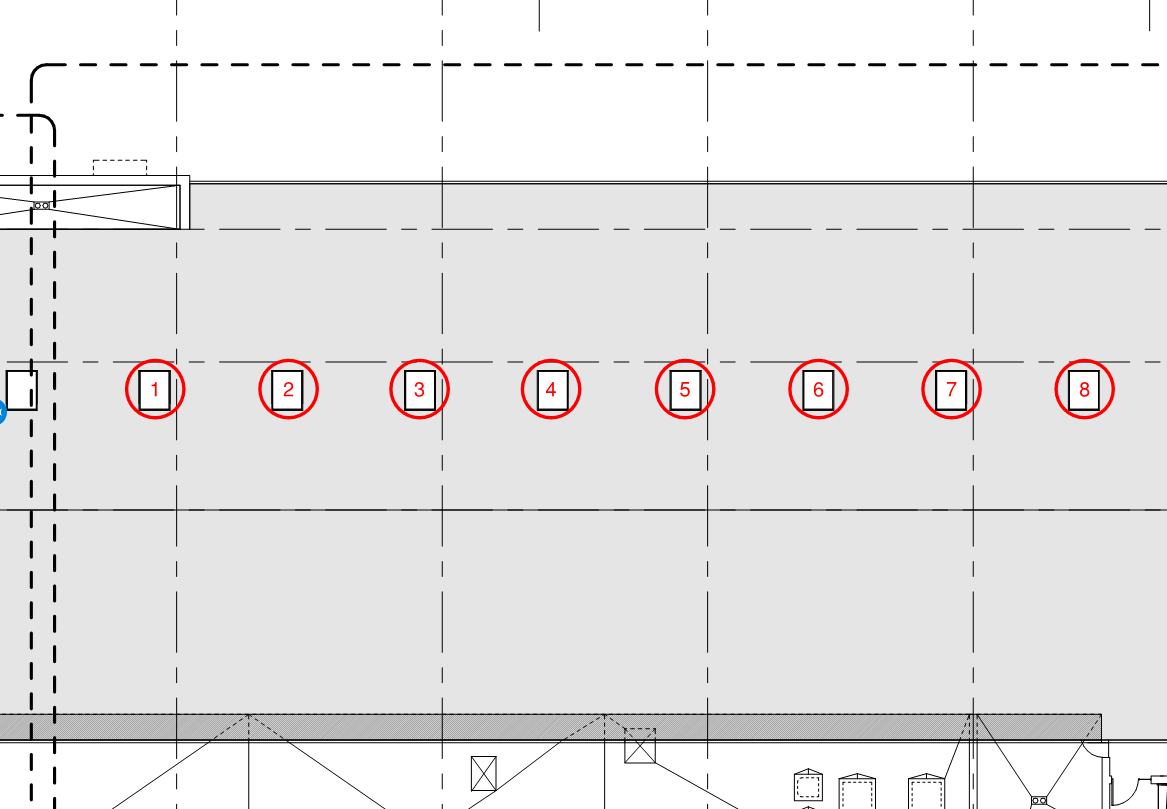
Distribution tools
These tools reposition markups so that the spaces between their centers are equal.
 Distribute Horizontally: Distributes three or more markups along their horizontal plane.
 Distribute Vertically: Distributes three or more markups along their vertical plane.
How to divide a space evenly
- Select your markups.
- Right-click any markup, and perform one of the following:
- Select Alignment > Distribute Horizontally.
- Select Alignment > Distribute Vertically.
- Select Alignment >

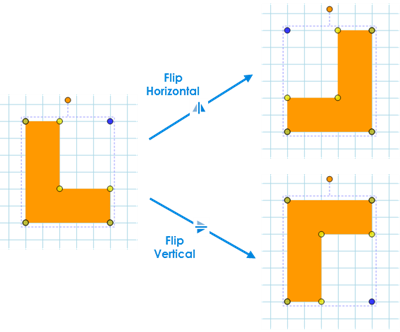
Flip tools
These tools change the direction a markup is facing across its horizontal or vertical axis while retaining its position.
 Flip Horizontal: Flips one or more markups horizontally.
 Flip Vertical : Flips one or more markups vertically.
How to flip a markup
- Select your markup(s)
- Right-click any markup, and perform one of the following:
- Select Alignment > Flip Horizontal
- Select Alignment > Flip Vertical
- Select Alignment >
How-To
Revu 2018
Revu 2019
Markup
Revu 20
Revu 21
Other versions of this article
Revu 2017 and older
Resizing and rearranging markups and images uniformly can be a difficult task without some kind of assistance. For this reason, Revu includes Alignment tools for every scenario so you can get the precise results you’re looking for.
Understanding Alignment Tools
Since there are many different alignment tools with very similar names and icons, it may be difficult to keep them all straight if you’re unfamiliar with them. To help you remember their functions, we have divided the tools into groups and provided an example of how to use each.
Before we explain what each Alignment tool does, it’s important to understand that nearly every Alignment tool is dependent on the primary markup, designated by yellow control points. Revu will reposition the other markups in your selection along a line extending from either the center, middle, or side of the primary markup (depending on the tool used).
To designate a primary markup, you must first select multiple markups. The first markup selected will become the primary markup by default. To change the primary markup, either click or right-click on a markup with green control points.
To access the Alignment tools, either right-click on the markup, then select one of the tools from the Alignment dropdown; or click on the appropriate icon in the Alignment Toolbar.
Positional Alignment Tools
These tools affect the position of the markups relative to the primary markup, or the center of the document.
- Align Left (Ctrl+Alt+L)
 : Aligns the left edges of two or more markups to the left edge of the primary markup.
 - Align Top (Ctrl+Alt+T)
 : Aligns the top edges of two or more markups to the top edge of the primary markup.
 - Align Right (Ctrl+Alt+R)
 : Aligns the right edges of two or more markups to the right edge of the primary markup.
 - Align Bottom (Ctrl+Alt+B)
 : Aligns the bottom edges of two or more markups to the bottom edge of the primary markup.
 - Align Middle (Ctrl+Atl+E)
 : Aligns the vertical middle of two or more markups to the vertical middle of the primary markup.
 - Align Center (Ctrl+Alt+M)
 : Aligns the horizontal center of two or more markups to the horizontal center of the primary markup.
 - Center in Document
 : Aligns the centers of one or more markups to the center of the page.
Place Markups in a Straight Line
Placing markups along a straight line can be useful for a variety of purposes, such as placing several markups along alongside a wall on a floorplan.
- First, select the markups that you want to align. Here are a few ways to do this:
- Click and drag a rectangle around the markups.
- Use the Lasso
 tool.
tool. - Shift+click on the markups one by one.
- Right-click on the markup you want to align to. This will become your primary markup.
- From the right-click menu, click Alignment, then select the appropriate tool. Use Align Middle for horizontal lines, or Align Center for vertical lines.
Resizing Tools
These tools allow you to copy the exact width and/or height from a primary markup and apply them to the other selected markups — even if they aren’t the same type.
- Align Width
 : Makes two or more markups the same width as the primary markup.
 - Align Height
 : Makes two or more markups the same height as the primary markup.
 - Align Size
 : Makes two or more markups the same height and width as the primary markup.
Aligning Markup Size
You can use the Alignment tools to re-size your markups to match the anchor markup.
- Select the markups.
- Right-click on the markup you want to resize the other markups to. (The markup will have yellow control points if done correctly, while the rest of the markups will be highlighted in green.)
- Click Alignment, then select one of the tools listed above.
Distribution Tools
These tools re-position markups so that the spaces between their centers are equidistant.
- Distribute Horizontally
 : Distributes three or more markups along their horizontal plane.
 - Distribute Vertically
 : Distributes three or more markups along their vertical plane.
Dividing a Space Evenly
Using Distribute Horizontally ![]() or Distribute Vertically
or Distribute Vertically ![]() , you can divide the space between markups evenly. This could work extremely well in situations where you might need to divide a space into separate rooms, for example.
, you can divide the space between markups evenly. This could work extremely well in situations where you might need to divide a space into separate rooms, for example.
- First, place the markups on the page.
- Select the desired markups.
- Right-click on any markup.
- Click Alignment, then select one of the above Distribution tools.
Flip Tools
These tools change the direction a markup is facing across its horizontal or vertical axis. The markup’s position is retained.
- Flip Horizontal
 (Ctrl+Alt+H): Flips one or more markups horizontally.
 - Flip Vertical
 (Ctrl+Alt+V): Flips one or more markups vertically.
Simply right-click on the markup you would like to flip, click Alignment, then choose one of the Flip tools, or use the Alignment Toolbar.
If you have more questions, please take a look at the Alignment Toolbar section in the Revu Help manual.
How-To
Revu 2017 & Below
Markup
Revu Alignment tools make it easy to align markups along straight lines, space them out evenly, and even copy the height and width from one markup to another.