The Tool Chest is a place where you can store customized markups so you can quickly add them to your PDFs without having to recreate them. For example, while the Highlight button on the toolbar allows you to save one default appearance for the Highlight tool, the Tool Chest can store multiple color and thickness combinations that you can access with a single click. Revu comes with a number of useful tool sets, or collections of markups, in the Tool Chest, but you can also create and share your own tool sets full of customized markups and measurements that fit exactly what you need and how you work. Custom markups can be saved in the pre-created “My Tools” tool set, or in your own custom tool set. To create a tool set:
 and select either Symbol
  or Detail
  .The image below shows changing the “Sequences & Actions” tool set from the original Symbol view to the new Detail view.
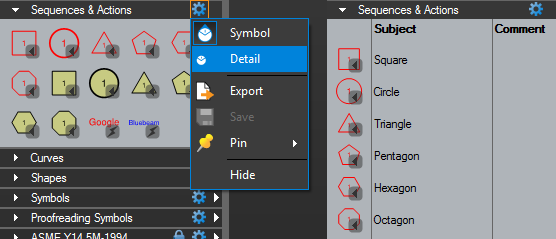 How to switch between Symbol and Detail display mode in the Tool Chest video tutorial
and a pop-out containing that tool set’s markups will appear. Just choose the markup you want from the pop-out. The image below shows the pop-out of the collapsed “Sequences & Actions” tool set.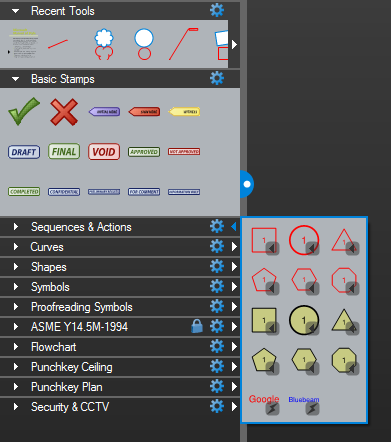
Revu comes with a number of useful tool sets, or collections of markups, in the Tool Chest, but you can also create and share your own tool sets full of customized markups and measurements that fit exactly what you need and how you work. Custom markups can be saved in the pre-created “My Tools” tool set, or in your own custom tool set. To create a tool set:- Click Manage Tool Sets at the top of the Tool Chest
 tab.
tab. - Click the Add button.
- Click New, type a Title and click OK.
Symbol vs Detail View
When you have several similar markups saved in your Tool Chest that have subtle, but important, differences, it can be hard to tell them apart. Revu 11 added the Detail view to the Tool Chest so you can display selected tool sets in a table that includes the symbol plus the Subject, Comment and Label in text, making it easy to find the right markup every time. To change the display of a tool set, click the tool set’s SettingsHow to switch between Symbol and Detail display mode in the Tool Chest video tutorial Pop-out
The Tool Chest allows you to collapse tool sets that you aren’t currently using to save space in the Tool Chest tab. But did you know you can still access symbols in a collapsed tool set without having to expand it first? Click the white arrow to the right of the collapsed tool set’s SettingsSharing Tool Sets
After you have created a tool set, you might want to share it with coworkers or project partners. Each tool set is stored as an individual file with a .btx file extension, and these files can be exported from Revu and shared. All your coworker or project partner needs to do is import or add it to their own Tool Chest. Be aware, however, that while these might sound like they are the same thing, there’s an important difference in where the tool set file will be stored. Importing copies the tool set into your local Revu environment. Adding links to the tool set where it currently resides, like on a network drive, allowing multiple users to access the same tool set so everyone has immediate access to new or updated symbols as soon as the tool set is updated.Revu has a locking mechanism for shared tool sets that prevents two people from updating the tool set at the same time. The “Managing Tool Sets” topic in Revu Help has additional information about working with shared tool sets.Exporting
The first step of sharing a tool set is to export it. To export a tool set:- Click the tool set’s Settings and click Export.
- Select the folder where you want to store the file and click Save.
Importing
Importing a tool set copies the tool set .btx file into your local Revu environment. The easiest way to import a tool set is to double-click on the tool set file. You can also choose multiple files in Windows Explorer, right-click and select Import to import them all at once. Dragging the tool set files from Windows Explorer into the Revu window will also import them.Adding
To add a tool set that is stored on a network:- Open the Tool Chest.
- Click Manage Tool Sets at the top of the Tool Chest tab.
- In the Manage Tool Sets dialog, click Add.
- In the Add Tool Set dialog, click Existing.
- Click Browse
 , select the file, then click Open.
 - Check the Display and Show in All Profiles boxes.
- Click OK to exit the Add Tool Sets dialog.
- Click OK.
Sharing with Revu iPad
Tool sets that you have created in Revu can also be shared with Revu iPad. That sharing process was covered in a previous article that can be found here.How-To
Revu 2017 & Below
Markup
The Tool Chest is a place where you can store customized markups so you can quickly add them to your PDFs without having to recreate them.