This article applies to:
- Revu 20
- Revu 2019
- Revu 2018
Jump to other versions:
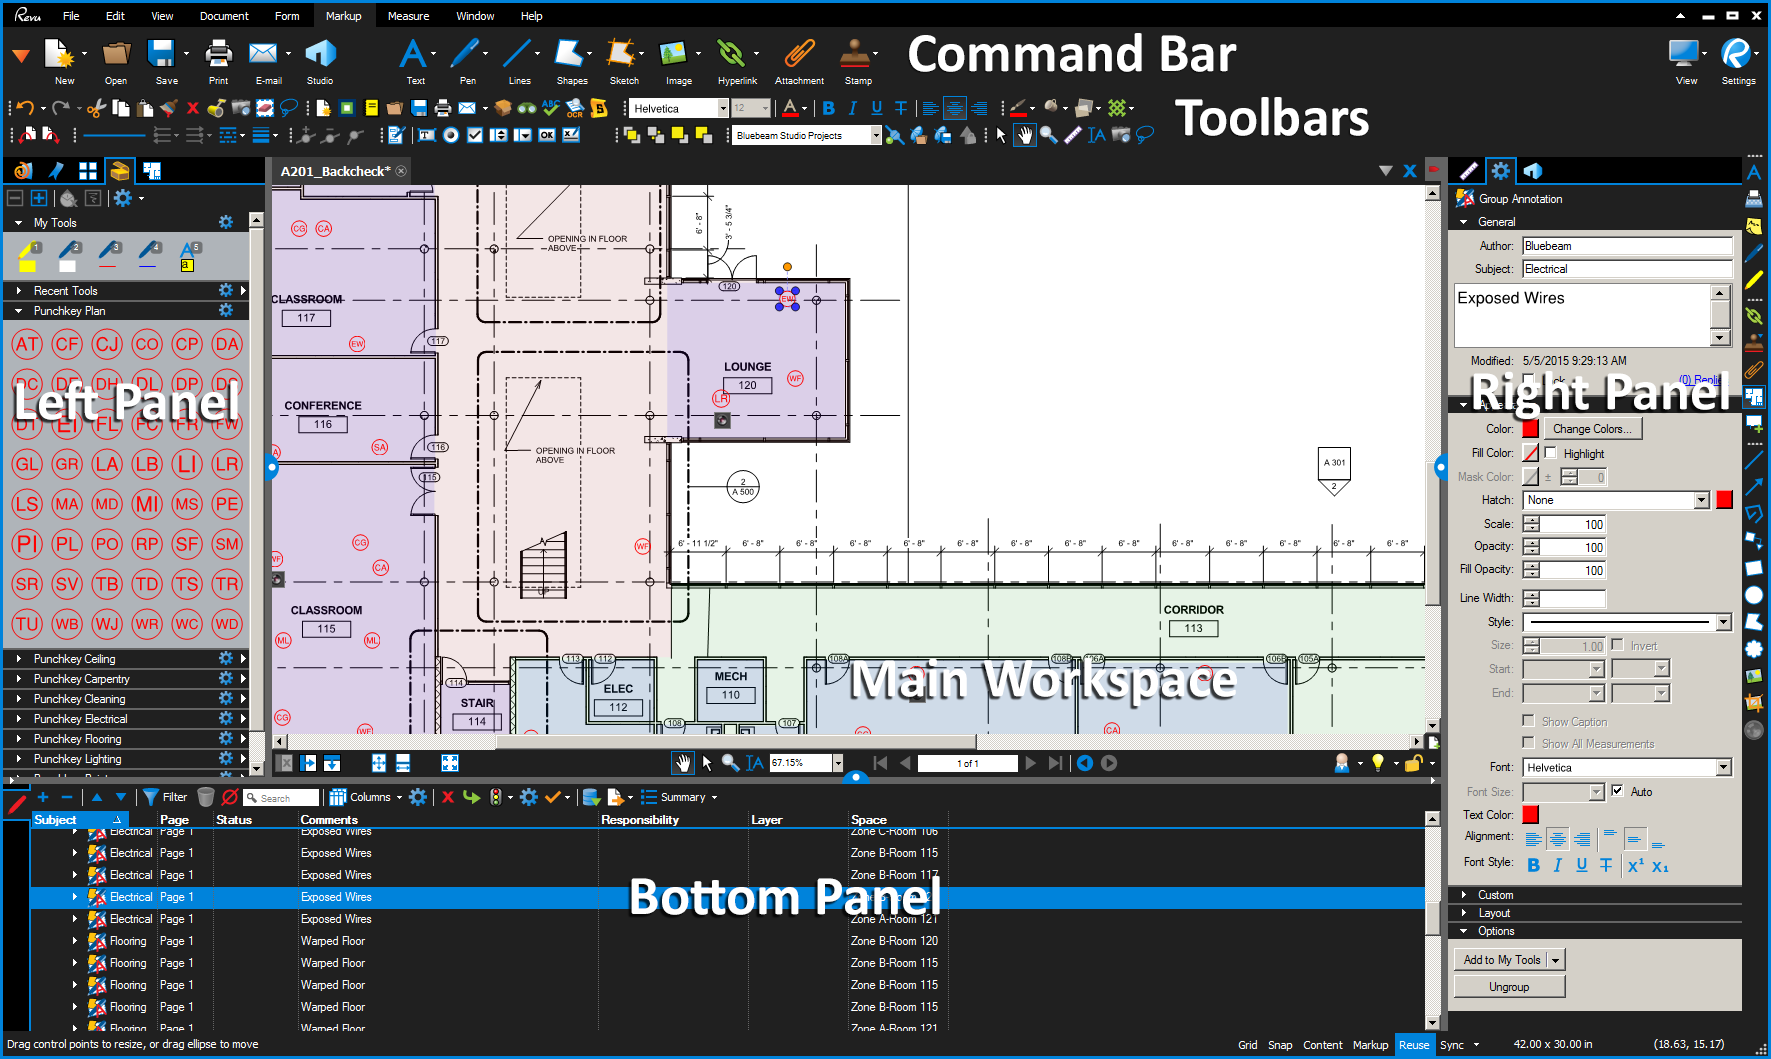
In this installation of Customizing Bluebeam Revu, we’ll take a look at Panels in Revu. Panels are in-depth Revu features that require special interfaces. Panels are hidden behind their icons and found by default on the left-hand side of the interface. They can be re-positioned to sit at the bottom or right of the interface. Click on one of these icons to hide or reveal the panel.
Panels vs toolbars
You can distinguish a Panel from a toolbar by noticing:
- A toolbar will always have a string of dots (……) near its top or left side called a handle.
- After clicking on a toolbar icon, the dynamic Properties Toolbar becomes active.
 sits on its own row to the left of the toolbar icons (marked by the string of dots).
How to customize Panels
Certain panels will be visible in the Revu interface by default, depending on the Profile you are using. You can enable or disable them to your liking from Window > Panels. This menu also provides a helpful reference for each panel’s keyboard shortcut.
Once a panel is enabled, there are many different ways that you can place or even combine them:
- Click and drag any panel icon to the left, right or bottom of the interface.
- Click and drag a panel to the center of the interface and then release it to create a floating panel. Floating panels act like separate windows, i.e. they become separate from the Revu interface.
- Click and drag additional panel icons into the floating panel.
- Drag panel icons over any open panel, and you will see a circle with four arrows. Move your panel icon over one of the arrows, and the panel will be split in your chosen direction. In this way, you can have multiple panels open at the same time.
A split panel will have a gray line underneath its icon. To undo split panel mode, drag the panel icon away from its current place and release. - Right-click on a panel icon to reveal a context menu. From there, you can use Hide to remove the panel from the interface. Or, use Attach > Left / Right / Bottom / Detach to quickly move a panel to an area of your choosing.
This is useful for those who would prefer not to drag and drop the panels.
Saving Panel arrangements
Any arrangement of toolbars and panels can be saved to a Profile.
To save your panel and tab arrangement to your active profile, go to Revu > Profiles > Save Profile.
To change your active profile, go to Revu > Profiles and select one of the profiles from the list.
To edit or delete profiles, go to Revu > Profiles > Manage Profiles.
Panels reference
Below is a full list of the Panels in Revu, and a link to more in-depth information about each.
| Flags | Signatures |
More information
This article is part of the Customizing Bluebeam Revu series:
| Introduction | General Preferences |
| Panels | Main Workspace and Menu Bar |
| Navigation and Status Bars | Toolbars |
See also:
- Getting Around the Interface – Learn how to navigate Revu’s interface.
- Tutorial Videos – Browse our in-depth tutorial videos on Revu features and workflows.
- Revu Help – Complete documentation of all Revu features and functions.
Other versions of this article
Revu 2017 and older
Customizing the Bluebeam Revu User Interface – Part 5. Panels & Tabs
In this section of our FAQ Series on Customizing the Revu User Interface, we’ll take a look at the areas of the program which let you access functions and features for tasks such as creating Bookmarks and Page Labels , Calibrating your drawings for Takeoffs and Estimations , and accessing Bluebeam Studio.
Revu offers three Panels located to the left and right of the Main Workspace, with an additional Panel below it.
You can open various Tabs in each Panel for easy access to numerous Revu features using Revu Keyboard Shortcuts, or by clicking Tabs ![]() in the View Command Group. Once opened, they can be dragged to the other panels, or detached from the main user interface and dragged to other areas of your screen or an additional monitor.
in the View Command Group. Once opened, they can be dragged to the other panels, or detached from the main user interface and dragged to other areas of your screen or an additional monitor.
The available Tabs and Panels are:
| Flags Panel | Signatures |
If you’d like additional information about customizing Bluebeam Revu please use the links listed below to access the rest of the series, and watch a tutorial video on Revu customization:
More Information
You can also find information about Getting Around the Interface and actually using the available functions and features in our Tutorial Videos, and your appropriate Revu Online Help manual.
How-To
Revu 20
Revu 2019
Revu 2018
Revu 2017 & Below
Interface & Navigation