Applies to:
- Revu 21
- Revu 20
- Revu 2019
- Revu 2018
Jump to other versions:
Revu can create curves on ![]() Perimeter and
Perimeter and ![]() Area measurements as well as other polygon and polyline shaped markups, which include:
Area measurements as well as other polygon and polyline shaped markups, which include:
 Polyline
 Polyline Sketch to Scale
 Polygon
 Cloud
Cloud Volume
 Polygon Sketch to Scale .
Because there are so many types of markups that support curves, we’ll refer to them as “polyline” below, but remember that this applies to all the markups listed above.
The easiest way to start making a curve is to create a polyline and then convert the control points (the yellow handles at each point on the polyline) or line segments to curves.
Converting a line segment to a curve
To convert a line segment:
- Right-click on a line segment in a polyline.
- Click
 Convert to Arc.
Two new control points at the end of handlebars will display. These are how you control both the direction and the curve of the arc.
- Stretch the handlebar away from the control point to stretch the curve.
- Rotate the handlebar to change the angle of the curve as it leaves the control point.
If you convert two adjacent line segments, there will be two handles on that control point which control the curve on either side of the point. These handles can be rotated independently, allowing you to have a curve on one side of the point and a straight line on the other.
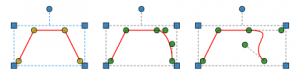
The image below shows the process of curving a polyline. From left to right we see a polyline, the same polyline after the right line segment is converted, and finally the curves after moving the handlebars.
Converting a control point
To convert a control point:
- Right-click on a control point.
- Click Control Point > Convert Control Point to Curve

-or-
- On the Control Point toolbar, click Convert Control Point to Curve
- Click the control point you wish to curve.
-or-
- Hold the Ctrl key down and click on the control point.
Converting a control point is different from converting a line segment because the two handlebars are locked together – rotating one handle also rotates the other. This allows you to create a smooth curve on each side of this point.
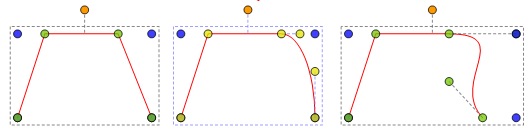
The images below show the same polyline that was used above, but this time the upper right control point has been converted and the handles have been moved to change the curve.

Adding and subtracting control points
Control points can quickly be added or removed from an existing polyline.
Add control point:
- Right-click on a line segment.
- Click Control Point > Add Control Point
– or –
- Hold the Shift key and click a line segment.
Subtract control point:
- Right-click on a control point.
- Click Control Point > Subtract Control Point.
-or-
- Hold the Shift key and click a control point.
Drawing curves
You can also draw curves directly on the PDF rather than editing a previously existing polyline:
- With a polyline tool activated, hold down the Ctrl key, then click and drag.
- A new point is created when the mouse button is released.
- Continue to click-and-drag and release to create more points.
- Press Enter to complete the polyline.
Drawing curves is a little more complicated, so remember that you can change the curves after you finish drawing. 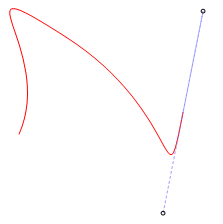
Measurements
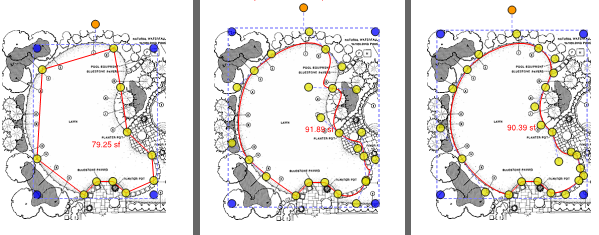
Let’s apply this information to create an Area measurement for a freeform lawn. The image below shows the progression as an Area is created and then adjusted to match the outline.
- Create an area with 11 points that roughly outline the shape. Start with one at each corner and for each curve. Additional points can be created if they’re needed.
- Create curves using Convert Control Point to Curve when a point has curves on each side and Convert to Arc when a line has an angle on one or both ends, such as the sides of the patio at the bottom.
- Finally, move the handlebar control points to fine tune the shape of the Area until it matches the outline.

How-To
Revu 2019
Revu 20
Revu 21
Measurement
Markup
Other versions of this article
Revu 2017 and older
A frequent question that we get is how to take Area ![]() or Perimeter
or Perimeter ![]() measurements on a curved or irregular shape, like a freeform pool or lawn area.
measurements on a curved or irregular shape, like a freeform pool or lawn area.
Revu allows you to create curves using the Polyline ![]() and Polygon
and Polygon ![]() tools – because the Perimeter tool is a polyline and the Area tool is a polygon, you can create curved measurements. (By the way, the Cloud
tools – because the Perimeter tool is a polyline and the Area tool is a polygon, you can create curved measurements. (By the way, the Cloud ![]() tool is also a polygon.)
tool is also a polygon.)
There are a few different ways to create curves. Existing control points or line segments can be converted to curves, or you can use a keyboard shortcut to draw curves directly. Because there are many different types of markups that support curves, I will only use the term “polyline” below, but remember that they apply to all of the aforementioned markup types.
The easiest way to start making a curve is to create a polyline and then convert the Control Points (the yellow handles at each point on the polyline) or line segments to curves.
Converting a line segment to a curve:
Right-click on a line segment in a polyline, then click Convert to Arc ![]() . Two new control points will display. These new handles are how you control both the direction and the curve of the arc.
. Two new control points will display. These new handles are how you control both the direction and the curve of the arc.
Stretch the handle away from the control point to stretch the curve.
Rotate the handle to change the angle of the curve as it leaves the control point.
If you convert two adjacent line segments, there will be two handles on that control point which control the curve on either side of the point. These handles can be rotated independently, allowing you to have a curve on one side of the point and a straight line on the other.
The below shows a polyline, then the same polyline after the right line segment is converted, and finally the curve after the handles have been moved.
Converting a Control Point:
Right-click on a control point, click Control Point, then Convert ![]() .
.
Converting a Control Point is different than converting a line segment because the two handles will be locked together – rotating one handle will also rotate the other. This allows you to create a smooth curve on each side of this point.
Shortcuts:
- On the Control Point toolbar, click Convert Control Point
 .
. - Hold the Ctrl key down and click on the control point.
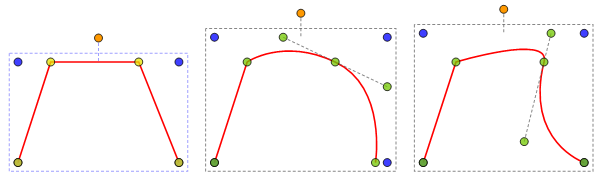
The images below show the same polyline that was used above, but this time the upper right control point was converted and then the handles moved to change the curve.
Drawing Curves
You can also draw curves directly on the PDF by holding down the Ctrl key and then clicking and dragging each line segment. Drawing curves is a little more complicated, so remember that you can still change the curves after you finish drawing.
Measurements
This brings us back to measuring curved areas. Everything that you did above can be done with Area and Perimeter measurements.
The images below show the progression of how an Area measurement is created for a freeform lawn. First, a series of points are defined. In this case, we defined 10 points.
Next, the Control Points and a few line segments are converted around the patio. A few curves are almost exactly where they need to be, but some, like the one in the upper right-hand corner, need to be adjusted. The final step is to make adjustments using the curve handles so the final curves match the outline.
Please check out the video tutorial on creating curves in polygons and polylines .
How-To
Revu 2017 & Below
Measurement
Markup