Applies to:
- Revu 21
- Revu 20
- Revu 2019
- Revu 2018
You can save custom statuses to a PDF (rather than a profile) and use scripting to apply them to multiple documents or folders. This allows all collaborators and stakeholders to have access to the same custom statuses even when they use a different profile in Revu.
Before starting this process, you need to create or locate a PDF in which your custom statuses are saved. For more information about creating custom statuses, please see How to save and share custom statuses.
Add and run a new script
To successfully embed your custom statuses in multiple PDFs, you need to generate a new script. When you apply the script, Revu will insert and delete a page from the document you located, leaving the custom statuses behind within the selected files/folders.
- Go to Batch >
 Script.
 - Select the + in the bottom left corner to add a new script.
- In the Script Editor dialog, enter a name for the script so it’s easy to identify and apply to future files/folders.
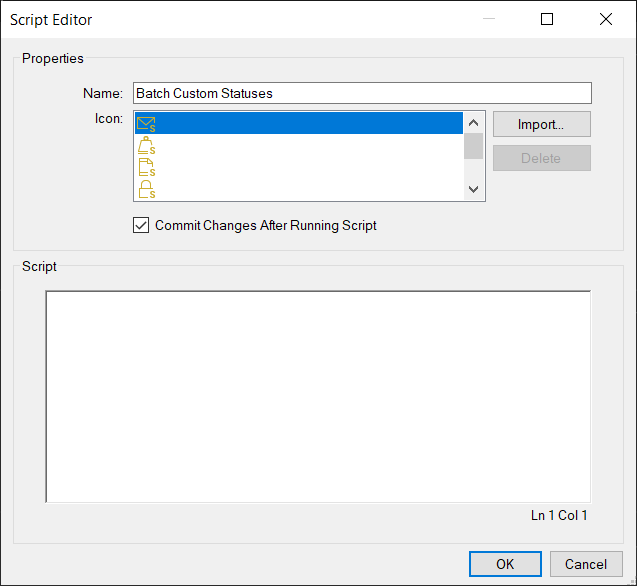
- Select an icon for the new script.
- In the Script field, copy and paste the following command:
InsertPages(0, "c:\users\name\desktop\status template.pdf", false, false, true, false, false)PageDelete(1) - Replace the placeholder file path above with the full file path and file name of the PDF you located, so the script references the specific PDF with your saved custom statuses.
You don’t have to open the PDF with your custom statuses to complete the batch process.
- Select OK.
- In the Script Manager dialog, select Add and add the files/folders that need your custom statuses.
- Under Scripts, select the newly created script.
- Select Run.
How-To
Revu 2018
Revu 2019
Revu 20
Revu 21
Markup
PDF Management
Drawing Management