
This article applies to:
- Revu 21
- Revu 20
- Revu 2019
- Revu 2018
The Bluebeam Stapler provides binding and batch capabilities. To launch the Stapler, go to Start > Bluebeam Software > Bluebeam Stapler.

There are a few ways to add documents to a job in the Stapler:
- Drag and drop the files onto the Stapler workspace.
- Click Add Files and select the desired documents.
- Click Start Wizard in the Stapler workspace or Wizard on the toolbar to launch the Stapler Wizard.
Once files have been added, the Stapler workspace changes to show them. To configure the job before running it, click Configure. To start the conversion process, click Staple.
To save the current configuration of jobs and files, go to File > Save. Saved configurations can then be loaded at a later time to repeat the same jobs.
Stapler settings
To change Bluebeam Stapler settings, open the Stapler and go to Edit > Settings. Below is a list of the preferences you can customize:
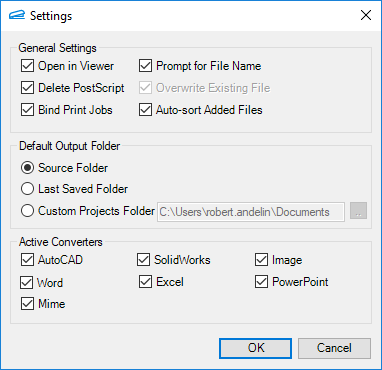
General Settings
- Open in Viewer: Select if you wish to open the default viewer for a file once created.
- Delete PostScript: Select if you wish to remove the temporary postscript file once the file has been created.
- Bind Print Jobs: If this is checked, files printed to the Bluebeam PDF printer with Stapler open will be automatically combined into a single conversion job with one output file.
- Prompt for File Name: Select if you wish to show a Save As dialog to enter a file name and location. If unchecked, the name will default to the current file name and the file will be saved in the source directory.
- Overwrite Existing File: If Prompt for Filename is off, use this setting to indicate whether old output files should be overwritten, or preserved. If the overwrite option is off, output filenames will be appended with a number to create a unique filename.
- Auto-sort Added Files: New files added to the Stapler will automatically be sorted when this option is checked.
Default Output Folder
- Source Folder: The output file will be created in the folder where the source file resides.
- Last Saved Folder: The output file will be created in the same folder as the previous conversion.
- Custom Projects Folder: Designate a static projects folder for all output files. You can type in a path, or browse the file system.
Active Converters
Normally the Stapler will attempt to use the Bluebeam plugins for converting files from AutoCAD, Word, and so on. These may be unchecked individually to override this behavior and instead use MIME printing. This may be useful for cases such as trying to print .dwg files using a viewer rather than the AutoCAD plugin.
More Information
How to configure jobs in the Bluebeam Stapler
Performing multiple jobs at once in the Bluebeam Stapler
How-To
Revu 20
Revu 2019
Revu 2018
Studio
Integrations & Plugins
Learn how to use the Bluebeam Stapler to combine PDFs.