Applies to:
- Revu 2017
Revu 2016 introduced many new features like Legends, Batch Markup Summary, Tags, improved text recognition with both AutoMark and OCR, and interface enhancements. Since then, we have been working hard to deliver even more innovative features to Revu 2017. Read on and follow the links below to learn more about all of the exciting new features now available in Revu.
| Dynamic Fill | Polylength |
| Quantity Link | Segments |
| Automatic Form Creation | 360° Photos |
| Batch Sign and Seal | 3D PDF Enhancements |
Dynamic Fill
Standard CAD eXtreme
Dynamic Fill is a simplification of the Takeoffs workflow, which involved carefully taking measurements one by one. Now, Dynamic Fill ![]() recognizes the lines on your drawing, so you won’t need to select the individual points of your desired area. Then you can add a Space
recognizes the lines on your drawing, so you won’t need to select the individual points of your desired area. Then you can add a Space ![]() , multiple measurements, and markups all at once.To use this feature:
, multiple measurements, and markups all at once.To use this feature:
- Click Measure
 > Dynamic Fill
- Use the Boundary
 tool to close doors or other gaps in the lines of the drawing. To create a boundary, click to add points, then double-click on the last point to complete it.
 - Click the Fill
 tool, then click and hold until the area has been highlighted.
 - In the Dynamic Fill menu, select the Space
 , measurements and markups you want to create.
 - Click Apply to add them to the drawing.
Keyboard shortcut: J
Quantity Link
eXtreme
Quantity Link automatically transfers measurement data from Revu to Microsoft Excel. In Excel, select the cells where you want your data to appear, and Excel will update along with the data in Revu.To use this feature:
- Place measurement markups on a PDF in Revu.
- Open a Microsoft Excel spreadsheet.
- Right-click on the cell you would like to transfer data to, then click Quantity Link
 > Create
  . You can set Preferences
  from this menu as well.
Automatic Form Creation
eXtreme
Creating PDF forms has never been easier . All you need is a PDF in a standard paper size. From there, Revu will detect where form text fields and check boxes should go, then create them automatically – all with the push of a button.To activate Automatic Form Creation ![]() :Open the PDF you want to turn into a form, then click Form (Alt+O) > Auto Create
:Open the PDF you want to turn into a form, then click Form (Alt+O) > Auto Create ![]() .
.
Batch Sign & Seal
eXtreme
Many architects and engineers are familiar with the challenge of signing approvals for large batches of plans. Batch Sign & Seal improves this process by allowing you to add a signature, seal, and current date to multiple documents at the same time. To use this feature:
- Click File > Batch
 > Sign & Seal
- In the Batch: Sign & Seal dialog, you can use the Add button to create a batch from scratch. Or, use the Load Batch button to load an existing Batch file.
- Follow the instructions in the dialog to place your signature for all files. You can also designate the location of your signature on a per-file basis.
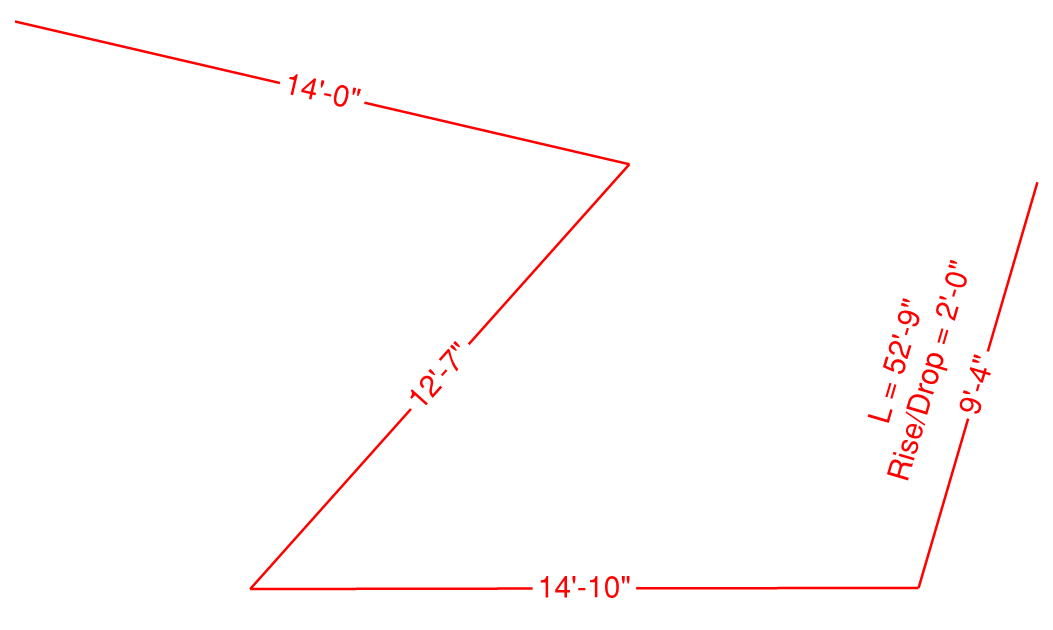
Polylength
Standard CAD eXtreme
The new Polylength tool is a type of perimeter measurement which displays the lengths of its individual segments, as well as the total measurement. A Rise/Drop may be added to these measurements in order to account for vertical length, which is normally missing from a 2D measurement.With the Polylength ![]() tool, you’ll be able to quickly and accurately measure MEP features like pipes, conduits and cables, which run vertically through walls. See the Help guide for more information.To use this feature:
tool, you’ll be able to quickly and accurately measure MEP features like pipes, conduits and cables, which run vertically through walls. See the Help guide for more information.To use this feature:
- Click Measure > Polylength
 .
. - Select the points of your measurement, then double-click to complete the markup.
Segments
Standard CAD eXtreme
Segments bring a new level of functionality to the Polylength ![]() , Area
, Area ![]() , Perimeter
, Perimeter ![]() and Volume
and Volume ![]() tools.Show Segment Values allows you to see the length of each segment of these measurements.Use Split to separate two segments of a measurement joined by a control point. Or, you can Split All parts into their own markups.The Resume feature adds line segments to the beginning or end of any segment.To Show Segment Values:
tools.Show Segment Values allows you to see the length of each segment of these measurements.Use Split to separate two segments of a measurement joined by a control point. Or, you can Split All parts into their own markups.The Resume feature adds line segments to the beginning or end of any segment.To Show Segment Values:
- Select a compatible markup.
- Open the Properties panel (Alt+P).
- Check the Show Segment Values box.
To Split:
- Place a Polylength or Perimeter
 measurement.
 - Right-click on a yellow control point, then click Split to separate the segments at that control point. Or click Split All to break up the entire markup.
To Resume:
- First, create a Polylength or Perimeter .
- Right-click on a yellow control point, located at the beginning or end of the measurement.
- Click Resume to begin drawing new segments.
360° Photos
Standard CAD eXtreme
The Capture tool now includes support for 360° Photos . Photos must be JPG files taken in a 2:1 aspect ratio, using one of the cameras listed in this compatibility chart Among these cameras are two popular models: the Ricoh Theta S, and the Samsung Gear 360.To add a 360° Photo:
- Right-click on a markup.
- Select Capture > From File…
- Select the 360° photo from File Explorer.
3D PDF Enhancements
Standard CAD eXtreme
Revu 2017 comes with big improvements to 3D PDF viewing , including:
- A new 3D Model Tree
 with improved navigation tools.
 - Automatic zoom, pan, and hide.
- Ability to directly edit Object names, colors, and metadata.
- Export metadata to CSV.
Announcements
Revu 2017 & Below
Getting Started
Revu 2016 introduced many new features like Legends, Batch Markup Summary, Tags, improved text recognition with both AutoMark and OCR, and interface enhancements. Since then, we have been working hard to deliver even more innovative features to Revu 2017. Read on and follow the links below to learn more about all of the exciting new features now available in Revu.