Using an older version of Revu?
Applies to:
- Basics
- Core
- Complete
The Properties Toolbar
The Properties Toolbar makes it easy for you to edit and customize your markups. The toolbar is dynamic and displays a custom set of properties based on the markup type selected. Using the Properties Toolbar simplifies your workflows by keeping your most common markup properties within view.
General Features
- When you select a specific markup, the Properties Toolbar shows a selection of the most useful properties for that markup.
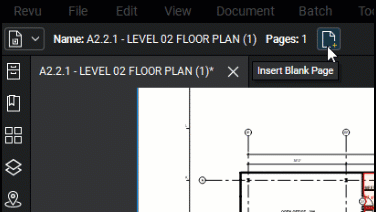
- When an active PDF has no markups selected, the Properties Toolbar displays basic information about the document, including its name and the number of pages. You can also add new pages to your document or assign properties such as Title, Author, and Subject from the Show Document Properties icon
 .
.
- When no active tabs are present, the Properties Toolbar remains empty.
Making the most of the Properties Toolbar
The following examples demonstrate a few ways you can fully utilize the Properties Toolbar.
Multiple Markups
When selecting multiple markups, the Properties Toolbar will expand to include properties for each markup type selected. Changing a property that any of the selected markup types have in common will change that property for each markup type. This is useful when you have multiple markups belonging to the same category or owner and wish to make changes across those markups.
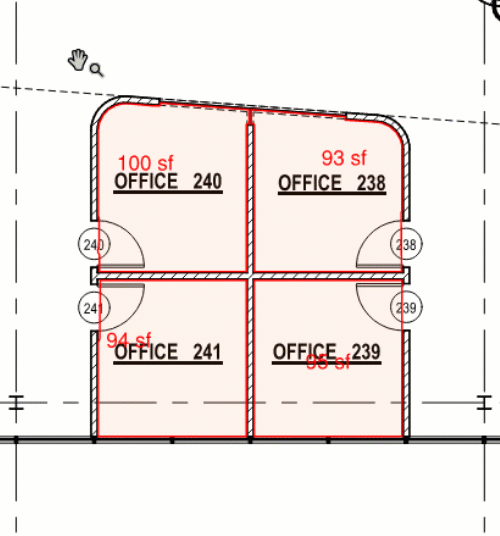
The following example shows you how to edit a ![]() Cloud (C) and
Cloud (C) and ![]() Callout (Q) markup simultaneously using the Properties Toolbar. The Fill, Opacity, and Subject for these markups will be changed to make it clear that they’re electrical issues.
Callout (Q) markup simultaneously using the Properties Toolbar. The Fill, Opacity, and Subject for these markups will be changed to make it clear that they’re electrical issues.
- Hold down Shift and select your desired markups. You can also select multiple markups from the Markups List by holding Shift and selecting your desired rows. After markups are selected, the Properties Toolbar expands to include properties for those markups
- Select Fill in the Properties Toolbar and choose your desired color.
- Select the arrows on Fill Opacity to increase or reduce the opacity for your markups. An opacity of 30%-40% provides a good balance between callout visibility and readability.
- Select
 Annotations on the far left of the Properties Toolbar to open the dropdown menu.
 - Under Subject, enter Electrical.
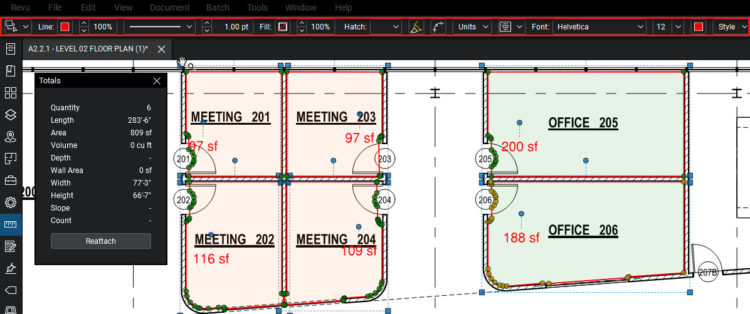
Measurement Totals
You can find the Measurement Totals in the Properties Toolbar. Your totals will be automatically displayed when you select an Area type markup. You can easily adjust properties such as the units of measurement and measurement values directly from the Properties Toolbar. You can even detach the Measurement Totals from the Properties Toolbar to create a new panel for increased visibility.
For example, you’ve added measurements to your drawing using Dynamic Fill, and you want to know the total area of four office spaces for a flooring installation job. In this example, you also want to change the units of measurement.
- Hold down Shift and select your desired markups. Alternatively, you can select multiple markups from the Markups List by holding Shift and selecting your desired rows. After markups are selected, the Properties Toolbar expands to include properties for those markups.
You can also click-and-drag an area around multiple markups to select them. - The Totals for your selected markups are automatically displayed. Select Totals to expand the property and see all your measurement values. Selecting Detach will create a panel that you can drag to your desired location on screen.
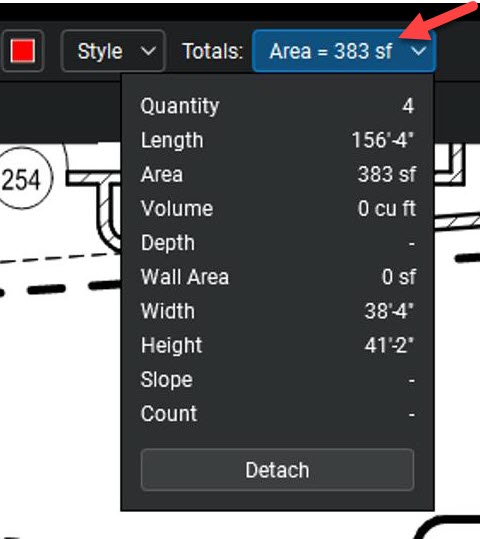
Totals are displayed when measurement markups are selected. - Under the Properties Toolbar, select Units and then select Area to reveal unit measurements.
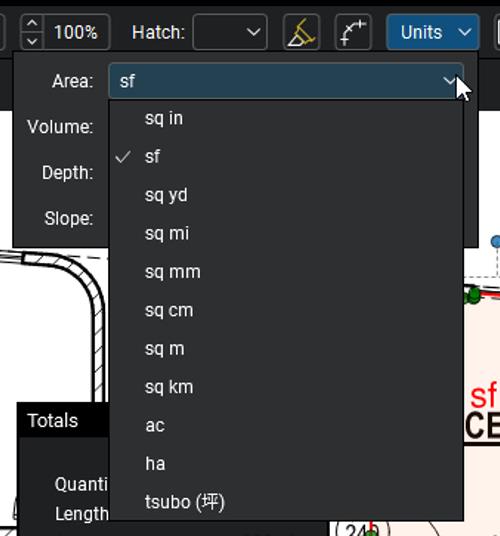
- Select your desired units of measurement. Under Measurement Totals, the Area is displayed in the units of measurement you selected.
Changing the units of measurement using the Properties Toolbar will only change the units for the selected markups. All other Area markups will remain unaffected. Change the units back at any time by reselecting your markups and selecting your desired units of measurement.
With the dynamic Properties Toolbar, you’ll no longer have to search for your markup properties. Everything you need to start editing your markups appears within view. Learn more about Markups and their properties to continue getting the most out of the Properties Toolbar.
How-To
Revu 21
Interface & Navigation