Applies to:
- Revu 21
- Revu 20
- Revu 2019
- Revu 2018
The Markups List in Revu automatically tracks all the markups placed on a PDF, including the information/data associated with them. One helpful way to use the Markups List is by setting statuses for markups. Revu has several built-in statuses (i.e., Review, Migration, and Issues) that allow you to quickly convey whether a markup has been Accepted, Rejected, Cancelled, or Completed. You can also create custom statuses for you and your team to use in your PDFs, so you can track the progress of repairs or design changes on a drawing, helping streamline communication throughout the project life cycle.
View and set statuses
You can set statuses for your markups in the Status column of the Markups List. If you don’t see the Status column, select Markups List > Columns > Status.
To apply a status to a markup, right-click the markup either in the Markups List or on the drawing and select Set Status > Model Name > Status Name.
Create custom statuses
If the statuses included in Revu don’t fit your project’s workflow, you can create your own. In order to create custom statuses, a custom model must be created first.
- Open the
Markups List.
- Select the
icon in the Status column and select Manage Status..
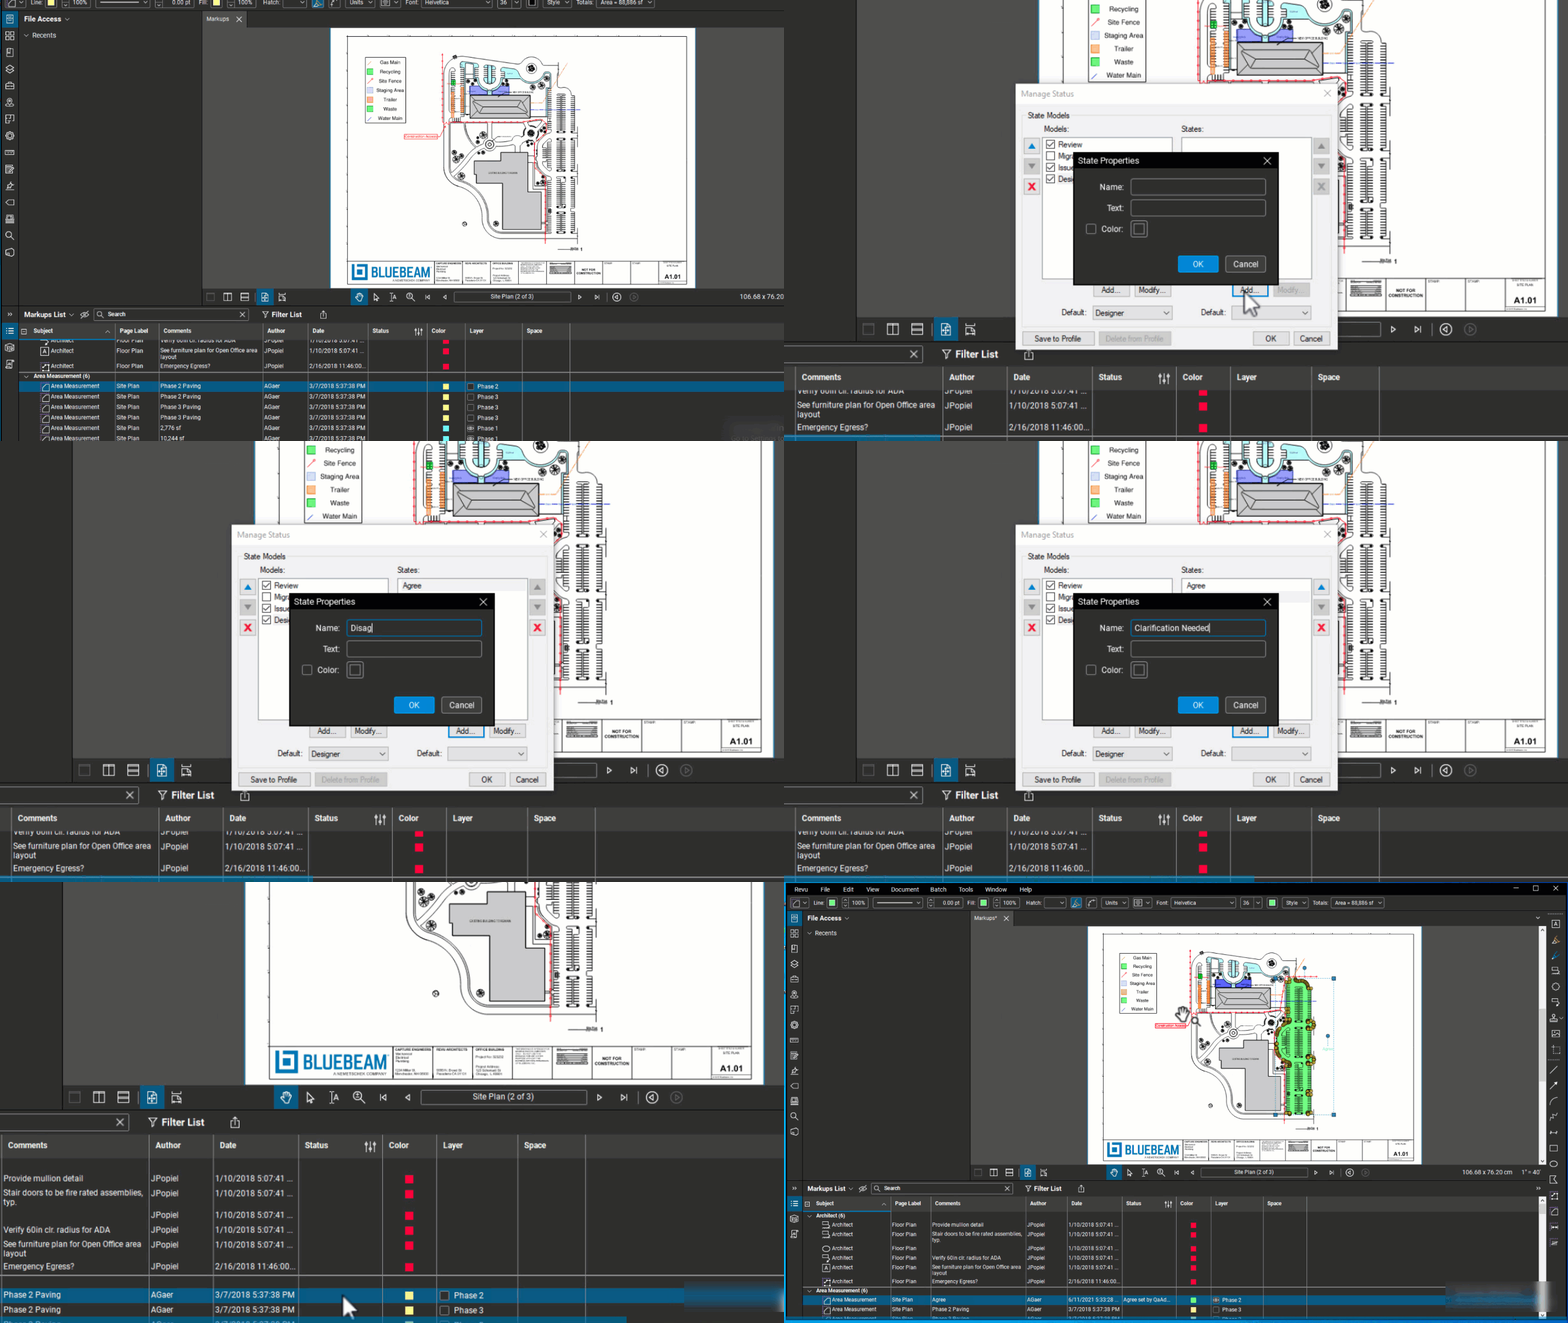
- In the Manage Status dialog, select Add.
- In the Model dialog, enter a name for the model and select OK.
- Select the new model in the Models list.
- Below States, select Add.
- In the State Properties dialog, enter a name for the new status.
- To associate text with this status, select Text and enter it in the corresponding field. If you change the status of a markup that’s grouped with a Text Box markup, the Text Box will automatically display the value entered here.
- To associate a color with this status, select Color and choose the color you’d like. Whenever a markup is set to this status, it will automatically change to this color.
- Select OK.
- Select OK to close the Manage Status dialog. The custom model will now appear in the Set Status list as a submenu with its associated, custom statuses inside it.
 You can now use your custom status when selecting a status from the
 Markups List. For tracking purposes, the Status column in the Markups List includes user information and a date/time stamp.
Where should I save my custom statuses?
There are two places you can save custom statuses: a profile or directly to a PDF. Where you should save your custom statuses depends on what you plan to do with your PDF. The table below offers an overview of the differences between saving custom statuses to a PDF or to a profile.
Save to PDF
This saves the custom column to an individual PDF and the custom column becomes part of the PDF’s content. If you upload the PDF to a Session or send it to a colleague, the custom column will go with it.
Consider this option if:
- You’re going to upload the PDF to a Session.
- You’re going to share this PDF with others and want them to see or interact with the columns.
Save to profile
This saves the custom column to a profile in Revu and the column becomes available whenever that profile is active. The column will not become part of the PDF’s content unless you add a markup to the PDF and save it.
Consider this option if:
- You want this column to appear in the
Markups List when that Profile is active.
- You’d like to use this custom column again.
To save the status model to the PDF, create your custom statuses and then save the PDF.
To save the status model to the current Profile:
- In the
Markups List, select the
icon In the Status column and select Manage Status.
- In the Manage Status dialog, select the status model you want to save and click Save to Profile.
Share custom statuses with collaborators
How you share your custom statuses depends on whether you’ve saved them to your profile or to the PDF.
If you’ve saved custom statuses to your PDF, you can create a Session with that PDF to make your custom statuses available to everyone in the Session. This is generally the preferred method for collaborating in Studio.
If you’ve saved custom statuses to your profile, you can share that profile with others to make it available to them. However, if the PDF you’re working in has its own custom statuses, the custom statuses in the PDF will be available and those saved in the profile will not.
How-To
Revu 21
Revu 20
Revu 2019
Revu 2018
Markup
