This article applies to:
- Revu 20
- Revu 21
If you’ve upgraded from Revu 2018 or 2019 to Revu 20 or above, you might notice some improvements to Studio. This article covers the updated Studio experience in the latest versions of Revu. Are you a new Revu user? See the Help Guide for a comprehensive look at Studio.
Quickly send invitations by entering multiple emails
In Revu 20 and above, you can send Studio Session and Project invitations by entering multiple email addresses instead of one at a time. Revu allows you to send up to 100 email addresses per batch of Session invitations. Revu includes several input methods for adding email addresses, including:
- Enter text.
- Paste a list of email addresses.
- Add a group.
- Select specific email addresses from a group.
- Use Session Settings to invite participants.
After adding a list of email addresses to invite to your Session or Project, you’ll have a chance to review them before you send the invitations. The review screen sorts email addresses by domain name, so it’s easy to see who you’ve invited from specific groups. Finally, you can continue to add email addresses to the list or remove them as needed.

To send an invitation for your Session or Project:
- Go to your Session or Project.
- Select
 Invite.
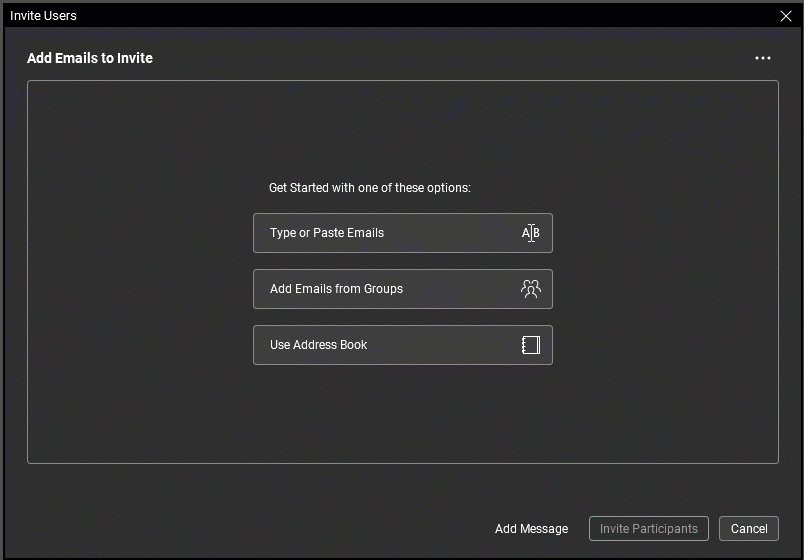
 - Select Type or Paste Emails.
For instructions on other input methods, see the Revu Help Guide. - Type or paste the email addresses of your attendees. Revu removes any extra characters.
- Select Check & Include Emails.
- If you want to add a personalized message to your invitation:
- Select Add Message.
- Enter your message.
- Select Save Message.
- Select Invite Participants.
Use Settings to invite attendees to Sessions or Projects
If you’re already in your Session or Project settings, Revu allows you to invite attendees to your Session or Project from that dialog. You must be a Session or Project host/owner or have full control permissions to send Studio invitations.
To send an invitation for your Session or Project:
- Go to your Session or Project.
- Select
 Studio or Project Settings.
 - If you’re inviting attendees to a Studio Session, select the Attendees tab.
- Click the
 Add button.
 - Select Apply, then select OK.
- Click the
- If you’re inviting attendees to a Project, select the User Access tab.
- Click the Add button.
- Select Apply, then select OK.
- Click the
Accept Session and Project invitations from the Studio panel
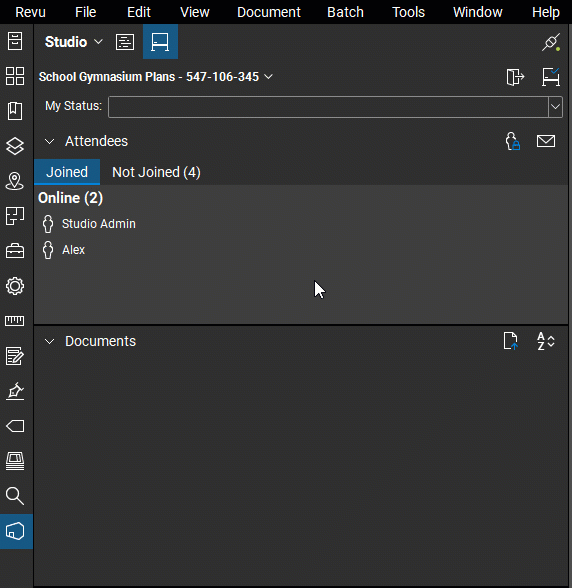
In Revu 2019 and below, a Studio Session or Project was accepted via email invitation only. In Revu 20 and above, you can accept a Session or Project invitation from the email invitation or directly from the Studio panel. New invitations will appear in your Studio panel in real-time, and you can join them whenever you want.
To accept a Studio invitation in Revu:
- Open
 Studio.
 - Select
 Sessions or
  Projects.
 - Select the Not Joined tab.
- Locate the Session by name or ID and select Join.
Send invitation reminders to attendees who haven’t joined your Session or Project
If you’ve invited someone to collaborate in Studio and they still haven’t joined, you can send them a reminder. Reminders are sent to the emails you entered for the original invitation(s). You can also add a personal message to the email reminder before sending it.
Sending reminders for a Session
- Open the Session.
- Select the Not Joined tab.
- Select the emails you want to send reminders to; you can select more than one.
- Optional: Enter a personal message to be displayed in the reminder email.
- Select Send Reminder.
Sending reminders for a Project
- Go to your
 Project.
 - Select
 Project Settings.
 - Go to the User Access tab and sort by Joined/Not Joined.
- Select the emails you want to send reminders to; you can select several.
- Select Email Reminder to Join.
- Optional: Enter a personal message.
- Select Send Reminder.
Keep track of who’s joined your Session or Project
In Revu 20 and above, you can easily keep track of who has or hasn’t joined your Session or Project by sorting attendees by Joined or Not Joined statuses.
To track Session participation:
- Go to your Session.
- Under Attendees, select the Not Joined tab.
You’ll see a list of people who haven’t joined your Session.
To track Project participation:
- Go to your Project .
- Open Project Settings.
- Select User Access and sort by Joined/Not Joined.
You’ll see a list of people who haven’t joined your Project.
Set Session or Project permissions before any attendees join
Add an extra layer of security to your Sessions and Projects with updated permissions. Now you can set Session or Project permissions before any attendees join.
To set attendee permissions for Sessions:
- Open Session Settings .
- Select Permissions.
- Select Add and choose emails. Select OK when finished.
- Modify attendee permissions in the Applied Permissions section.
- Select OK.
To set attendee permissions for Projects:
- Open Project settings.
- Select Permissions.
- Select Add and choose emails. Select OK when finished.
- Modify attendee permissions in the Applied Permissions section.
- Select OK.
How-To
Revu 20
Revu 21
Studio
Getting Started