Applies to:
- Revu for Mac 1
Markup selection in Bluebeam Revu for Mac is a very quick and simple process, but you can quickly adjust to any workflow and increase your overall productivity if you learn about the various ways to select and deselect markups.
| Basic Select | Lasso Select |
| Select All | Individual Select |
| Deselect All | Markups List |
| Rectangle Select | Primary Markups |
The Basics
Of course, selecting a single markup is as simple as clicking on it. But keep in mind, unless the markup has a fill color, it can only be selected by clicking on its edge and not the space it encloses. (A fill color is treated as a part of the markup). If the markup is selectable, your cursor will change into a black arrow.
Select All Markups
Use shortcut Command Command+A to select all markups. Be aware that this also selects markups across multiple pages.
Deselecting All Markups
There are two ways to deselect all markups: either click on a space outside of the selected markups, or press Esc.
Rectangle Select
You can click and drag with the Select ![]() tool to draw a rectangle that selects multiple markups at once. For a markup to be included in the selection, the rectangle must either touch or enclose it.
tool to draw a rectangle that selects multiple markups at once. For a markup to be included in the selection, the rectangle must either touch or enclose it.
Lasso Select
The Lasso tool is a common tool you may be familiar with using in other programs. It allows you to quickly free-form the selection of markups.
Unlike many similar tools, Revu’s Lasso ![]() traces a dotted line from the point where you began drawing to your cursor, and automatically closes when you release the mouse button.
traces a dotted line from the point where you began drawing to your cursor, and automatically closes when you release the mouse button.
To use the Lasso tool:
- Go to Edit > Select > Lasso
 , or use shortcut Shift+O.
 - Draw any shape you like to select your markups. This selects all markups that are within the shape or intersect it.
Selecting Multiple Markups, One at a Time
You can also select multiple markups by using the shortcut Shift+click on each. If you include a markup you don’t want, Shift+click on the markup again to remove the selection.
This shortcut is great when a rectangle or free-form selection won’t do an adequate job. For example:
- The markups you need to edit aren’t in the same vicinity.
- You need to omit certain markups within a page region.
- You can point and click on markups faster than you can draw a selection.
- You selected multiple markups with a different method, but found that you need to add one or two others to the selection.
- You accidentally selected the wrong markups.
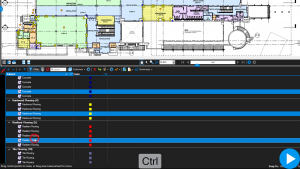
Markups List
At the bottom of the Revu interface is the Markups List, containing a list of all markups in a document, as well as more detailed information and sorting tools. Selecting a markup in this list also highlights and selects it on the page.
Selecting from the Markups List is incredibly useful when the document you’re working on is cluttered. By using the Sort, Filter, Search and Columns features, you can quickly narrow down the list and find what you need.
You can find more information about the Width and Height columns here. Additional details about the Markups List can be found in the Revu Help Guide.
There are a couple of selection methods available in the Markups List. The first is Control+click, which allows you to select multiple consecutive or non-consecutive markups in the list individually. If you need to remove individual selections, you can do so by using Control+click a second time.
The second method allows you to select a group of consecutive markups by clicking on the first markup, then holding down Shift and clicking the last markup. This selects both of the markups you clicked on and everything in-between.
Selecting the Primary Markup
Have you ever noticed that the control points on your markups sometimes have different colors? These colors actually have different meanings. Yellow control points designate a primary markup, while green control points designate a secondary markup.
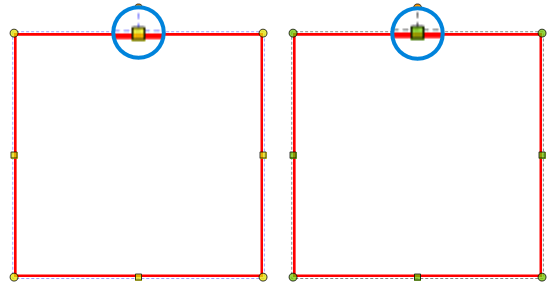
Simply put, the primary markup acts as a reference point, which is important for certain Revu features like Alignment tools that require a specific markup to align to. Primary markups are also important for markup grouping.
There are a few things to keep in mind when working with primary markups:
- If you select multiple markups, the first will be the primary markup by default.
- To change the primary markup, click on a markup with green control points. This allows you to use any selection method in conjunction with the Alignment toolbar or the Markups List.
- You can also change the primary markup by right-clicking, which has the advantage of bringing up the Alignment context menu for easy access.
How-To
Revu for Mac 1
Markup