PDFs do not need to be open in Revu when the batch process is run. If a document is open in Revu, any changes resulting from the batch process will be made to the document, but the document will not be saved or checked in (if relevant); the user will need to save and check in the document manually. If a document is not open in Revu, and it is not checked out/locked by another user, changes will be applied and saved to the document automatically (without opening the document in Revu).
To batch reduce the size of multiple PDFs:
- Go to File >
 Batch >
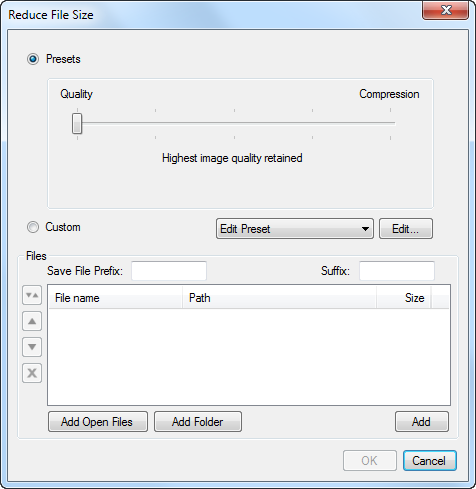
  Reduce File Size. The Reduce File Size dialog box appears.
-
Use one or more of the following methods to select PDFs to be reduced in size:
- To add all PDFs that are currently open in Revu, click Add Open Files.
- To select files from a local or network drive, click Add.
- To add all PDFs that are in a folder on a local or network drive, click Add Folder.
-
Revu comes preloaded with several convenient Presets, pre-configured settings designed to balance document Quality with the amount of Compression. Use one of these presets or use customized reduction settings to determine how the selected PDFs will be compressed.
To use a preset reduction setting:
- Select Presets.
- Move the slider bar to the desired setting. The leftmost setting has the highest image quality and the lowest amount of compression while the rightmost setting applies the highest amount of compression resulting in the greatest size reduction, though possibly at the expense of image quality.
- Proceed to step 4 below.
To use custom reduction settings:
- Select Custom.
-
Select a previously saved custom configuration set from the Edit Preset menu and click OK, then proceed to step 4 below.
- or -
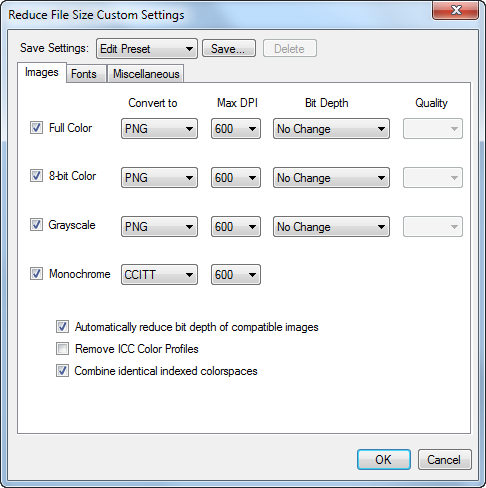
Click Edit. The Reduce File Size Custom Settings dialog box appears.

Reduction settings are divided among three tabs at the top of the dialog box.
Images
Images are broken into four categories according to bit depth (Full Color, 8-bit Color, Grayscale and Monochrome) and the number of images in a given category is shown below each heading as the Count. Settings are applied to all images in the category.
- Convert to: Select the image type to convert images to. The effects of this selection vary greatly according to the original image type, but for color images, generally PNGThe PNG format is a lossless compressed format. The benefits to using this format are that the full quality of the image will be retained, yet the amount of information describing the image will be reduced, generally resulting in a smaller file size. renders images of higher fidelity while JPEGJPEG is a lossy compressed graphics format that drops certain graphic information entirely in the save process. When an image is stored in this format, it will not retain all of the fidelity of the original source image, but it will produce a significantly smaller file than PNG. and JPEG2000JPEG2000 is an update to the JPEG format. Compression is based on wavelet technology and creates compressed images that generally look better than a JPEG file; the compression mechanism is more complex, however, and therefore requires more computing power to display. result in smaller image sizes. For monochrome images, CCITT generally renders the higher fidelity and JBIG2 results in the smaller image sizes.
- Max DPI: Select the maximum number of Dots Per Inch (or “resolution”) to convert images to. The number of images that would be reduced by the selection is shown below the selection. If this value is 0, all of the images in this category are already at a lower DPI than what is selected.
- Bit Depth: Select the color depthNumber of bits used to indicate the color of a single pixel/dot. of converted images.
- Quality: Select the image quality (high, medium or low) for JPEG or JPEG2000 images.
In addition, enable or disable any of the following global image settings:
- Automatically reduce bit depth of compatible images: Enable to cause all images selected for conversion (above) to be analyzed to determine whether they can be converted to a smaller bit depth without introducing errors (for example, some images saved as "full color" would do just as well saved at "8-bit color" with a considerably smaller file size) and, if so, convert those images to the smaller bit depth type.
- Remove ICC Color Profiles: Enable to remove any embedded ICC color profilesInternational Color Consortium (ICC) color profiles define color spaces, data that characterizes a color input or output device, according to standards maintained by the ICC., which are generally only needed when printing PDFs, and replace them with their defined, alternate color spaces.
- Combine identical indexed colorspaces: Enable to cause all images that use identical color spaces to reference a single instance of the color space in the PDF and remove the duplicates.
Fonts
- Drop Embedded: Enable to remove any embedded fonts from the PDF. Note that this might affect the display of the PDF on other computers; if a font used in the PDF is not present on another computer, a substitute font will be used to render the PDF.
Miscellaneous
Enable any of the following options, as desired. The general effects of selecting an option (for example, the number of bytes that would be removed from the file or the number of images that would be affected) is shown immediately to its right; if nothing is shown, that type of data is not present and enabling the option would have no effect.
- Drop Metadata: Enable to remove all metadata associated with the PDF or with objects within the PDF.
- Drop Private Data: Enable to remove document private data, which is generally only usable by whatever application created the PDF.
- Compress All Streams: Enable to compress any uncompressed content streamsContent streams are the primary means for describing the appearance of pages and other graphical elements in a PDF. in the PDF.
- Drop Thumbnails: Enable to remove embedded thumbnails, generally used for quick previews of content by some applications, from the document.
- Drop Unused Resources: Enable to remove any resources, such as images, fonts, color spaces, or snapshots of content from other pages, that are not used when rendering page content (this often happens when PDFs are extracted from larger documents).
- Drop Free XRefs: Enable to recycle any XRefsXRefs are reference numbers for objects within a PDF. that no longer refer to anything in the document.
- Crop content to crop box: Enable to remove any image data that falls outside of a PDF's crop box (often when an image is "cropped" within a PDF, the parts of the image that fall outside the crop box are simply hidden; this option deletes the hidden content).
- Dereference number XRefs: Enable to replace XRefsXRefs are reference numbers for objects within a PDF. that reference a number (some PDFs, for example, use XRefs to define image width) with the actual number (which takes up less space).
- To save these configuration settings for future use:
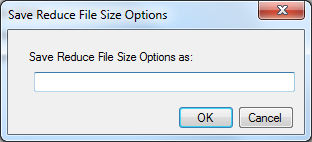
Click Save at the top of the dialog box. The Save Reduce File Size Options dialog box appears.

- Enter a name for the configuration in the Save Reduce File Size Options as field and click OK.
- Click OK.
- To apply these file reduction settings to the selected PDFs:
- Enter a file name suffix or prefix (or both) in Save File Prefix or Suffix, as desired. This functions like a standard Save As, adding whatever is added to these fields to the new file name for each PDF.
Note: If no Prefix or Suffix is added, the original PDFs will be automatically replaced with the compressed files. No confirmation dialog box will appear. Be sure to provide a Prefix and/or a Suffix to preserve the original PDFs.
- Click OK. The files are compressed and automatically saved to the same folders as their originals. The Reduce File Size Results report opens.
- Click Close.
- To leave the PDFs in their present state, click Cancel. The Reduce File Size dialog box closes and the files are not compressed.