Working with Tags
Tags in a Set are used for many things from organizing the sheets within a Set to creating customized drawing logs. Tags are generally defined when the Set is created, but it is sometimes necessary to make changes to them over the life of the Set.
You can edit existing Tags within a Set after they have been created. Tags can be edited one at a time or in bulk.
To edit Tags:
- Go to Window > Panels >
 Sets or press ALT+2 to show the Sets panel.
 - On the Sets panel toolbar, go to Sets >
 Open Set and open the Set for which you wish to edit Tags.
 -
Click
 Edit Tags. The Tags dialog box appears showing the Tags currently defined for the Set.
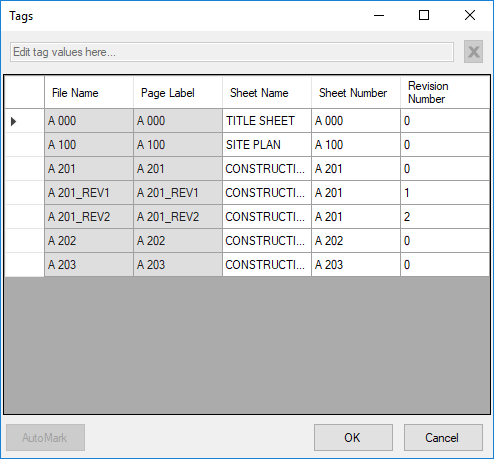
Tag columns can be sorted in ascending or descending order by clicking the desired column header.
- To edit a single Tag manually:
- Click the cell of the Tag you wish to edit. The current Tag data appears in the field at the top of the dialog box.
- Edit the Tag data in the field at the top of the dialog box as desired. To clear the Tag data, click
 .
.
- To edit multiple Tags manually:
- Multi-select the cells of the Tags you wish to edit by SHIFT-clicking, CTRL-clicking, or clicking and dragging, as desired. Only similar Tags can be selected (that is, Tags in the same column).
- If each of the selected Tags contains the same data, it will be shown in the field at the top of the dialog box, otherwise that field will be blank. Enter the desired Tag data in this field.
- To recreate Tags automatically:
- Click the cells of the Tag you wish to edit. Cells can be multi-selected by SHIFT-clicking, CTRL-clicking, or clicking and dragging, as desired. Only similar Tags can be selected (that is, Tags in the same column).
Click AutoMark. The first sheet opens and the Add Tags dialog box appears.
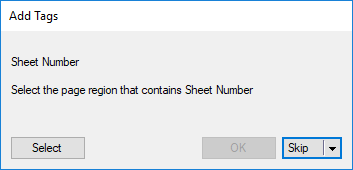
- Click Select and draw a rectangle around the region of the drawing that contains the desired tag information.
- Revu will analyze the contents of the defined region and the Add Tags dialog box will reappear with a preview of what it found. This is what the new tag for the current sheet will be. If it is incorrect or incomplete, click Reselect and draw the rectangle again.
- Click OK to accept the tag region. Revu will analyze the rest of the selected drawings and re-create the tag for each.
- Click OK to accept the changes or click Cancel to discard them.
Note: When an Auto-tag option is enabled for a Set and the sheet number tag is changed, the associated tag will automatically update. For example, if the option Auto Tag: Discipline per Sheet Number is enabled and the sheet number tag for sheet A100 is changed to E100, the discipline tag will change from "Architectural" to "Electrical" automatically.
Tags are generally added to a Set during Set creation, but they can also be added to a Set after it has been created. When a new Tag is added to a Set, Revu will process it from all sheets currently in the Set and automatically add it to any sheets added to the Set in the future.
To add Tags to a Set:
- Go to Window > Panels > Sets or press ALT+2 to show the Sets panel.
- On the Sets panel toolbar, go to Sets > Open Set and open the Set for which you wish to edit Tags.
- Click
 Modify Set. The Set dialog box appears.
 - Click Options. The Sets Options dialog box appears.
-
Select the Tags tab.
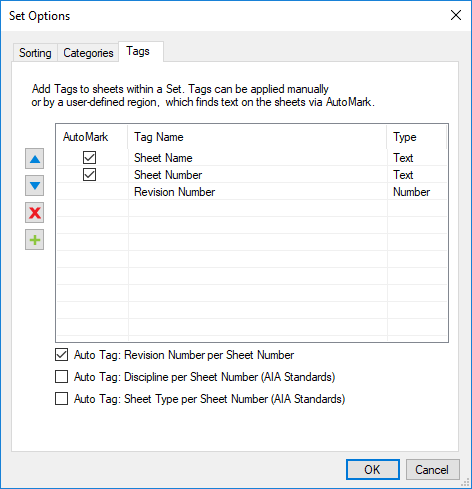
-
Click
 . The Tag Field Editor dialog box appears.
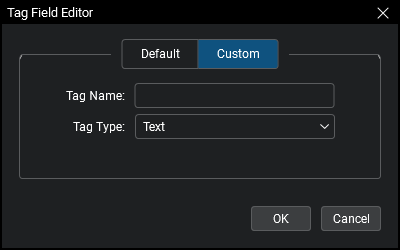
- To add one of the standard tags, select the Default tab and select the desired tag from the menu.
- To add a custom tag, select the Custom tab, then enter the desired Tag Name of the tag and select the appropriate Tag Type.
- Click OK.
- Click OK to close the Set Options dialog box.
- Click OK to close the Tags dialog box.
Tags can be completely removed from a Set after it's been created. Please note that this process describes removing the Tag entirely from the Set for all sheets in the Set. To remove the Tag data from one or more sheets in a Set, see Editing Tags above.
To remove a Tag from a Set:
- Go to Window > Panels > Sets or press ALT+2 to show the Sets panel.
- On the Sets panel toolbar, go to Sets > Open Set and open the Set from which you wish to remove Tags.
- Click Modify Set. The Set dialog box appears.
- Click Options. The Sets Options dialog box appears.
-
Select the Tags tab.
- Select the tag to be removed.
- Click
 .
.
- Click OK to close the Set Options dialog box.
- Click OK to close the Tags dialog box.
The order in which Revu searches for Tags in a Set is determined by its order on the Tags tab of the Set Options and is usually established when the Set is created, however this order can be changed at any time.
To reorder a Set's Tags:
- Go to Window > Panels > Sets or press ALT+2 to show the Sets panel.
- On the Sets panel toolbar, go to Sets > Open Set and open the Set for which you wish to reorder Tags.
- Click Modify Set. The Set dialog box appears.
- Click Options. The Sets Options dialog box appears.
-
Select the Tags tab.
- Select the tag to be moved.
- Drag and drop it to the desired position in the list.
- Click OK to close the Set Options dialog box.
- Click OK to close the Tags dialog box.