-
Go to Markup >
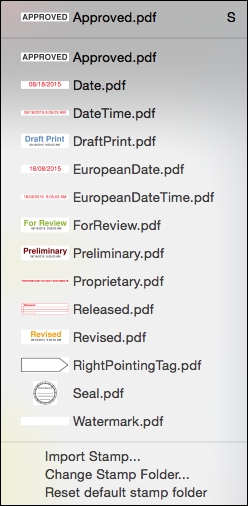
 Stamp and select the desired stamp.
- Click the PDF to place the stamp.
Use the Stamp Tool to add "rubber stamp" comments on the drawing. A text stamp can be used to indicate that a generated PDF is "DRAFT," "FOR REVIEW," and so on. Stamps are placed on a PDF as a markup and, as such, have editable appearance properties and show up on the Markups list.
Go to Markup > ![]() Stamp and select the desired stamp.
Stamp and select the desired stamp.

The topmost stamp in the Stamp menu is the current default stamp. The most recently used stamp is usually the current default.
To place the default stamp:
Stamps are saved to local or network drives as individual files. This can be used to organize large collections of stamps, making it easier to find a needed stamp.
Revu lists the stamps found in a selected folder. To change the current folder, go to Markup > ![]() Stamp > Change Stamp Folder and select the desired folder. The stamps found in it will be automatically shown in the Stamp menu.
Stamp > Change Stamp Folder and select the desired folder. The stamps found in it will be automatically shown in the Stamp menu.
Since stamps tend to be uniform across an organization, it is often desirable to store them in a centrally located network folder (or even a set of folders). When doing this, give all users at your work location access to the network folder(s) and have them set their Stamps folders accordingly. As new stamps are added, they will become available on all users' computers.
The files are copied into the Stamps folder and will appear in the Stamps list. You can also manually copy files into the Stamps folder.
You can attach a note to nearly any markup that does not have a text box of its own. Simply double-click the markup to open the Note pop-up window. Notes attached to markups are functionally similar to the Note Tool.
Select a markup to reveal its control handles. Each handle controls a different aspect of the markup's size and orientation.
To rotate the markup, click and drag the orange handle outside the markup (when the markup is first placed, it will be at the top). By default, the markup is rotated in increments of 15°; to rotate in increments of 1°, hold down SHIFT while dragging.
The rotation can also be entered in the Rotation field found in the Layout section of the Properties tab.
To resize the markup, click and drag the appropriate yellow handle.
See Editing Markups for more information.
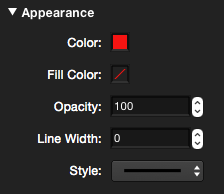
The appearance of a Stamp markup is configurable, including its border and fill color, opacity, line width and style, and its blend mode.
To change the appearance of a Stamp markup, select it and click the ![]() Properties tab.
Properties tab.

Color: Sets the color of the stamp's border.
Fill Color: Sets the background color of the stamp.
Opacity: Sets the opacity of the stamp as a percent, where 100% is completely opaque and 0% is completely transparent.
Line Width: Sets the thickness (in points) of the stamp's border.
Style: Determines the pattern of the stamp's border.