Introduction to Links in Revu
Hyperlinks in Revu can be either text or graphic elements that, when clicked, take the user to another part of the same document, to a different document or to a website. The Links tab in Revu makes it easy to add, change and manage hyperlinks.
Go to Window > Panels >  Links or press ALT+N to show the
  Links panel.
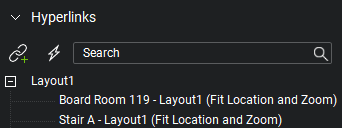
Any hyperlinks in a PDF are listed in the Hyperlinks section of the Links tab.
There are several actions available in the toolbar just above the list of hyperlinks:

 Hyperlink (SHIFT+H): Create and view hyperlinks in a PDF.
 Edit Action: Brings up the Action dialog box to define what happens when the link is clicked.
 Search bar: Filters the hyperlinks list by the text entered into the field. Useful for documents with a large number of links.
Click a hyperlink from the list to jump to it on the PDF. Hold SHIFT or CTRL while clicking to select multiple hyperlinks.
Hyperlinks can be created for an area on a PDF or for selected (non-scanned) text. Of course, you can also define the area over text as a hyperlink to simulate the hyperlinking of scanned text.
To add a hyperlink to a defined area:
- Go to Tools >
 Hyperlink.
 - Click and drag a rectangular region on the current PDF. A blue rectangle appears, indicating the active region for the hyperlink.
- Release the mouse button and the Action dialog box appears. Define the hyperlink's action as described below and click OK.
To add a hyperlink to text:
- Go to Tools >
 Hyperlink.
 - Click and drag to select text in the PDF. The text is highlighted.
- Release the mouse button and the Action dialog box appears. Define the hyperlink's action as described below and click OK.
You can also create hyperlinks directly to selected files from the  File Access panel. To do that, open the
  File Access panel (go to Window > Panels > File Access if it is hidden), then:
- Place the cursor over the desired file name in the list.
- Click the
 Hyperlink icon to the right of the name.
 - Click and drag to define the area of the hyperlink on the PDF. Release the mouse button and the Action will be automatically defined as opening that file.
Hyperlinks can also be created to Places in a PDF, which are defined and named anchors than can be placed anywhere on a document so that you can easily link to that location. Places can be moved on the PDF without breaking links to them, provided that their names remain unchanged.
To create a Place:
- Go to Window > Panels >
 Links or press ALT+N to show the
  Links panel.
 -
In the Places section of the Links panel, click
 Add Place.
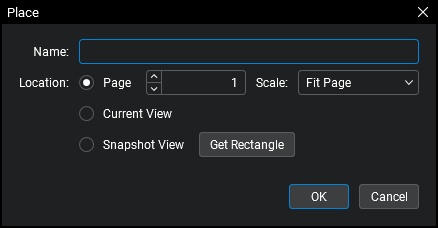
- Enter a name for this Place in the Name field.
-
Select one of the following options to describe the Location of the Place:
- Page: Use to define a page number in the PDF as the location, with option to define the scale.
- Current View: Sets the current page and scale as the location.
- Snapshot View: Use to define an area on the current page as the location. Once selected, click Get Rectangle and drag a rectangle over the desired area to set the view.
- Click OK.
To create a link to a Place:
- Go to Window > Panels >
 Links or press ALT+N to show the
  Links panel.
 - Hover over the desired Place name in the Places list and click the
 Hyperlink icon that appears to the right of it.
 - Click and drag to define the area of the hyperlink on the PDF. Release the mouse button and the Action will be automatically defined as opening that Place.
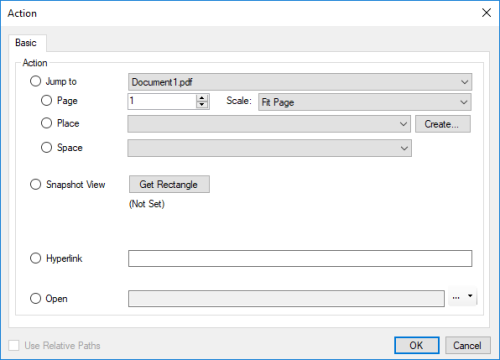
The Action dialog box allows you to define the action a hyperlink will take when clicked. When creating a new hyperlink, the Action dialog box will open automatically once the hyperlink area or text is selected. To edit an existing hyperlink, select it on the Links panel and click  Edit Action. Whether creating a new hyperlink or editing an existing one, the process is the same:

There are
Jump to Page: Moves to a specific page number in a selected PDF. To set this action:
- Select the PDF from the Jump To dropdown menu. Only PDFs that are currently open in Revu will be available.
- Specify where in the PDF to jump to by entering a page number in the Page field.
- Set the zoom factor or scale of the page that is displayed by choosing the desired setting from the Scale dropdown menu. The pages can be set to display either in a Fit Page, Actual Size or Fit Width mode. Alternatively, the Inherit Zoom setting will display the page at whatever the current zoom setting is within Revu.
Jump to Place: Moves to a predefined Place on a PDF. The location of a Place can be changed later without breaking the action. To set this action:
- Select the PDF from the Jump To dropdown menu. Only PDFs that are currently open in Revu will be available.
- Select the Place from the Place dropdown menu. If the desired Place does not already exist, click the Create button to create one on the fly.
Jump to Space: Moves to a predefined Space on a PDF. To set this action:
- Select the PDF from the Jump To dropdown menu. Only PDFs that are currently open in Revu will be available.
- Select the Space from the Space dropdown menu.
Note: If an Action is set to jump to a Space that is subsequently deleted, the Action will be automatically converted to Snapshot View, as described below.
Snapshot View: Moves to a specific, zoomed in area of the current PDF. This option is useful for zooming into specific views of a region of a large format drawing, such as a particular elevation detail. Click Get Rectangle to define the area of the drawing to jump to.
Hyperlink: Opens the URL entered in the Hyperlink field. The URL will open in
Open: Opens the file specified in the Open File field. Click  button
Use Relative Paths: Revu can store either a full or relative path to a file. When a full path is stored, the location of the file is defined from the drive it resides on; when a relative path is stored, it defines the location of the linked file relative to the current file. A full path is best when you plan to move the file storing the link but not the file being linked to, such as when the linked file resides on a network drive that is accessible to all users. A relative path is best when both files are liable to be moved, such as when you are archiving an entire project to CD, or moving a project to another computer. For more information and Relative vs Full Path, see Understanding Relative vs Full Paths.
To use a relative path to the file being linked to, select Use Relative Paths. This will cause the link to recognize the location of the file in relation to its home folder (for example, to know that the file's home folder is two levels up or down in the folder hierarchy). This is recommended when project files are liable to be moved together as a group from one drive to another.
To use a full path to the file being linked to, do not select Use Relative Paths. This will cause the link to recognize the exact location of the file being linked to. This is recommended when the file that contains the hyperlink is liable to be moved to another drive, but the file being linked to will stay put.
See the Help Guide in Revu for a more detailed discussion of Relative vs Full Paths.
-
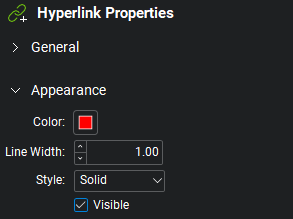
 If you want a hyperlink to stay visible all the time, check the Visible option on its
  Properties panel. You can also define a Color, Line Width and Style to set a box around it.
 - As a best practice, when linking between PDFs, use Jump To instead of Open.
- When linking between PDFs in a Studio Project, open both files and be sure to check out the file the hyperlink is being created in. You don't have to check out the file being linked to, but you do need to at least open it.