Using Revu on a Tablet PC
Revu includes features specifically designed for tablet PC users who are looking for a quick and easy way to review and markup PDF files. When using Revu on a tablet, using the Tablet Profile is highly recommended. In addition, there are specific features that are automatically enabled when Revu detects the user is on a touch-screen tablet PC.
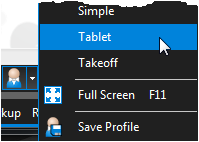
 To access the Tablet Profile, select it from the
  Profile button on the Navigation bar or go to View > Profiles > Tablet.
Once selected, the main workspace of Revu will reset to a portrait-oriented landscape with an optimized toolbar and collapsed right, left and bottom panels.
 Tablet-specific Features
- Shift Button: The Shift button
 is located in the Navigation bar. This button allows access to several useful shortcuts that would otherwise be unavailable without access to a keyboard. For example, a Line will lock to 0, 45 or 90 degrees when the Shift key is held down. Click the Shift button and it will temporarily highlight to show that it is active, causing Revu to act as if the Shift key was being held down on the keyboard.
- Handwriting Recognition: Revu makes use of Window's Tablet PC Input Panel for handwriting recognition when making annotations requiring text input. When first adding a Text Box or Callout, a button appears: either
 or
or  . Click this button to activate the input panel.

Text entered will be recognized and filled into the Text Box or Callout.
For more information about text input, see the Windows help about the Tablet PC Input Panel.
- Pen Resolution: Revu will use a higher resolution when making pen or highlight annotations.
- Pressure Sensitivity: When using the Pen and Highlight tools, Revu will automatically detect the amount of pressure being applied and react accordingly. For example, pushing down firmer with the stylus generates a thicker line.
- Sharing Markups: Annotations may be copied between Revu and other tablet applications.
- Camera: Photos taken with your tablet's built-in camera can be inserted as Image markups or embedded into existing markups. To embed a photo into an existing markup, select the markup first; if no markup is selected, the image will be added to the PDF as its own markup. Then take the picture:
- Go to Markup >
 Camera or use the keyboard shortcut CTRL+ALT+I. A Camera preview window appears showing the current view from the device's primary camera.
 - Click the
 Shutter button to take a picture.
 - Click Use to place the photo onto the document, or Retake to try again.
Revu 2017 & Below
Help Guide
Interface & Navigation
 To access the Tablet Profile, select it from the
  To access the Tablet Profile, select it from the
 ![]() Profile button on the Navigation bar or go to View > Profiles > Tablet.
Profile button on the Navigation bar or go to View > Profiles > Tablet.![]()
