Measurements Panel
The  Measurements panel provides access to the measurement modes, allows setting the document scale and measurement precision,
If the page scale has been set, a preview of key measurement values will appear in the lower-right corner of the drawing as you place measurements to help ensure precision. You can hide this preview window by clicking the X to its left. When minimized, the preview window is replaced with a  measure icon; click this icon to recall the measurement values preview window. Note that you can hide and recall this preview window while placing a measurement.
Totals for selected measurements are available in the Markups list and on the Dynamic Properties Toolbar.
Go to Window > Panels >  Measurements or press ALT+U to show the
  Measurements panel.
The Measurements panel toolbar provides easy access to the measurement modes.

Measurements menu:
Show Measurement Tools: When enabled, measurement tools are shown on the panel toolbar. When disabled, these tools are hidden, though they are still accessible from the Measure Toolbar and the Tools > Measure menu.
Make Annotations from Measurements: When enabled, measurements are created as permanent annotations on the document. When disabled, measurements are temporary. This function is only available for Studio Session PDFs.
Snap Orthogonal: Restricts measurements to angles in 45° increments. This can be temporarily enabled by holding down SHIFT.
Snap to Content: Snaps the cursor to the underlying lines and drawing elements, making it much easier to accurately select 2 points. Only snaps to vector content in a PDF file. Will not snap if the content is an image or a scanned file. The cursor will change to include a shaded square when it is over an element that can be snapped to.

Highlight Viewports: Causes any Viewports on a page to be highlighted in blue anytime a measurement tool is selected.
 Length (SHIFT+
 Polylength: Calculates the total length and the length of each segment of a shape or multi-segment line (SHIFT+
 Perimeter: Calculates the total perimeter length (SHIFT+
 Area (SHIFT+
 Polygon Cutout: Cuts out or subtracts a polygonal area from an existing Area or Volume measurement.
 Ellipse Cutout: Cuts out or subtracts an elliptical area from an existing Area or Volume measurement.
 Diameter (SHIFT+
 Angle (SHIFT+
 Radius (SHIFT+
 3-Point Radius (SHIFT+
Note: The keyboard shortcut for the radius measurement tool automatically calls the most recently used version of the tool.
 Volume (SHIFT+
 Count (SHIFT+
 Dynamic Fill (J): Automatically creates Spaces and measurement markups from any shape on the content layer of a drawing.
The Page Scale section shows the document scale and measurement precision. To ensure the accuracy of measurements, takeoffs, and so on, check that the scale is set correctly.
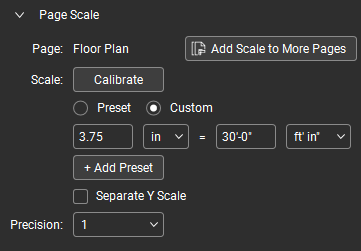
Changes made here generally affect all measurements on the drawing, including those made previous to the change, unless the page scale is protected. A warning message will appear at the top of the Page Scale section when this is the case.

When the page scale is protected (most commonly seen in drawings opened from Studio, either from Sessions or from Projects without first checking them out), changes made to the page scale can behave differently than what it described below. See Protected Page Scales below for more information.
Page: Shows the current page.
Add Scale to More Pages: Used to apply the current page's scale to other pages in the drawing.
Scale: The following tools for checking or setting the page scale are available:
Calibrate: Calibrates the scale to a known length on the drawing. This method is particularly useful when one cannot be assured that no scaling errors occurred during the PDF creation process. See Calibrating a Scale to the PDF for more information.
Preset vs Custom: Used when setting a scale for the current page (if the scale is already set, can be ignored). When the scale of the drawing is known and you can be assured that no scaling errors occurred during the PDF creation process, you can set the scale yourself (if you cannot be assured that no scaling errors occurred during the PDF creation process, calibrating the scale to the page is recommended). Revu comes with several of the most common scales preloaded. To use one of these, select Preset and choose a scale from the menu that appears. To set known scale that is not on the Preset list, select Custom and enter the scale manually in the scale definition fields (described below).
Scale definition: The current scale is shown in the form (Measurement A) = (Measurement B). These can be changed manually, if desired, though calibration is generally recommended unless you can be assured no scaling issues occurred during the PDF creation process.
+ Add Preset: Custom and calibrated scales can be added to your Preset list for later use, either on this document of other drawings. Once you have set a scale, click + Add Preset to save it to your Preset list. Saved scales appear at the top of the Preset list.
Separate Y Scale: Select to define separate X and Y scales. If a scale has already been set, it will automatically become the X scale. The Y scale can be set using any method mentioned above and need not be the same as the one used to set the X scale.
Precision: Defines the decimal or fractional precision of the measurement values.
The page scales of some drawings are automatically protected. This is most commonly encountered with drawings opened from a Studio Session or opened but not checked out from a Studio Project, but can also affect drawings that are otherwise in a read-only or other protected mode. The protected status of these documents is shown at the top of the Page Scale section.
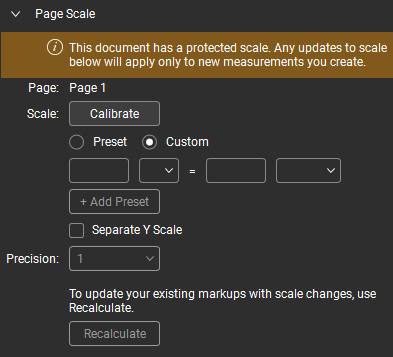
If you change the scale of a protected drawing, the new scale will be temporary and will revert to the default page scale when you close the drawing. Temporary page scales only affect markups placed while they are in effect, which lasts as long as the document is open.
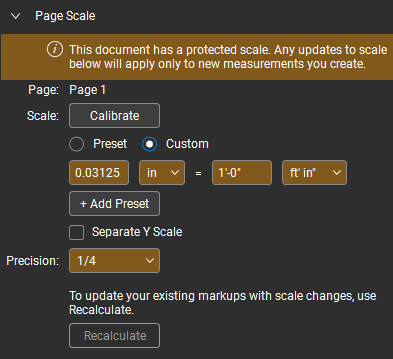
If you want the new scale to apply to all measurements on the drawing (or, in the case of drawings opened from a Studio Session, all your measurements), click Recalculate to process the new scale.
The Measurement Properties section shows properties pertaining to the selected measurement. All measurements have Subject and Label properties and when no measurement tool is selected, that's all that you will see.

Entering text in these fields (with no measurement tool selected) will create default values for the Subject and/or Label properties that will persist across all tools. If these fields are unavailable, check the Use legacy persist behavior for Subject and Label preference in Measure Preferences.
Other properties appear, as appropriate, when the various tools are selected.

Subject: Defines the subject for the selected measurement markup. Subject is reported in the Markups list; giving similar markups similar subjects can make them easier to work with in Markups list.
Label: Defines the label for the selected measurement markup. The label is reported in the Markups list and appears on the markup itself by default.
 Show Caption: Determines what measurement captions are shown on the drawing. Select the desired captions or disable Show Caption to turn off all captions.
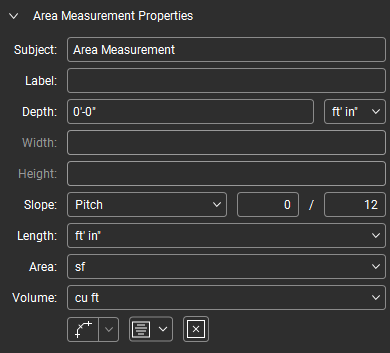
Subject: Defines the subject for the selected measurement markup. Subject is reported in the Markups list; giving similar markups similar subjects can make them easier to work with in Markups list.
Label: Defines the label for the selected measurement markup. The label is reported in the Markups list and appears on the markup itself by default.
Depth: Defines the depth for the selected measurement, which is used to calculate volume and wall area. Can be set before placing the measurement (but after an applicable measurement type is selected) or after selecting an existing markup.
Width: Shows the width (to scale) of the measurement. For the document width, see the Layout section of the Properties tab.
Height: Shows the height (to scale) of the measurement. For the document height, see the Layout section of the Properties tab.
Slope: Describes the slope ratio for the measurement, allowing for accurate calculations of materials over a sloped plane. To set a slope, select a unit of measure for it (Pitch, Degree, or Grade) and enter the value in the corresponding field.
Length: Sets the unit of measure for the length dimension of the measurement.
Area: Sets the unit of measure for the area dimension of the measurement.
Volume: Sets the unit of measure for the volume dimension of the measurement.
 Show Segment Values: When enabled, measurement values are shown for separate segments in the measurement in addition to other default measurements. Select an alignment option from the menu to determine the alignment of the measurement caption.
 Show Caption: Determines what measurement captions are shown on the drawing. Select the desired captions or disable Show Caption to turn off all captions.
 Show Centroid: When enabled, shows the geometric center of the measurement.
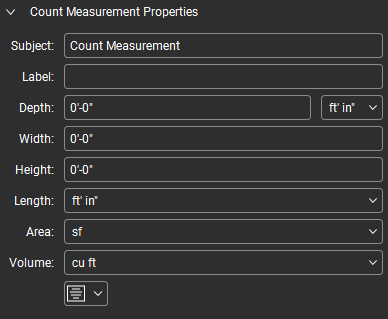
Subject: Defines the subject for the selected measurement markup. Subject is reported in the Markups list; giving similar markups similar subjects can make them easier to work with in Markups list.
Label: Defines the label for the selected measurement markup. The label is reported in the Markups list and appears on the markup itself by default.
Depth: Defines the depth for the selected measurement, which is used to calculate volume and wall area. Can be set before placing the measurement (but after an applicable measurement type is selected) or after selecting an existing markup.
Width: Shows the width (to scale) of the measurement. For the document width, see the Layout section of the Properties tab.
Height: Shows the height (to scale) of the measurement. For the document height, see the Layout section of the Properties tab.
Length: Sets the unit of measure for the length dimension of the measurement.
Area: Sets the unit of measure for the area dimension of the measurement.
Volume: Sets the unit of measure for the volume dimension of the measurement.
 Show Caption: Determines what measurement captions are shown on the drawing. Select the desired captions or disable Show Caption to turn off all captions.
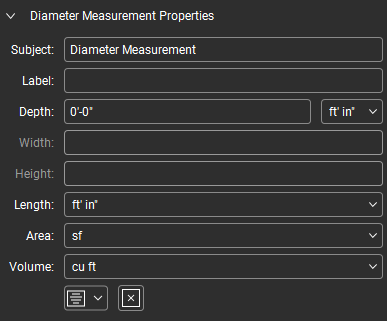
Subject: Defines the subject for the selected measurement markup. Subject is reported in the Markups list; giving similar markups similar subjects can make them easier to work with in Markups list.
Label: Defines the label for the selected measurement markup. The label is reported in the Markups list and appears on the markup itself by default.
Depth: Defines the depth for the selected measurement, which is used to calculate volume and wall area. Can be set before placing the measurement (but after an applicable measurement type is selected) or after selecting an existing markup.
Width: Shows the width (to scale) of the measurement. For the document width, see the Layout section of the Properties tab.
Height: Shows the height (to scale) of the measurement. For the document height, see the Layout section of the Properties tab.
Length: Sets the unit of measure for the length dimension of the measurement.
Area: Sets the unit of measure for the area dimension of the measurement.
Volume: Sets the unit of measure for the volume dimension of the measurement.
 Show Caption: Determines what measurement captions are shown on the drawing. Select the desired captions or disable Show Caption to turn off all captions.
 Show Centroid: When enabled, shows the geometric center of the measurement.
Dynamic Fills have no properties of their own. Instead, they have the properties of the measurement they are used to create.
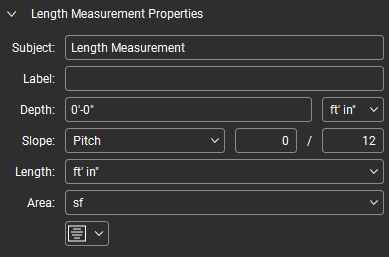
Subject: Defines the subject for the selected measurement markup. Subject is reported in the Markups list; giving similar markups similar subjects can make them easier to work with in Markups list.
Label: Defines the label for the selected measurement markup. The label is reported in the Markups list and appears on the markup itself by default.
Depth: Defines the depth for the selected measurement, which is used to calculate volume and wall area. Can be set before placing the measurement (but after an applicable measurement type is selected) or after selecting an existing markup.
Slope: Describes the slope ratio for the measurement, allowing for accurate calculations of materials over a sloped plane. To set a slope, select a unit of measure for it (Pitch, Degree, or Grade) and enter the value in the corresponding field.
Length: Sets the unit of measure for the length dimension of the measurement.
Area: Sets the unit of measure for the area dimension of the measurement.
 Show Caption: Determines what measurement captions are shown on the drawing. Select the desired captions or disable Show Caption to turn off all captions.
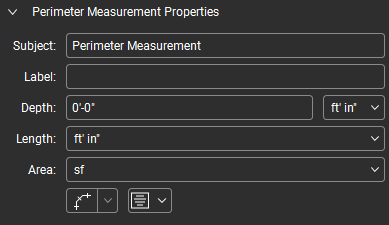
Subject: Defines the subject for the selected measurement markup. Subject is reported in the Markups list; giving similar markups similar subjects can make them easier to work with in Markups list.
Label: Defines the label for the selected measurement markup. The label is reported in the Markups list and appears on the markup itself by default.
Depth: Defines the depth for the selected measurement, which is used to calculate volume and wall area. Can be set before placing the measurement (but after an applicable measurement type is selected) or after selecting an existing markup.
Length: Sets the unit of measure for the length dimension of the measurement.
Area: Sets the unit of measure for the area dimension of the measurement.
 Show Segment Values: When enabled, measurement values are shown for separate segments in the measurement in addition to other default measurements. Select an alignment option from the menu to determine the alignment of the measurement caption.
 Show Caption: Determines what measurement captions are shown on the drawing. Select the desired captions or disable Show Caption to turn off all captions.
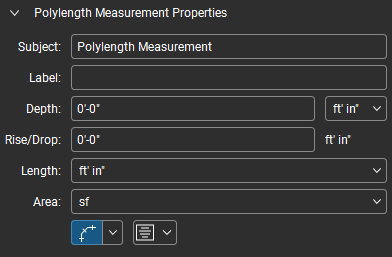
Subject: Defines the subject for the selected measurement markup. Subject is reported in the Markups list; giving similar markups similar subjects can make them easier to work with in Markups list.
Label: Defines the label for the selected measurement markup. The label is reported in the Markups list and appears on the markup itself by default.
Depth: Defines the depth for the selected measurement, which is used to calculate volume and wall area. Can be set before placing the measurement (but after an applicable measurement type is selected) or after selecting an existing markup. Depth and Rise/Drop are mutually exclusive.
Rise/Drop allows for accurate measurements of materials that run up or down from one floor to the next, such as piping or conduit. The value entered here represents the total amount of rise and/or drop and will be added to the length total. To set a rise/drop for the markup, enter a value; the unit of measure is automatically the same one used for the markup length. Rise/Drop and Depth are mutually exclusive.
Length: Sets the unit of measure for the length dimension of the measurement.
Area: Sets the unit of measure for the area dimension of the measurement.
 Show Segment Values: When enabled, measurement values are shown for separate segments in the measurement in addition to other default measurements. Select an alignment option from the menu to determine the alignment of the measurement caption.
 Show Caption: Determines what measurement captions are shown on the drawing. Select the desired captions or disable Show Caption to turn off all captions.
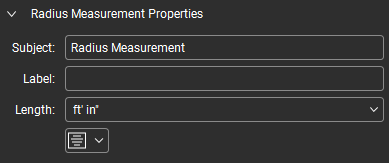
Subject: Defines the subject for the selected measurement markup. Subject is reported in the Markups list; giving similar markups similar subjects can make them easier to work with in Markups list.
Label: Defines the label for the selected measurement markup. The label is reported in the Markups list and appears on the markup itself by default.
Length: Sets the unit of measure for the length dimension of the measurement.
 Show Caption: Determines what measurement captions are shown on the drawing. Select the desired captions or disable Show Caption to turn off all captions.
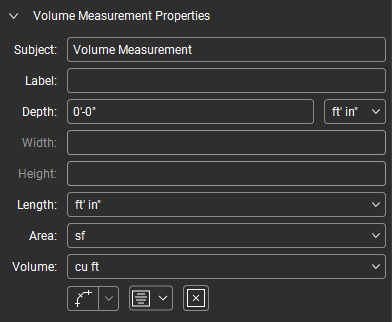
Subject: Defines the subject for the selected measurement markup. Subject is reported in the Markups list; giving similar markups similar subjects can make them easier to work with in Markups list.
Label: Defines the label for the selected measurement markup. The label is reported in the Markups list and appears on the markup itself by default.
Depth: Defines the depth for the selected measurement, which is used to calculate volume and wall area. Can be set before placing the measurement (but after an applicable measurement type is selected) or after selecting an existing markup.
Width: Shows the width (to scale) of the measurement. For the document width, see the Layout section of the Properties tab.
Height: Shows the height (to scale) of the measurement. For the document height, see the Layout section of the Properties tab.
Length: Sets the unit of measure for the length dimension of the measurement.
Area: Sets the unit of measure for the area dimension of the measurement.
Volume: Sets the unit of measure for the volume dimension of the measurement.
 Show Segment Values: When enabled, measurement values are shown for separate segments in the measurement in addition to other default measurements. Select an alignment option from the menu to determine the alignment of the measurement caption.
 Show Caption: Determines what measurement captions are shown on the drawing. Select the desired captions or disable Show Caption to turn off all captions.
 Show Centroid: When enabled, shows the geometric center of the measurement.
The Viewports sections shows viewports (regions of the drawing that have different scales than the default scale of the document) that are on the current document