Bluebeam® Revu® 21 Deployment Guide
Download Deployment Packages (MSI)
Before continuing, make sure you download the 64-bit deployment package. These packages include everything you’ll need for a successful deployment. For a breakdown of the components in these packages, see Planning your Deployment.
Download Revu 21
Introduction
Typically, large organizations face a wide range of challenges, such as finding the most efficient deployment method, and properly configuring an application for use in networked, multi-user settings. We have presented guidelines in the following pages for planning and implementing your Bluebeam Revu deployment.
This guide was written for IT Administrators, under the assumption that the reader has a firm understanding of fundamental concepts, such as software installation, the Windows Command Line, as well as writing and running batch files.
You can find guidelines for post-installation management of your deployment in the Revu 21 Administration Guide.
What’s new in Revu 21
The Registration Process:
- A Serial number or Product Key is no longer necessary for deployment. As a result, there are no required properties to include in your script.
- The Delayed Authorization (DA=1) property is no longer required.
- Connection to the Licensing Server isn’t necessary during install. Due to this improvement, we’ve removed the need to register / unregister the software. You’ll no longer find the Registration button within the Revu menu or the Command Line Options within the Administrator.
As of Revu 21, internet access is no longer required during installation:
- You can use the SYSTEM account when deploying via SCCM.
- Since we now have a Subscription model, users will login to Revu post-deployment so that the proper Subscription tier can take effect.
Other notable changes in Revu 21:
- The need for Markup Mode and View Mode is not required, as the features and functionality are now determined by the Subscription tier login.
- Due to the simplicity associated with Subscription and Deployment, we have eliminated the need for the Configuration Editor.
- Since we have moved away from Revu Editions and onto a Subscription model, the need for the ARP modifier and the optional pre-installation check has been removed.
Planning Your Deployment
Compatibility & System Requirements
The latest compatibility information can be found in the Bluebeam Revu 21 Compatibility & System Requirements.
The Revu 21 Administration Guide
The Revu 21 Administration Guide covers various post-installation topics such as the Bluebeam Administrator Console application, Revu Preferences and settings, subscription management, Bluebeam Studio, as well as electronic and digital signatures.
The Enterprise Deployment Packages
The MSI Package
This is the file you’ll use for deploying a full installation of Revu.
It is very important that you download the correct deployment package for your environment. Once you have done that, open the .zip file and become familiar with its contents, which are:
- A ReadMe file listing the contents of the MSI package and installation pre-requisites.
- The Revu MSI installation file
- The OCR MSI installation file. As of Revu 20, the OCR module was separated from the Revu MSI and is now a separate installer.
- The Microsoft .NET Framework 4.8 offline installer. The .NET Framework 4.8 installation under Windows 10 requires either the Windows 10 Anniversary or Windows 10 Creators Update. For more information, please refer to the Microsoft website.
.NET Framework 4.8 is also included with Windows 11 installations.
- A Visual C++ Redistributable for Visual Studio 2022. If this is not already installed on the machines, it must be deployed prior to deploying the MSI.
- A script for removing older Revu versions (Uninstall Previous Version.txt). Change the file extension to .bat before running it. Once the file is changed from a text file to a batch file, run it with elevated privileges. This batch file will unregister and uninstall Revu (any version) on the machine.
You should run the Uninstall Previous Versions script only if you’re upgrading to a major release version, such as from Revu 20 to Revu 21. If you don’t run the Uninstall Previous Versions Script, a “side-by-side” installation occurs, and both major versions are installed on the same machine.
If you’re upgrading from one point release to a newer point release, such as upgrading Revu 21.x.1 to Revu 21.x.2, there is no need to run the Uninstall Previous Versions Script file, because the MSI uninstalls the current point release on your machine before installing the latest point release.
- A SharePoint extension. Supported on SharePoint 2019 or later on-premise servers, and SharePoint Online (Office 365) instances.
- A SharePoint add-in. Supported on SharePoint 2013 or later on-premise servers, and SharePoint Online (Office 365) instances.
To learn more about installing the Bluebeam SharePoint integration app within a SharePoint environment, see Installing the SharePoint integration app.
Custom Settings and Assets
If your organization uses custom or shared settings and assets, such as Preferences, Profiles, Tool Sets, and Stamps, please refer to the Revu 21 Administration Guide for the best practices for exporting, gathering and staging these items.
Setting Up a Staging Computer
If you do need to create custom settings and assets as mentioned above, you’ll need to manually install Revu on a machine so you can create and stage these assets, as described in the Managed Net Configuration section of the Revu 21 Administration Guide.
The Deployment Process
Best Practices
Before we get into the actual steps of the deployment process, there are some important details which must be considered:
- Please carefully follow the instructions and do not take shortcuts or otherwise change the workflow.
- Bluebeam does not support manually editing the MSI file, as it will invalidate the files’ digital signature.
- We strongly recommend setting up a pilot group of end-users to test new Revu versions before deploying it throughout your organization.
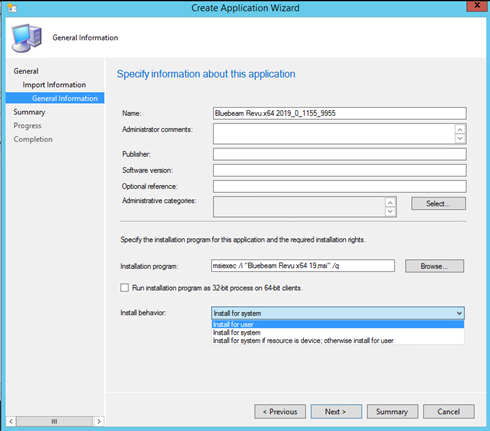
Using Microsoft SCCM
As of Revu 21, internet access is no longer required during deployment. You can now select Install for user or Install for SYSTEM (SYSTEM account) when creating an MSI deployment package.
Upgrading Revu
When using the MSI installer to upgrade Bluebeam Revu in your environment, note the following:
- If you’re upgrading to a major release version, such as from Revu 20 to Revu 21, run the Uninstall Previous Versions script (included in the Revu 21 MSI Deployment Package) to remove the older version before you install the latest version. If you don’t run the Uninstall Previous Versions Script, a “side-by-side” installation occurs, and both major versions are installed on the same machine.
You must run the Uninstall Previous Versions script with elevated permissions.
Revu only supports side-by-side installations of the most current version and a version no older than two prior versions. For example, you may install Revu 21 along with either Revu 20 or Revu 2019.
You can install only two versions of Revu on one machine.
- If you’re using SCCM, the Uninstall Previous Version script can be pushed out through a Task Sequence. If you need assistance with the SCCM process, please refer to the Microsoft SCCM documentation.
- If you’re upgrading from one point release to a newer point release, such as upgrading Revu 21.x.1 to Revu 21.x.2, there is no need to run the Uninstall Previous Versions Script file, because the MSI uninstalls the current point release on your machine before installing the latest point release.
Deployment Tools
Regardless of which package or deployment tool you use, your Command Line script will launch the Windows Installer (msiexec.exe) during your installations.
There are various deployment tools which utilize the command line for running an MSI installer, such as System Center Configuration Manager (SCCM), Quest KACE (formerly Dell KACE), and Microsoft Windows Group Policy.
Deploying the OCR Module
If you want your users to be able to take advantage of certain Revu features that utilize text detection such as OCR, AutoMark, Sets, and Batch Link, then you’ll need to deploy the OCR MSI file.
The Revu MSI and OCR MSI can be deployed in any order. One is not dependent on the other. When updating Revu to a new minor point release (e.g. updating from 21.0.20 to 21.0.30), you won’t need to re-deploy an installed OCR module. In this situation, you’ll only need to deploy the Revu MSI.
The OCR package has no special parameters beyond standard msiexec options. Here is an example of a silent install of the 64 bit OCR MSI:
msiexec.exe /i "[path to deployment folder]\BluebeamOCR x64 21.msi" /qn
When using the Uninstall Previous Version .bat file, both Revu and the OCR installers will be removed. However, if uninstalling from the “Control Panel”, Revu and OCR will appear as separate line items and must be uninstalled individually.
If you find yourself troubleshooting an individual machine and re-install using the Suite.exe, OCR will be installed automatically.
The Revu MSI Properties Table
The MSI Properties table lists the properties that allow you to configure and customize the Revu installation. As of Revu 21, there are no longer any required properties for installation. Below are the supported optional properties.
Supported Optional Properties
| BB_AUTO_UPDATE | Enable or Disable in-app update notifications: Enabled (default) = 1, Disabled = 0. See notes. |
| BB_DISABLEANALYTICS | Enable or disable sending application usage info to Bluebeam. Send (default) = 0, don’t send = 1. See notes. |
| BB_DEFAULTVIEWER | Set as the default application (default) = 1, Do not change the default = 0. See notes. |
| BB_DESKSHORTCUT | Bluebeam Revu desktop shortcut (default) = 1, No shortcut = 0 |
| BB_DESKSTAPLER | Bluebeam Stapler desktop shortcut = 1, No shortcut (default) = 0 |
| BB_FEATURES | Disables various Revu features: All Features Enabled = 65535 (default). See Enabling and Disabling Revu Features with BB_FEATURES for more information. |
| BB_IE_PLUGIN | Install and enable = 1, Disable (default) = 0 |
| BB_JOBOPTIONS | Enter the UNC or fully-qualified path to your custom. jobOptions file. |
| BB_NETCONFIG | Enter the UNC or fully-qualified path to your managed NetConfig folder. |
| BB_PAGESIZE | Enter “A4” to override default page size for the Bluebeam PDF printer. |
| DISABLE_WELCOME |
Disables the Revu HTML Welcome page and Workflow Training Videos page. Enable (Default) = 0, Disable = 1 Creates a registry entry Computer\HKEY_CURRENT_USER\Software\Bluebeam Software\21\Revu and DWORD named WorkflowsInitialized“. |
| BB_REVUPREFERENCES | Enter the UNC or fully-qualified path to your RevuPreferences.xml file. |
| IGNORE_RBT | Disable Check for Pending Reboot = 1, Check for Pending Reboot = 0. See notes. |
| MBCODE | Determines which of the Bluebeam plugins are enabled. The default value of 1023 enables all of them. See Enabling the Bluebeam Plugins with MBCODE for more information |
The BB_AUTO_UPDATE Property
The BB_AUTO_UPDATE Property is on by default. When left enabled, users will receive an in-app notification when a new Revu update is available. If you do not want your users to receive an in-app notification when a new version is released, you’ll need to disable this property.
The BB_DISABLEANALYTICS Property
By default, Revu sends usage data to Bluebeam in order to help improve the application. The info you provide will help us better understand usage behavior and trends, so that we can continue improving our products and services. All information provided is anonymous and is not shared with third parties. Bluebeam will not collect personal information about you. If you want to disable this, deploy your installations with the BB_DISABLEANALYTICS property set to One (BB_DISABLEANALYTICS=1) in your MSI command line script or MST file.
Users opening Revu 21 for the first time will see a new window called “Tell us about yourself” that will ask for some basic customer information. 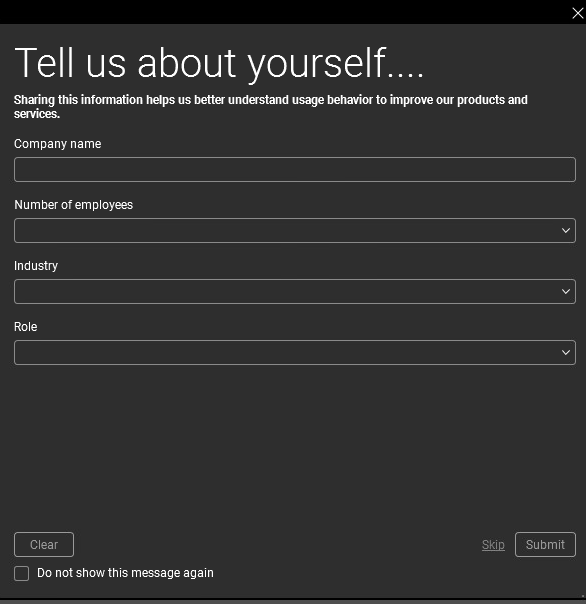
If you choose to opt out of sending usage data by passing BB_DISABLEANALYTICS=1, this will also suppress the “Tell us about yourself” window. For more information about the data we collect, see Bluebeam’s Privacy Policy.
Setting the Default PDF Program with BB_DEFAULTVIEWER
Microsoft has changed how default applications are selected in Windows 8 and above, which result in the BB_DEFAULTVIEWER setting being overridden. This means that your users will have to follow the steps in Changing the Default PDF Viewer. Further information can be found on the Microsoft website.
Enabling and Disabling Revu Features with BB_FEATURES
Each Revu feature has an assigned numerical value as shown in the table below. To disable a feature, subtract its numerical value from the default value of the BB_FEATURES property (65535) shown in the table of Supported Optional Properties above, and enter the answer as the new value for the BB_FEATURES property.
For example, to disable the Redaction feature, you would subtract the value of that feature (2) from 65535, and then enter the balance (65533) as the new value for BB_FEATURES.
Revu Features and Their Numeric Values:
| Administrator Button (Revu Menu) = 128 | Product Updates Button (Help menu) = 16 |
| AllFeatures = 1023 | Redaction Cut Content & Erase Content = 2 |
| DigitalSignatures = 4 | SelfSignCertificates = 8 |
| EditText = 1 | TranslateMarkups = 32 |
| ExportToOffice = 64 | Session Following Feature = 512 |
More information about the Session Following Feature
Some users may need the ability to prevent other users from following them in a Studio Session in order to comply with privacy and labor regulations. The following scenarios illustrate what happens when this feature is turned off:
User X tries to follow User Y
– User X’s screen will still show as if they are following User Y, but they will not receive any position updates from User Y.
User X sends a “Follow Me” request to all users
– User Y will not display the request dialog
User Y tries to follow User X
– User Y will not be able to follow another user (all Session following UI elements are removed)
Disabling “Check for Pending Reboot”
By default, the installer sets the property IGNORE_RBT to 0. When the MSI is launched, the installer checks to see if there is a reboot pending on the machine. The install is halted if both the IGNORE_RBT=0 and if there is a pending reboot. If the property IGNORE_RBT=1 is passed, the install won’t be halted, even with a pending reboot. Without this flag, the installation will stop if a user does not reboot when requested.
Additionally, a Microsoft parameter called REBOOT=ReallySuppress allows you to control when a machine reboots.
Enabling the Bluebeam Plugins with MBCODE
Each of the Bluebeam plugins for supported third-party software has an assigned numerical value, as shown in the table below. If you only want to enable a single plugin – for example, the plugin for AutoCAD— you would replace the default MBCODE value of 1023 (all plugins enabled) with the number 2. In cases where you need to enable more than one plugin, you would add up their numerical values and enter the total as the new MBCODE value. Changing the value to 0 disables all of the plugins.
Revu Plugins and Their Numeric Values
| All Plugins Disabled = 0 | Microsoft Outlook = 128 |
| AutoCAD = 2 | Navisworks = 512 |
| AutoCAD LT (32 & 64-bit) = 4 | ProjectWise = 64 |
| Internet Explorer = 32 | Revit = 16 |
| Microsoft Office = 1 | SolidWorks = 8 |
Language Transforms
You can deploy installations in a different language from your Windows default by setting the TRANSFORMS property to one of the language codes listed below. Otherwise, Revu is installed in the language used by the host operating system.
Command line examples for MST and MSI installations can be found later in this guide.
Revu Language Transform Codes:
| Danish = 1030 | Italian = 1040 |
| Dutch = 1043 | Japanese = 1041 |
| English = 1033 | Korean = 1042 |
| Finnish = 1035 | Norwegian = 1044 |
| French Standard = 1036 | Spanish = 1034 |
| German = 1031 | Swedish = 1053 |
Deployment Methods
This section covers topics such as Windows Installer Switches and how to write scripts for MSI installations.
A Note about Windows Installer Switches
There are three important Windows Installer switches to be aware of when writing a script for MST, or MSI installations:
Tells the Windows Installer to call up msiexec.exe to run an installation
/i
This switch lets you run unattended and silent installations
/qn
Used if you’ve created an MST that needs to be called up. This is done by entering the folder path to where the MST file is located and the filename of the MST. TRANSFORMS also lets you install Revu in different languages.
TRANSFORMS
Writing an Installation Script
Let’s look at the different methods for deploying Revu, each of which utilizes the command line in slightly different ways.
Using a Microsoft Transform (MST) file
A Microsoft Transform (MST) file allows you to minimize typographical errors, as all property/parameter changes are done in the MST file, which is called up by a short command-line script. This means you can double-check your changes to the Properties table before they’re passed on during the installations.
Important Note About Transforms
Scenario 1: Language TRANSFORMS
When using a Language TRANSFORMS, the MST file should be in the same root as the MSI. Do not use a path to the MST; just the MST name. Also, there should be NO spaces in the name of the MST file and NO quotes around the MST file name.
TRANSFORMS=:1031;MyTransforms.mst
TRANSFORMS=:1031;<do not use path to mst, just the mst file name>
Scenario 2: Standard TRANSFORMS
When using TRANSFORMS, the MST file should be in the same root as the MSI. Use quotes around the pathing to the MST file.
TRANSFORMS="C:\Deployment Folder\MyTransforms.mst"
TRANSFORMS=<path with quotes to mst file name>
Creating and Editing an MST File
If you haven’t done so already, you’ll need to download and install an MSI editor such as InstEd. Once you’ve done that, please follow the steps listed below:
- Launch InstEd, click the File menu, and open the original MSI file.
- Click the Transform menu and select New Transform.
- When the New Transforms dialog opens, name the MST file then click Save.
The file should not be called “Transforms.mst,” and must be saved in the same folder as the original MSI installer.
- Click the Tables tab on the left, select Property in the Tables list. At this point, it might help to click the Property column heading to alphabetically sort the Properties list.
- Edit the Properties to suit your requirements.
DO NOT edit any properties other than the ones listed in the MSI Properties Table
- Click the File menu and Save the file.
Writing a Command Line Script that Uses Your MST File
Here are a couple of installation script examples that call up an MST file:
msiexec.exe /i "Bluebeam Revu x64 21.msi" TRANSFORMS=YourMSTFile.mst /qn
A silent German Language Installation:
msiexec.exe /i "Bluebeam Revu x64 21.msi" TRANSFORMS=:1031;MyTransforms.mst /qn
It’s very important that you test your script in an elevated command prompt on a test machine, before deploying the installation to ensure that it runs correctly.
Using the MSI Properties Directly
Another method of building your deployment is to write a complete installation script which calls up the Revu MSI file and lists all property changes.
MSI Script Examples
To help give you a better idea of how command line scripts can be written for various installation requirements and configurations please refer to the following examples:
Basic silent installation that also deploys a specific RevuPreferences.xml file
Notice the difference in pathing between the .msi and .xml file:
msiexec.exe /i "\\MyServer\Bluebeam?Deployment\Bluebeam Revu x64 21.msi" BB_REVUPREFERENCES=\\MyServer\Bluebeam?Deployment\RevuPreferences.xml /qn
Script that silently combines the OCR MSI and the Revu MSI using a TRANSFORMS file:
START /WAIT msiexec.exe /i "C:\Users\<USERNAME>\Desktop\MSIBluebeamRevu21x64\BluebeamOCR x64 21.msi" /qb && msiexec.exe /i "C:\Users\<USERNAME>\Desktop\MSIBluebeamRevu21x64\Bluebeam Revu x64 21.msi" TRANSFORMS="C:\Users\<USERNAME>\Desktop\MSIBluebeamRevu21x64\Bluebeam Revu x64 21.mst" /qn
Running and Troubleshooting a Deployment
Assuming you have written your script and tried it out in an elevated command prompt on a test machine, you can now run it in a deployment tool of your choice, such as SCCM, Dell KACE, or Group Policy.
If the installations do not go as intended, or otherwise fails, you’ll need to go back and check your work. If your script is calling up an MST file, reopen it with MSI editor and make sure you’ve correctly set the Properties.
After confirming you have used the correct syntax in the script, validate again using an elevated command prompt on a test machine.
The MSI installer creates a verbose log file in %TEMP% directory on the local drive of the machine on which Revu is installed. The naming convention is MSIxxxxx.log” where xxxxx” are random characters like MSIjfb1d6.log.” Review this log for common Windows installation errors.
Updating Existing Installations
The new MSI process removes the currently-installed version of Revu 21 and replaces it with the latest Revu 21 update that you’re deploying. The process also doesn’t require re-distributing the OCR MSI file. Since the OCR module won’t be needed in newer Revu 21 updates, your Revu deployment package will be smaller.
Below are some example scripts that can be used to update an existing installation of Revu 21:
Initial MSI Install with optional parameter:
msiexec /i "Bluebeam Revu x64 21.0.0 msi" DISABLE_WELCOME=1
Update MSI Install with optional parameter:
msiexec /i "Bluebeam Revu x64 21.0.X msi" DISABLE_WELCOME=1
Post-Installation: Optional Customization Deployment
Bluebeam Administrator Console
The Administrator application (PbMngr5.exe) lets you perform the following post-installation functions, via the Windows Command line:
- Install Plugins
- Reinstall/Uninstall our Bluebeam PDF Printer
- Set default DPI for the Bluebeam PDF Printer
- Setup Net Config
- Backup, Reset, Restore Revu user settings
For more information about the available features, you can access the PbMngr5.exe help information from the Windows Command Prompt by clicking Start > Search and entering cmd. When the Command Prompt opens, enter the following command:
"C:\Program Files\Bluebeam Software\Bluebeam Revu\21\Revu\PbMngr5.exe" /help
Alternatively please refer to the Bluebeam Administrator Help.
Revu Preferences
There are two Bluebeam configuration files containing application settings which can be deployed: the RevuPreferences.xml file which can be deployed at any time, and the UserPreferences.xml which can only be deployed once a new Revu installation has been finished.
RevuPreferences.xml
This file contains all settings configured in the Revu Preferences dialog (Ctrl+K). Clicking Export in the dialog window lets you save the RevuPreferences.xml file to any location, such as a centralized folder on a server.
Although it can be deployed as part of an MST or passed as an MSI Command Line, you can also do so post-installation using a command line option that calls up the Bluebeam Administrator, which allows you to automate changes.
Here’s an example of how to deploy an updated set of Revu Preferences where all plugins except the one for Internet Explorer need to remain enabled:
"%ProgramFiles%\Bluebeam Software\Bluebeam Revu\21\Revu\PbMngr5.exe" /setup /PREFSPATH:"G:\Bluebeam Software\Settings\RevuPreferences.xml"
You can also copy or push the RevuPreferences.xml file to:
C:\ProgramData\Bluebeam Software\Bluebeam Revu\21\Revu
Setting an Offline PIN Requirement
Users can setup an Offline PIN for accessing Studio files when they’re not connected to Bluebeam Studio. Although this isn’t a default requirement, it can be edited under the Studio section of the RevuPreferences.xml on your staging machine. It can then be exported to a staging location on your network. Typically this is the same location as the MSI you are deploying.
The RevuPreferences.xml modification consists of:
 <Studio>
 <RequireOfflinePIN>True</RequireOfflinePIN>
 </Studio>
This can be deployed using the BB_REVUPREFERENCES MSI property.
UserPreferences.xml
This file contains settings for an individual Revu user. Although this file cannot be deployed to existing installations, it can be deployed to a new one, prior to their initial launch, by pushing a modified UserPreferences.xml to the following location on each machine:
C:\Program Files\Common Files\Bluebeam Software\Bluebeam Revu\RevuVersion#\Revu
Merging Revu Preferences
If you only want to add new settings, you should first open the RevuPreferences.xml file in a text editor and add Merge=”True” to the beginning of the file as shown below, before staging it for deployment. Refer to the Revu Administration Guide for more information. The Merge process is a replacement of the data to be updated or edited in the RevuPreferences.xml file.
Example of an Edited RevuPreferences.xml File
The following set of Revu Preferences provides a Revu installation which merges these settings into an existing UserPreference.xml file (Merge=”True”), provides the URL for an organization’s SharePoint server:
<?xml version="1.0" encoding="utf-8"?>

<RevuPreferenceDictionary Version="2" Merge="True">

<DocManSys>

<ActiveIndexx64.>0</ActiveIndexx64.>

<CacheSharePointFilesx64.>False</CacheSharePointFilesx64.>

<CheckcoutOnOpenFromHyperlinks.x64.0>False</CheckcoutOnOpenFromHyperlinks.x64.0>

<CheckcoutOnOpenFromHyperlinks.x64.1>False</CheckcoutOnOpenFromHyperlinks.x64.1>

<CheckoutOnOpen.x64.0>False</CheckoutOnOpen.x64.0>

<CheckoutOnOpen.x64.1>False</CheckoutOnOpen.x64.1>

<ClaimsSupported.x64.0>False</ClaimsSupported.x64.0>

<ClaimsSupported.x64.1>True</ClaimsSupported.x64.1>

<Countx64.>2</Countx64.>

<DefaultFileFilterPDF>True</DefaultFileFilterPDF>

<DocumentLibrary.x64.0></DocumentLibrary.x64.0>

<DocumentLibrary.x64.1></DocumentLibrary.x64.1>

<LastAccessedLibraryPath.x64.0>Test</LastAccessedLibraryPath.x64.0>

<LastAccessedLibraryPath.x64.1></LastAccessedLibraryPath.x64.1>

<LoginName.x64.0>sa</LoginName.x64.0>

<LoginName.x64.1>sa</LoginName.x64.1>

<PromptForCheckinCommentsx64.>True</PromptForCheckinCommentsx64.>

<PromptForCheckoutFromIEx64.>True</PromptForCheckoutFromIEx64.>

<RegKey.x64.0>SharePoint2007</RegKey.x64.0>

<RegKey.x64.1>SharePoint2007</RegKey.x64.1>

<SelectionDialogx64.>False</SelectionDialogx64.>

<SharePointUseExistingCookies>True</SharePointUseExistingCookies>

<Site.x64.0>http://sharepointserver1</Site.x64.0>

<Site.x64.1>http://sharepointserver2</Site.x64.1>

<SiteAlias.x64.0>SharePoint</SiteAlias.x64.0>

<SiteAlias.x64.1 />

<StoreLastAccessedFolderx64.>True</StoreLastAccessedFolderx64.>

<TestIfSharePointPathx64.>True</TestIfSharePointPathx64.>

<ToolbarIntegrationOnlyx64.>True</ToolbarIntegrationOnlyx64.>

<UseDefaultCredentialsx64.>True</UseDefaultCredentialsx64.>

</DocManSys>

</RevuPreferenceDictionary>
*These Sharepoint server URLs will change when the data is merged with the Revu Preferences file.
Deploying Revu in View Mode While Allowing Users to Switch to Markup Mode
For example, if you only were concerned with pushing out Revu in View Mode but allow users to be able to switch to Markup Mode, these are the only six lines you would need in your RevuPreferences.xml file. Note this example uses Merge=”True” for merging this setting into a users existing RevuPreferences, without changing any of their existing settings.
<?xml version="1.0" encoding="utf-8"?>

<RevuPreferenceDictionary Version="2" Merge="True">

<General>

<RevuAppDefaultModeInt>2</RevuAppDefaultModeInt>

</General>

</RevuPreferenceDictionary>
Restricting Startup Mode in Revu Preferences
Restricting Startup Mode requires a Windows Registry key change that IT Admins can push out post-install. Enabling this restriction will hide the “Startup Mode” dropdown in Revu Preferences. If you intend to set your users to View Mode (as outlined above), Restricting Startup Mode ensures that your changes won’t be overwritten by the end-user.
Hiding “Startup Mode” also prevents users from taking a seat on an Open License each time Revu is opened. Follow the steps below to hide “Startup Mode” from Revu Preferences:
- Create a new registry key called Revu in:
HKEY_CURRENT_USER\SOFTWARE\Bluebeam Software\20
If the Revu key already exists, move on to step 2.
- Create a new DWORD registry key value called DisableStartupMode in:
HKEY_CURRENT_USER\SOFTWARE\Bluebeam Software\20\Revu
- Set the value to 1.
When Revu launches in this state, the “Startup Mode” option in Revu Preferences will be hidden. Setting the key Value to 0 or deleting it all together will cause “Startup Mode” to reappear in Revu Preferences.
Restricting Users to View Mode Only
To set any or all of your Revu installations to View Mode (Revu 2018 and above):
- Create a new DWORD registry key called ViewModeOnly in: HKEY_CURRENT_USER\Software\Bluebeam Software\20.
- Set the value to 1.
When Revu launches in this state, the Markup Mode and Register/Unregister options in the Revu menu will be hidden. Setting the key Value to 0 or deleting it all together switches the Revu installation back to Markup Mode.
Deploying Custom Extensions via the Revu.exe Command Line
Revu.exe Command Line Switches
The following switches allow you to determine how the import process runs and which assets to copy into a user’s default local %appdata% Revu roaming folder:
- /bpximport:[File] – Imports and activates a profile.
- /bpxdir:[Path] – Lets you specify a folder path if you want to designate a new profile directory. This is the path to a network shared location where Profiles are located and shared across an organization.
To prevent users from making changes to the Profiles in this directory, set its Folder Permissions to “Read Only.”
- /bpxactive:[Name] – Designates a specific Profile as “Active” in either the users local %appdata% Revu roaming folder or in a shared Profile. If you have used /bpxdir: to specify a shared Profile directory in a network location, make sure the Profile you set as Active is in the specified directory.
- /btxadd:[File] – This tells a Revu installation to use a Tool Set located in a non-default location without importing it.
- /btximport:[File] – Imports a Tool Set into the current profile directory.
- /bhxadd:[File] – Tells Revu to use a Hatch Pattern set located in a non-default location without importing it.
- /bhximport:[File] – Imports a Hatch Pattern set into the current profile directory.
- /blxadd:[File] – Tells Revu to use a Line Style located in a non-default location without importing it.
- /blximport:[File] – Imports a Line Style set into the current profile directory.
Usage Examples
The following script silently imports the Power Profile, as well as the toolset1.btx and dimensions.btx files, into that profile:
"C:\Program Files\Bluebeam Software\Bluebeam Revu\RevuVersion#\Revu\Revu.exe"
/s /bpximport:"U:\netProfiles\Power.bpx"
/bpxactive:Power/btximport:"U:\netProfiles\Revu\toolset1.btx"
/btximport:"U:\netProfiles\Revu\dimensions.btx"
- /s – This switch turns off any on-screen prompts that normally appear during the import process.
Imports a profile and makes it active:
"C:\Program Files\Bluebeam Software\Bluebeam Revu\<RevuVersion#>\Revu\Revu.exe" /bpximport:"U:\Temp\Name_Profile.bpx" /bpxactive:Name_Profile
Imports tool set:
"C:\Program Files\Bluebeam Software\Bluebeam Revu\<RevuVersion#>\Revu\Revu.exe" /btximport:"U:\Temp\name_Toolset.btx"
Imports hatch pattern:
"C:\Program Files\Bluebeam Software\Bluebeam Revu\<RevuVersion#>\Revu\Revu.exe" /bhximport:"U:\Temp\name_Hatch.bhx"
Imports line style:
"C:\Program Files\Bluebeam Software\Bluebeam Revu\<RevuVersion#>\Revu\Revu.exe" /blximport:"U:\Temp\name_Line.blx"
Bluebeam, Revu, and Bluebeam Studio are trademarks or registered trademarks of Bluebeam, Inc. Microsoft, SharePoint, and Windows are either registered trademarks or trademarks of Microsoft Corporation in the United States and/or other countries.
AutoCAD is a registered trademark of Autodesk in the United States and/or other countries.
© 2020 Bluebeam, Inc. All Rights Reserved.
All other trademarks or registered trademarks are the property of their respective owners.
How-To
Revu 21
Deployment