Get started in the Bluebeam Developer Portal
This page is your guide through our new Developer Portal. We recommend that you open it in its own tab as you go through the steps in a separate tab.
To get started, create a Bluebeam account and request access to the Bluebeam Developer Portal, if you haven't already.
Choose your path:
-
New to Bluebeam's API? Head down to Platform overview.
-
Migrating an existing integration to our new platform? See our Migration Guide.
-
To get started, create a new Client Application.
The Bluebeam API is RESTful and currently has 2 categories of endpoints:
-
Authentication
-
Studio
There are region-specific base URLs that apply to all endpoints:
- US: https://api.bluebeam.com
- DE: https://api.bluebeamstudio.de
- AU: https://api.bluebeamstudio.com.au
- UK: https://api.bluebeamstudio.co.uk
- SE: https://api.bluebeamstudio.se
For example, https://api.bluebeam.com/publicapi/v1/sessions in the US would be https://api.bluebeamstudio.com.au/publicapi/v1/sessions in AU.
Authentication
Some high-level notes of how we handle authentication:
-
Authentication with OAuth 2.0
-
All API calls are made under the context of a user. By authenticating with OAuth, a user grants permission to your App to gain access to their data and make API requests on their behalf.
-
-
All requests and response bodies must be JSON formatted. Set the Content-Type: application/json header on all requests that have bodies.
-
API calls must be made over HTTPS.
-
See our Authentication Guide to start setting up OAuth 2.0 in your App.
Studio
Studio is our cloud collaboration platform with a direct connection to our flagship desktop application: Bluebeam Revu. Our Studio endpoints open up lines of communication for seamless integration between Studio and your systems.
You can generally think about the functionality offered by the Studio API as the same set of functionality that a user would get via the Studio GUI in Revu.
To learn more about Studio, visit our Studio FAQ page.
This procedure uses Postman as the example, but other API software programs can be used to complete this procedure.
To get an access token, follow these steps:
-
Create a Bluebeam account and request access to the Bluebeam Developer Portal, if you haven't already.
-
Go to developers.bluebeam.com and log in.
-
Request access and create a Client ID.
-
Go to My Apps and click Request Access.
-
Fill out the Request Access form (see screenshot below). Select the Bluebeam API instance associated with your specific region.
Bluebeam Developer API is the US server.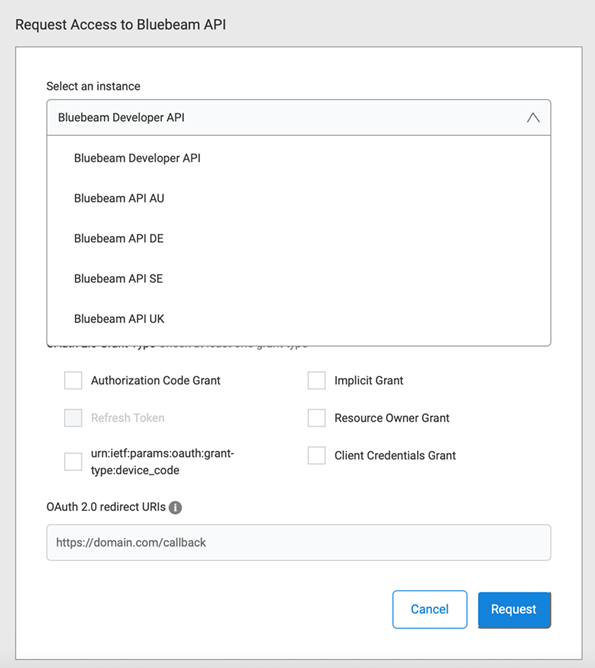
- Authorization Code
- Refresh Token
-
Redirect URI: use
https://oauth.pstmn.io/v1/callbackThis URI is specific to making calls in Postman. Alternate API tools or your App will require a different URI. -
Select Request to submit the form.
Bluebeam API supports only the following selections for Grant Type:Approval email
Upon selecting Request, you'll receive a MuleSoft branded email with the subject: "Application registration approved" – please ignore. It's another unwanted side-effect of using our out-of-the-box solution. -
-
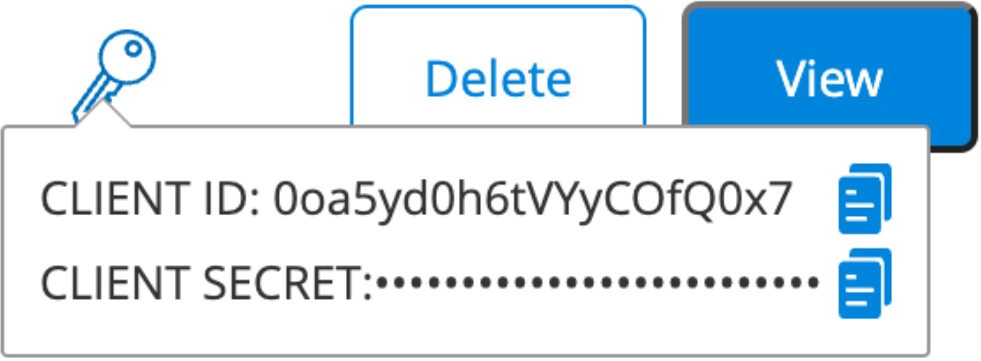
Get credentials. Now you should see your newly registered App in the list (if you don't see it, refresh your browser). Hover over the key to get your credentials.
-
Get an access token via Postman.
-
Access Postman via their desktop app or browser and create a free account.
-
Here's a script that you can import into Postman. This script is a collection of all available Bluebeam API calls. In Postman, go to File > Import, and drop the script in.
-
To get an
access_tokenin Postman, select the Bluebeam API (Script x.x.x) collection. -
Select the Authorization tab to configure a new token in Postman.
For more information regarding authentication, see the Authentication Guide. The Authentication Guide references request parameters; these are known as variables in Postman.You can either set up an environment in Postman to create variables for your authorization, or you can manually fill out the required values.
-
Scroll to the bottom and click Get New Access Token.
-
Sign in with your BBID and click Allow Access when prompted. You'll be presented with a token that you can use in Postman, our API docs, or your own code.
-
Tokens expire after 1 hour, so if your calls stop working, go through the process again to get a new token. To set up OAuth to use Refresh tokens, see our Authentication Guide .
Here's a step-by-step process to migrate an existing integration to our new platform.
-
Create a BBID account, if you haven't already.
-
Go to developers.bluebeam.com and log in.
-
Register a new App.
-
Go to My Apps and select Request Access.
-
Fill out the Request Access form (see screenshot below). Select the Bluebeam API instance associated with your specific region.
Note for Grant Type:Only select the boxes next to:
- Authorization code
- Refresh token
-
Select Request to submit the form.
-
-
Get credentials. Now you should see your newly registered App in the list. Hover over the key to get your credentials.
-
Update your existing integration with the new API routes for authorization and Studio endpoints listed below.
United States Servers Environment
Original Base Route
New Base Route
Auth – Production (US)
https://authserver.bluebeam.com/auth/oauth/authorizeAuth – Production (US)
https://authserver.bluebeam.com/auth/tokenStudio – Production (US)
https://studioapi.bluebeam.com:443/publicapi/v1 -
Anywhere you have your legacy Client ID and Client Secret configured in your integration, replace them with your new Client ID and Secret.
-
In your API calls, add a header called "
client_id" with the value of your new Client ID. This is required for all requests hitting the new platform.Note
We're still working on making our error messaging more accurate and meaningful, but in the meantime, if you send your request without the"client_id"header, you'll see an error message like this:copy{
"msg": "Internal Server Error"
} -
Our new platform handles authentication slightly differently from our old platform, so we recommend reviewing our new Authentication Guide . Two noteworthy changes:
-
We've introduced an
offline_accessscope for refresh tokens (see Step 1 in the Authentication Guide ). -
Our token endpoint responses have changed (see the Authentication Guide for example responses).
-
-
If everything is configured correctly, you should receive a response identical to the previous Studio API's response for all Studio endpoints.
For example, if you requested a list of Studio Projects, your response body would look something like this:copy{
"$id": "1"
"Projects": [
{
"$id": "2",
"Id": "385-509-537",
"Guid": "Mzu1D6xhLE2bE0y2F4ozfQ",
"Name": "Test Project Name",
"Restricted": true,
"Created": "2024-02-29T17:40:58.043",
"OwnerNameIdentifier": "e149e277-3052-4f3e-a376-29fc6c5aa76c",
"OwnerEmail": "jdoe@bluebeam.com"
}
]
} -
Test your app and let us know if you run into any issues.
See also:
Resources
Revu 21
Developer Portal
Developer Portal