Digitally sign a document
How a PDF is digitally signed depends on how it was created. In most cases, a signature field will have already been added to the document in preparation for your signature. Such documents might also be certified. In some cases, however, you might need to add your own signature field before signing. Fortunately, Revu makes it simple to do this.
Before signing a document, a Digital Signature must be created. To learn more, see Managing Self-Signed Digital IDs.
 Create a self-signed digital ID
Generally speaking, self-signed digital IDs are sufficient for personal use and small-to-medium businesses, though it is recommended that you limit their use to parties that are already known to each other and have established a measure of mutual trust. When using a self-signed digital ID, you are essentially vouching for yourself.
Before others can recognize your self-signed digital ID, you must export your public certificate and send it to them, at which point they must install it. If somebody has sent you a public certificate and you wish add them to your Trusted Identities Store, you must import their public certificate.
To create a new, self-signed digital ID, follow these steps:
-
Go to Tools > Signatures > Digital IDs. The Manage Digital IDs dialog appears.

-
Select
 Add Digital ID. The New Digital ID dialog appears.
- Select one of the available Create Digital ID options:
- Create Digital ID file: Creates a digital ID in the PKCS #12 format. It is protected by a separate password that is defined at the time of creation.
- Create Digital ID in Windows Certificate Store: Creates a digital ID in the Windows Certificate Store. It is protected by the user's Windows login.
Since it relies on a user's Windows login credentials, Windows Certificate Store is not recommended for environments with shared login credentials. Additionally, the Windows Certificate Store is Windows-only while PKCS #12 is compatible with both Windows and Mac OS. - Enter the Identity information, as desired. Name and E-mail Address are required fields.
-
If Create Digital ID file was selected, enter and confirm a Password under PKCS #12 Options. This password will be used to confirm the user as the signer of a document, so use a sufficiently secure password.
Keep your password in a secure place. By design, passwords for these types of digital IDs cannot be retrieved or reset if lost. In the event that you lose your password, you will need to create a new digital ID. - Select OK.
The new digital ID now appears in the Manage Digital IDs dialog box. See Customizing the Appearance of a Digital Signature for more information about controlling the appearance of the signature on documents.
Documents you've been given to sign might be certified. Some certified documents don't allow any changes to be made to them after certification.
If a digitally signed PDF is combined with another PDF, any signatures that were placed are automatically cleared and the resulting, combined document must be signed again. To avoid this situation, either combine PDFs before signing or use Sets to view separate, signed PDFs as a single collection. Another option that preserves the signature in this situation is to create a PDF package.
Documents that have been digitally signed are automatically locked for editing and their security status can't be changed unless the signatures are cleared. Operations that would change the document—adding or deleting pages, flattening markups, running OCR, or adding new form fields—aren't permitted or available for these documents.
 How to create and use digital signatures Video2:15
Digital Signatures ensure the authenticity and integrity of your digital ID when signing and validating documents electronically, as well as those of your colleagues and project partners. Watch at Bluebeam University.
Digitally sign a PDF that already has a signature field
-
Select the desired signature field. The Sign dialog appears.

- Choose a Digital ID.
- For PKCS #12 IDs, enter the Password and select Log in.
Windows Certificate Store IDs do not require a separate password as they are protected by the user's Windows login.
- Complete any of the desired Options fields.
- Select an Appearance for your signature.
- Select OK. A Save As dialog appears. Signed documents must be saved at the time of signature placement.
- Enter a file name and select the location for the signed file, and select Save to save the signed PDF.
Digitally sign a PDF that does not have a signature field
- Go to Tools > Signature >
 Sign Document.
 -
Drag a rectangle to define the region where the signature will appear. The Sign dialog appears.
- Choose the Digital ID to sign with.
- For PKCS #12 IDs, enter the Password and select Log in.
Windows Certificate Store IDs do not require a separate password as they are protected by the user's Windows login.
- Under Signature Type, select Digital Signature.
- Complete any of the desired Options fields.
- Select an Appearance for the signature.
- Select OK. A Save As dialog appears. Signed documents must be saved at the time of signature placement.
- Enter a file name and select the location for the signed file, and select Save to save the signed PDF.
Clear your digital signature
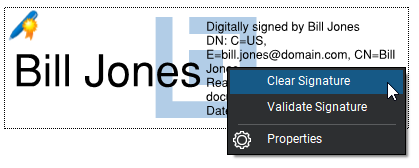
To clear your digital signature, either permanently or in order to make any needed changes and reapply it, right-click the signature and select Clear Signature.

You can only clear your own digital signature.