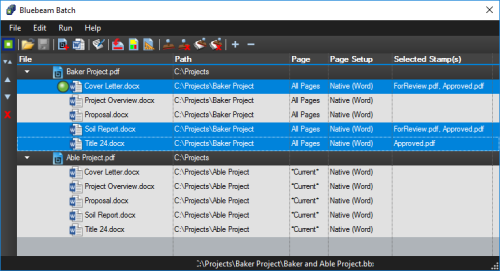
The Bluebeam Batch feature is used to reorder, add or remove files from the batch list, change the name or location of the output file, add stamps to the output file and to save the batch list so it can be reused in the future. It opens automatically after an existing batch job has been opened or a new one has been created (see Creating or opening a batch job for more information about that process).
For detailed instructions on modifying Batch configurations from this window, see Configuring with the Bluebeam Batch Window.

The window has a toolbar below the top menus. Use these tools to control the batch PDF creation process.
 Batch Convert: Begins the batch conversion process of the entire batch list.
 Open Batch: Opens an existing batch file. Bluebeam Batch list files have a .bbx file extension.
 Save Batch (CTRL+S): Saves the current batch list. If the batch list has not been saved before, a Save As dialog will display.
 New Output File (CTRL+Z): Adds an output file to the batch list.
 Add File (CTRL+Y): Adds document to be converted to the selected output file.
 Logging: Displays the log file.
 Output File Name: Changes the name of the selected output file in the batch list.
 Pages: Defines the page range for the selected document.
 Page Setup: Changes the page setup to use for the selected file or files.
 Global Stamps: Selects global stamps to apply to all documents in the batch list.
 Clear Global Stamps: Removes all global stamps.
 Selected Stamps: Applies stamps to the selected documents.
 Clear Selected Stamps: Removes stamps for the selected documents.
 Expand Batch List and
  Contract Batch List: expands or contacts all of the output files in the batch list. Click the disclosure triangles to the left of a filename to collapse or expand a single output file in the list.
The left-side toolbar allows you to sort and reorder both the output files and the documents in the selected output file.
 Sort: Sorts the documents in the selected output file. Click the button and then click by Name, by Full Path or by Date.
 Move Up (CTRL+UP ARROW): Moves the selected item up the list.
 Move Down (CTRL+DOWN ARROW): Moves the selected item down the list.
 Delete (DELETE): Removes the selected item from the list.
The main batch window shows the details of the individual output files that will be created. This example shows two PDF files will be created from two Word docs.

The Project Overview.pdf file will contain one document - Project Overview.doc. The Path where the PDF will be stored is displayed on the same line as the PDF file and the location of the source document is displayed on the line with the source file name. The Pages column indicates that all pages in the document will be included in the PDF, and the Page Setup column shows that the Native (Word) page setup will be used for creating the PDF file.
The settings for the Cover Letter.pdf file are displayed next. Similar settings indicating that one document will be used to create the PDF file using All Pages and Native (Word) page setup.
This example shows one PDF file will be created from five separate source documents:

The Baker Project.pdf file will contain all pages from the included documents. This also shows that Cover Letter.doc is currently opened, that three of the documents have been selected and that the Stamp "ForReview" will be applied to two of the documents.