By default, whenever a document is saved using the Bluebeam Office Plugin, a Save As dialog box appears. It gives the user the opportunity to choose a save location and file name, as well as determine the file format and customize certain save options.

This dialog box can be disabled by turning off Prompt for File Name in the General Settings.
In addition to the standard Windows functions by which users can choose the save location and file name for documents, users can also select from the following file format types:
Depending on which file format type is selected, some of the following save options can be changed for the document, overriding the default settings from Advanced Settings.
Note: Not all save options apply to all file types.
Append Mode: Determines how the new PDF is handled when it shares a name with an existing PDF in the same save location. Overwrite will replace the existing PDF with the new one while Append and Prepend will add the new PDF pages to the end or beginning of the existing PDF, respectively.
Color Setting: Determines how many colors to use when saving the image (also known as "color depth"). Select the desired color depth from the list.
For color images, use True Color, 256 Color, or 16 Color. True Color is suited for the highest quality images. 256 Color and 16 Color will produce smaller files, but with less color precision. Monochrome is black and white, and Grayscale supports many different shades of gray. If this option is set to fewer colors than the source document includes, unsupported colors will be replaced by their closest available approximation. Photographs and rendered images should generally use True Color, while schematics and documents with fewer colors can usually be well represented with 256 Color or 16 Color.
Select from the available options to determine how much (if at all) images should be compressed. The options are:
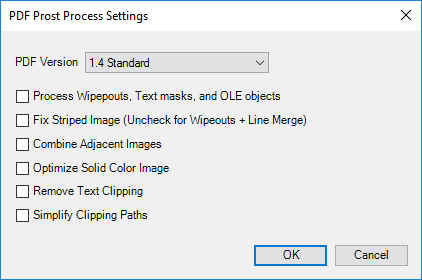
Enable: Select this option to activate a post-processing operation as part of the PDF creation process. If enabled, a second pass is performed on the PDF to correct certain conditions that may create non-optimal PDFs.
Click Manage to bring up the PDF post-processing settings.

The PDF Post Process Settings are:
Image: Select the image resolution. Resolution is measured in dots-per-inch (DPI). A higher DPI setting will create a better image but will increase the file size.
Aliasing is the effect that causes jagged lines in diagonal or curved objects due to the square pixels on computer screens and printers. Anti-Aliasing attempts to correct this by smoothing the image using intermediate colors between the line color and background color. There are different anti-aliasing settings for Text and Graphics. Choose between High, Low, and None for each.
Note: The Graphics anti-aliasing setting will not affect photographs or other raster images. It only applies to vector graphics.
Select Open File to open the file with the workstation's default viewer after the file is created.
Note: By default, Windows does not have a viewer capable of displaying PDF, PSD, or PCL-XL files.