Work with 3D views
Views are saved presets defining how to display a 3D model. At a minimum, a view consists of camera position and projection style, but it can also include other settings like background color, lighting style, and the transformation of parts. The 3D Model Tree panel contains a Views section that allows switching quickly from one view to another. Views are also used for Marking Up 3D PDFs.
3D Models can have predefined views. To show the model from a predefined view:
- Go to Window > Panels >
 3D Model Tree or press ALT+3 to open the 3D Model Tree panel.
 - Select a view from the View
 list on the 3D Model Tree panel.
You can reset the model to the default view at any time by selecting  Default View on either the 3D Model Tree panel or the 3D Hover Bar.
To create a new view, first use the mouse controls to manipulate the model the way you want it to appear (see 3D Model Tree panel for information about mouse manipulation of a 3D model) and the 3D transformation tools to change parts. When you are satisfied with the results:
- Go to Window > Panels > 3D Model Tree or press ALT+3 to open the 3D Model Tree panel.
-
Select Manage Views from the Current View menu.
- Enter a name for the view in the View Name field.
- Select either Orthogonal or Perspective from the Projection list.
- Enable any desired Display Settings to include in the view. See Display Settings for Views below for more information about these options.
- Select Save.
The Display Settings of a 3D model's View Properties control things like Background, Lighting, Render Mode, Node Visibility and Cross Section Information. They are all optional.
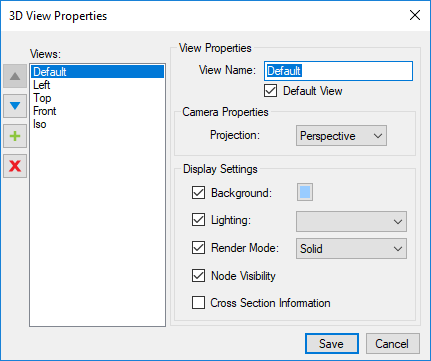
Views list: Shows the views defined for the 3D PDF. Use the controls to the left to rearrange their order or add and delete views.
View Name: Defines the name that will appear in the Views section.
Camera Properties: Defines the projection mode, Orthogonal or Perspective.
Background: When selected, includes and defines the background color. Select the color box to choose a color.
Lighting: When selected, includes and defines the lighting style. Select a lighting style from the dropdown list.
Render Mode: When selected, includes and defines the render mode. Select a render mode from the dropdown list.
Node Visibility: Determines whether or not the current visibility status from the 3D Model Tree section is carried into the view.
Cross Section Information: Determines whether or not the current clipping plane information is carried into the view.
To play the currently selected Animation Cycle, select  Play on either 3D Model Tree panel or on the 3D Hover Bar. To change the Animation Cycle type, select the arrow next to the Play and select either Rotate or Cycle Views.
Rotate: Spins the model as if it were on a turntable. The mouse navigation (zoom, pan) is still available in Rotate mode. The spin rate and direction are defined in the 3D Rendering Preferences.
Cycle Views: Animates the transition from one predefined view to the next. The transition time and length of time spent on each view are controlled in the 3D Rendering Preferences.
To take a 2D snapshot of a the current view of a 3D model, right-click anywhere in the main workspace and select Copy as Image. To highlight a specific component in the snapshot, right-click it. Right-click a blank area of the main workspace for a snapshot without a highlighted component.
The image is copied to the clipboard so that it can be placed in another PDF within Revu or in another program. The default DPI of the snapshot is set in Markup Preferences.