Edit page labels and page numbering
Page labels are a way of naming or numbering the pages of a PDF that can be distinct from Bookmarks and file names. They appear on the Thumbnails panel.
There are several ways to edit page labels, depending on what kind of edit is desired.
- Select the
 Thumbnails panel. If it is hidden, go to Window > Panels > Thumbnails or press ALT+T.
 - Select the thumbnail and do one of the following to make the thumbnail's label editable:
- Go to Thumbnails > Rename Page Label on the Thumbnails panel toolbar.
- Press F2.
- Double-click the thumbnail's page label.
When in this mode, pressing TAB will move to the next page label while remaining in Edit mode. Pressing SHIFT+TAB will move to the previous page label.
- Select the Thumbnails panel. If it is hidden, go to Window > Panels > Thumbnails or press ALT+T.
- Use one of the following methods to open the Page Numbering and Labeling dialog:
- Select the thumbnail and go to Document >
 Number Pages.
 - On the Thumbnails panel toolbar, go to Thumbnails > Number Pages.
Right-click a thumbnail and select
Number Pages.
- Select the thumbnail and go to Document >
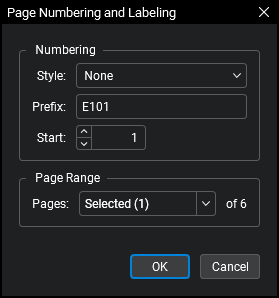
- Set or change any of the following options, as desired:
- Style: Select a numeral style for the page label.
- Prefix: Enter a value (for example, "Page ") that will precede the page label's numeral. To insert a space between the Prefix and the numeral, add a blank space at the end of the Prefix.
- Start: Sets the starting numeral.
Page Range: Determines which pages will be affected by the settings. Select one of the following:
- All Pages: Sets the range to all pages.
- Current: Sets the range to the current page only. The current page number will appear in parentheses, for example, Current (2) if page 2 is the current page.
- Selected: Sets the range to the current selection. This option only appears if pages were selected prior to invoking the command.
- Custom: Sets the range to a custom value. When you select this option, replace any text left in the field with the page or pages to be printed directly. To enter a custom range:
- Use a dash between page numbers to define those two pages and all pages in between.
- Use a comma to define pages that are separated.
For example: 1-3, 5, 9 will include pages 1, 2, 3, 5 and 9.
- Select OK.
Follow the procedure outlined in Edit a page label's numbering style above, and set the following options in the Page Numbering and Labeling dialog:
- Style = None.
- Prefix = desired text label.
Follow the procedure outlined in Edit a page label's numbering style above and set the following options in the Page Numbering and Labeling dialog:
- Style = None.
- Prefix = blank.
There are a couple ways that you can create page labels automatically: using Bookmarks or using text found on the PDF.
-
From the Thumbnails panel toolbar, select
 Create Page Label.
 - In the Create Page Labels dialog, select Bookmarks.
-
Select a Page Range:
- All Pages: Sets the range to all pages.
- Current: Sets the range to the current page only. The current page number will appear in parentheses, for example, Current (2) if page 2 is the current page.
- Selected: Sets the range to the current selection. This option only appears if pages were selected prior to invoking the command.
- Custom: Sets the range to a custom value. When you select this option, replace any text left in the field with the page or pages to be printed directly. To enter a custom range:
- Use a dash between page numbers to define those two pages and all pages in between.
- Use a comma to define pages that are separated.
For example: 1-3, 5, 9 will include pages 1, 2, 3, 5 and 9.
- SelectOK.
Every defined page that contains a bookmark will have its page label changed to that bookmark's title, as shown in the example below.
Bookmarks Included in the File
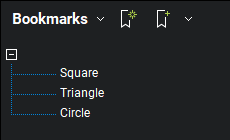
Original Page Labels

Page Labels Modified With Bookmark Titles

-
From the Thumbnails panel toolbar, select
Create Page Label. - In the Create Page Labels dialog, select Page Region.
- Select Select. The Create Page Labels dialog disappears, replaced with a crosshair cursor.
-
Drag to define a region on the PDF. The data in this region should be consistent across any PDFs being labeled. When the region has been defined, the AutoMark dialog opens.
- To add another region, select Add. The AutoMark dialog disappears, replaced with a crosshair cursor again. Drag to define another region. The AutoMark dialog reappears with the new region added to the Selection field. There is no limit to the number of regions that can be added.
Review the sample page label as shown under Preview. If desired, select the Selection field to add text before, after or between [Regions].
- When all regions have been defined, select OK. The AutoMark dialog closes, replaced by the Create Page Labels dialog .
-
Select a Page Range:
- All Pages: Sets the range to all pages.
- Current: Sets the range to the current page only. The current page number will appear in parentheses, for example, Current (2) if page 2 is the current page.
- Selected: Sets the range to the current selection. This option only appears if pages were selected prior to invoking the command.
- Custom: Sets the range to a custom value. When you select this option, replace any text left in the field with the page or pages to be printed directly. To enter a custom range:
- Use a dash between page numbers to define those two pages and all pages in between.
- Use a comma to define pages that are separated.
For example: 1-3, 5, 9 will include pages 1, 2, 3, 5 and 9.
- Select OK.