Define access and permissions in Studio Sessions
Permissions can be defined in Studio to grant or deny users access to specific Sessions and to define what users can do in those Sessions. Permissions can be defined for individual users or groups of users and can be set up before the users join the Session or even before they set up a Studio account.
Sessions can also be set up to expire on a specific date.
Studio Sessions can be configured to have an expiration date. This date can be set up at the time the Session is created or it can be configured afterward. Once an expiration date is set, it can be changed if necessary.
To set or change an expiration date:
-
When in a Session, select
 Session Settings.
- If an expiration date has already been set, Enabled will be selected.
- To disable the expiration date, clear Enabled.
- To change the expiration date or time, change the appropriate value to the right of Enabled.
- If no expiration date is currently set, you can set one by selecting Enabled and entering the desired expiration date in the fields to its right.
- Select OK.
Revu will send the Host and attendees email notifications as the Session approaches its expiration date. Notifications are sent out:
- Seven days before expiration
- Two days before expiration
- 24 hours before expiration
- After the Session has expired
Similarly, a notification is sent if the Session's expiration date is changed.
Adding a user to a Session can have different effects depending on whether or not the Session is set to restrict access. When Restrict Users is enabled, adding a user is the only way to grant them access. Conversely, when Restrict Users is not enabled, adding a user is the only way to deny them access. Restricted user access is discussed in more detail below.
Adding a user to a Session does not send them an invitation to join the Session. Additionally, it is done for one person at a time and only by email address. To invite several new users or just send invitations while adding a few, see Inviting Users to the Session.
To add a user to the Session, follow these steps:
-
When in the Session, select Session Settings. The Session Settings dialog appears.
-
Select the Attendees tab. Previously added users will appear in the list.
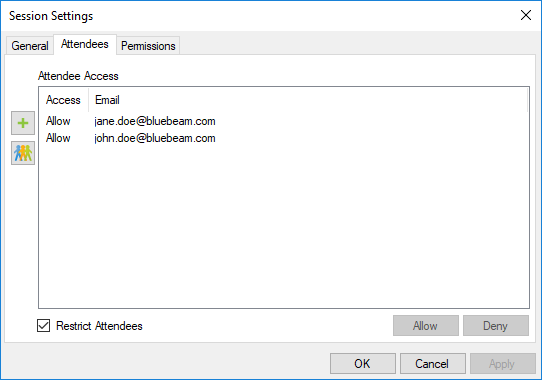
- To add new, individual users, select
 . In the Add Email Address dialog, enter the user's email address and select OK.
 - To add the users in a Group, click
 . In the Select Groups dialog, select the desired group and select OK. All the users in that Group are automatically added.Only Session owners and those with Full Control permissions can use Groups to add users to a Session. Bear in mind, however, that the only Groups shown here are those of the Session owner. Somebody with Full Control permissions can use the owner's Groups to add users, but they will not be able to use their own and they will not be able to alter the users in the owner's Groups.
 - By default, all users added to the User Access tab automatically have their Access set to Allow. To deny access to a specific user (for example, one brought in with a Group that should not have access to this specific Session), select the desired user and select Deny. The Deny Users dialog appears: leave the default option Don't let someone else edit their markups selected and select Deny User.
- To restrict access to this Session to only those users listed on the User Access tab whose Access is set to Allow, select Restrict Users.
The relationship between this setting and a user's Access status (either Allow or Deny) lets you set up the equivalent of a "white list" or a "black list" and merits some further explanation:
- When Restrict Users is selected, only users listed here on the User Access tab whose Access is set to Allow will be able to access this Session. This is the equivalent of a "white list."
- When Restrict Users is not selected, any user can access the Session except for those listed here on the User Access tab whose Access is set to Deny. This is the equivalent of a "black list."
- Select OK.
-
When in a Session, select Session Settings.
-
From the Session Settings dialig, select the Permissions tab.
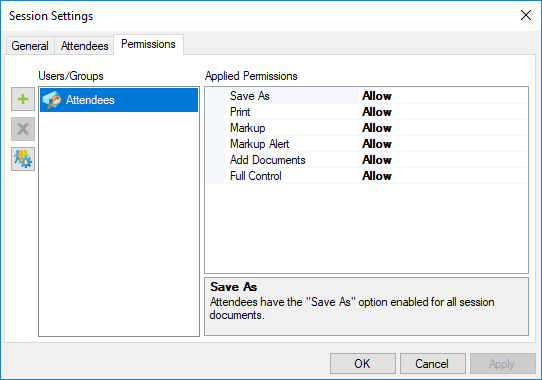
The default group, Attendees, will be shown, as well as any other users or Groups that have been previously added. The Attendees group applies to all users in the Session, and its initial permission settings are configured when the Session is created. It cannot be deleted. Most permissions for the Attendees group are set to Deny when the Session is created; a recommended best practice is to give additional permissions to specific users and Groups rather than allow greater access to the Attendees group.
- To add individual users or Groups:
- Select .
In the Add Users/Groups dialog, select the desired user or group and select OK. Only the owner's Groups are shown as they are the only ones that can be used in the Session. By default, when users and Groups are added, they inherit the permissions of the Attendees group.
If you are the Session owner and would like to create a new Group for this Session or change the membership of one currently being used, select
 Manage Groups. See Studio Groups for more information about creating and managing groups. Users with Full Control permissions can also use Manage Groups to manage their own groups, but they will not be able to use those groups in this Session nor will they be able to alter any of the owner's Groups.
When creating Groups, keep in mind that Revu will allow somebody to be in multiple Groups within the same Session or Project; when this occurs, that person's permissions will default to whichever is the most restrictive. As such, adding somebody who is already in a Group to a second Group might not have the desired effect, either by not granting expected permissions (because the first Group's are more restrictive) or by imposing undesired restrictions (because the second Group's are more restrictive).
- Select
- To change the permissions for a user or Group:
- Select the desired user or Group in the Users/Groups list.
- Select the desired permission in the Applied Permissions list.
- Select a permission setting from the dropdown list.
- When defining permissions for the Attendees group, the options are Deny or Allow.
- When defining permission for all other users and Groups, then options are blank, Deny or Allow. Selecting blank will cause the user or Group to inherit the permission defined for the Attendees group.
- The Full Control permission is powerful and setting it to Allow gives the user or Group of users administrator powers. The effects of this are:
- All permissions for administrators are set to Allow.
- Administrators can rename the Session.
- Administrators can delete the Session.
- Administrators can manage attendee Access.
- Administrators can manage Permissions for other users.
- Administrators have full permissions to any folder, regardless of the folder's default permissions.
There are some limits on what administrators can do, however:
- Administrators cannot block the Host.
- Administrators do not have access to the Host's (or any other administrator's) Groups.
- To remove a user or Group, select them and select
 .
. - Select OK.
When setting permissions, there are two sets of hierarchies to keep in mind: Permission Sets and Permission States.
- A Permission Set describes how a user came to have their permissions: Were they assigned to the user specifically (Individual permissions)? Did the user pick them up by virtue of belonging to a certain Group (Group permissions)? Or did the user default to the general permissions because neither of the previous two conditions were met (General permissions)?
- A Permission State describes whether the user is permitted to perform a certain task (Allow) or not (Deny). For individual users and Groups, permission states can either be specifically selected (Explicit) or they can be left blank, causing them to default to whatever the corresponding permission state is for the Everyone group (Inherited).
Permission States work within Permission Sets and generally come into play only to resolve conflicts that arise when a user is a member of two or more Groups that have conflicting permissions (see examples 4 and 5 below for further illustration). It is generally recommended that people not be added to multiple Groups, but in the event that it is necessary, Hosts and administrators should coordinate to ensure that the proper permissions are granted.
Hierarchies
The hierarchies are:
Permission Sets
- Individual permissions (that is, those set up for a specific user) have primary importance.
- Group permissions (that is, those set up for a Group you have created) have secondary importance.
- General permissions (that is, those set up for the default Everyone group) have the least importance.
Permission States
- Explicit Deny (that is, a permission that is specifically set to Deny) has primary importance.
- Explicit Allow (that is, a permission that is specifically set to Allow) has secondary importance.
- Inherited State (that is, any permission—whether it is Deny or Allow—that is inherited from the default Everyone group) has the least importance.
Examples
With these hierarchies in mind, here are a couple examples that illustrate how a user's actual permissions are determined:
- User Alice has individual permissions set up and the Send Invitations permission is set to Deny. User Alice also belongs to Group A and the permissions for Send Invitations for Group A is set to Allow. Alice will not be able to send invitations to the Project.
- Her individual permissions overrule the Group A permissions.
- User Bob has individual permissions set up and the Send Invitations permission is set to Allow. User Bob also belongs to Group A and the permissions for Send Invitations for Group A is set to Deny. Bob will be able to send invitations to the Project.
- His individual permissions overrule the Group A permissions.
- User Charlie has individual permissions set up and the Send Invitations permission is set to Allow. User Charlie also belongs to Group A and the permissions for Send Invitations for Group A is set to <blank>. The Send Invitations permission for the Everyone group is set to Deny. Charlie will be able to send invitations to the Project.
- His individual permissions overrule the Group A permissions.
- User Alice does not have individual permissions set up, but she is part of Group A that has the Send Invitations permission set to Allow and she is also part of Group B that has the Send Invitations permission set to Deny. Alice will not be able to send invitations to the Project.
- The explicit Deny permission from Group B overrules the explicit Allow permission from Group A.
- User Bob does not have individual permissions set up, but he is part of Group A that has the Send Invitations permission set to Allow and he is part of Group B that has the Send Invitations permission set to <blank>. The Send Invitations permission for the Everyone group is set to Deny. Bob will be able to send invitations to the Project.
- The explicit Allow permission from Group A overrules the inherited Deny permission from Group B.