How to animate 3D PDFs
Applies to:
- Revu 2017 and older
Have you ever wished you could animate your 3D PDFs, like this?
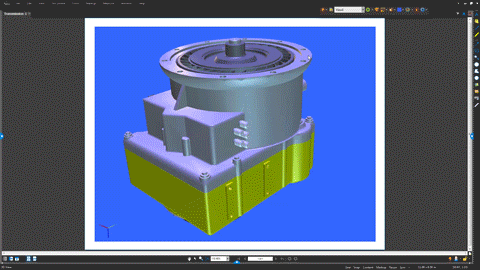
Let's say you have a 3D PDF file that you want to use for a meeting, and you'd like to make things more interesting by including some motion. Well, you can do this in Revu 11 and above by combining the Transform and 3D Views features to "sequence" the Views you've created, and then playing this back as an Animation Cycle using the Cycle Views function.
Setting It All Up
So you've got your document open and you have some ideas about how you'd like the different parts to move in relation to each other so that the file is displayed in an engaging manner. Now what?
Well, the first thing to do after opening your 3D PDF is open the 3D Model Tree tab. This is where you'll create and, if needed, edit your 3D Views.
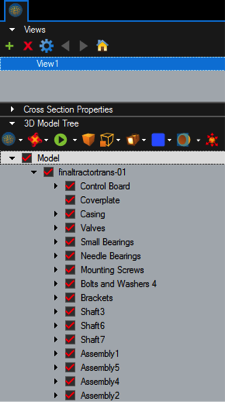
For this article, we will focus on the Views and 3D Model Tree sections of this tab.


Setting Up the First View
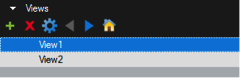
The first thing you'll notice is that the Views section already contains a pre-existing View for the initial positioning of the 3D model. In the example below, it's called "View1".
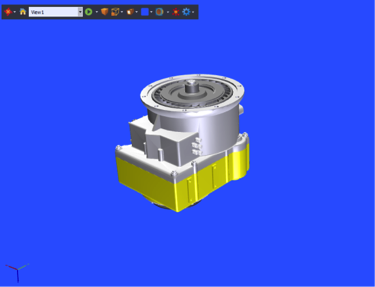
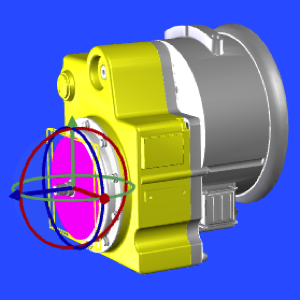
Now we'll set up the first new View, where we'll rotate the model about 90 degrees to the left and from there, counter-clockwise by about 180 degrees, and then zoom out. To do this:
- Click the Rotate
 option in the Mouse Interaction menu on the 3D Model Tree toolbar and move the model into position.
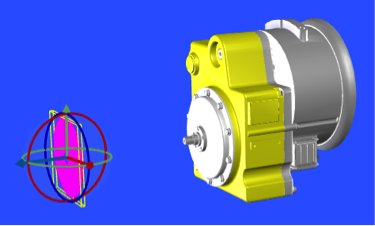
 - Set your mouse to Zoom
 mode and zoom out.
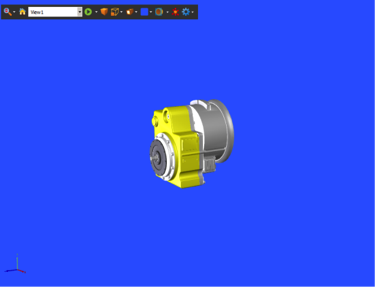
Note: You can also change the Mouse Interaction mode by going to the Mouse Interaction Menu located on the 3D Hover Bar that's located in the 3D Model Window.

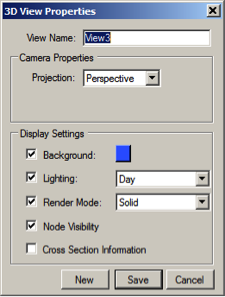
- Now that the new position is set, it can be saved as a new View:
- Go to the Views Toolbar and click Create New View
 .
.This opens the 3D View Properties dialog box for the new View that's being created.
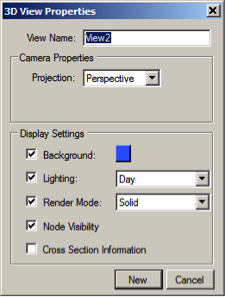
- Enter the new View Name, "View2" in this example, and click New.
- Go to the Views Toolbar and click Create New View
- Save the changes.
The View section of the 3D Model Tree tab will now include Views 1 and 2.
- At this point, you can test the Animation Cycle based on Views 1 and 2 by either:
- Setting the Animation Cycle to Cycle Views and then clicking Play
 on either the 3D Model Tree toolbar or the 3D Hover Bar.
-Or-
- Clicking Next View
 and Previous View
  on the Views toolbar, or the View names.
- Setting the Animation Cycle to Cycle Views and then clicking Play
Creating a View with Transformed 3D Parts
This is where we'll start putting together the "cool" stuff that creates "exploded" views of your models using the Transform function. After selecting "View2", we'll do the following:
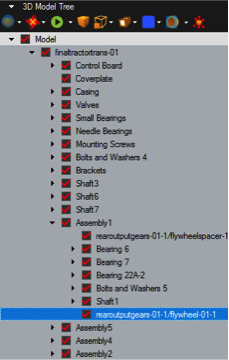
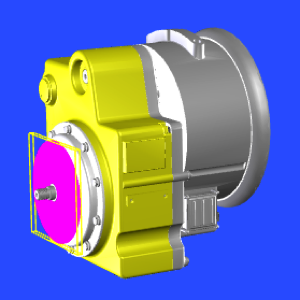
- Select the first part that we want to detach from the model. In this instance, it will be the black flywheel shown in View 2. You can select a part by either:
- Clicking on the part name in the 3D Model Tree.
-Or-
- Clicking the part itself in the 3D Model Window.
Regardless of which selection method you use, both the part name in the 3D Model Tree and the part itself in the 3D Model Window will be highlighted.
- Clicking on the part name in the 3D Model Tree.
- Click Transform
 on either the 3D Model Tree toolbar or the 3D Hover Bar.
The icon changes color
 whenever it's active.
The Transform Control will now appear at the center point of the flywheel.
- Now we're going to click the blue Axis Line and drag the flywheel off of the shaft it's attached to.
Note: The Axis Line will change color and slightly move in the direction that the part will eventually "travel."
- Click Transform on either the 3D Model Tree toolbar or the 3D Hover Bar, and then click anywhere in the 3D Model Window to deselect the part.
- Go to the Views Toolbar and click Create New View .
- Enter the new View Name, "View3" in this example, and click New.
- Save the changes.
Now you can click Home ![]() to send the model back to View1, which happens to be the Default View in this example, and then run the Animation Cycle again by clicking Play
to send the model back to View1, which happens to be the Default View in this example, and then run the Animation Cycle again by clicking Play ![]() on either the 3D Model Tree toolbar or the 3D Hover Bar.
on either the 3D Model Tree toolbar or the 3D Hover Bar.
Creating Additional Views
Create additional views by repeating the processes described earlier. With this, you can combine model movements with part movements, or movements of multiple parts, and save them as additional views.
Editing Views
If you need to alter a selected view, you can make the physical changes to the model, and then open its 3D Model Properties and click Save.
To open the 3D Model Properties dialog box for a View, you can either click View Properties ![]() on the Views toolbar or right-click on a View name in the Views section and select View Properties.
on the Views toolbar or right-click on a View name in the Views section and select View Properties.

Renaming a View
If you need to change the name of a View, right-click the name, select Rename View, and then type the new name. To save, press Enter or click another View name.
You can also open the View Properties, enter the new name, and click Save.
Setting a Default View
To set a View as the default, right-click its name and select Set as Default. From now on, clicking Home ![]() switches the model to this view.
switches the model to this view.
Note: Don't forget to save the changes that you're making to the file.
Rearranging Views
You can change the order of your Views by clicking and dragging a View to a different location in the list.
Adjusting the Animation Cycle Speed
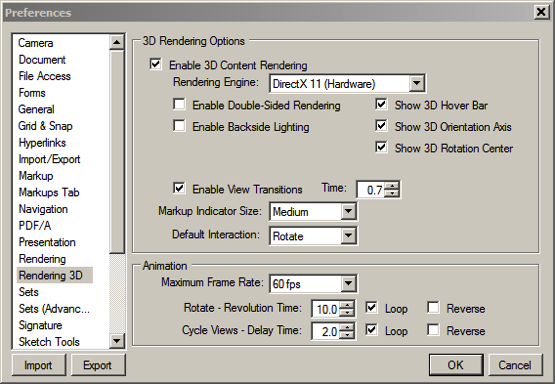
If you need to adjust the speed of the Animation Cycle, go to Rendering 3D Preferences. The following screenshot shows the default settings, but you can try experimenting with the Time and Cycle Views – Delay Time.
This covers the basics of animating 3D PDFs, but you can find more information about creating and working with them in our training videos.
How-To
Legacy
3D PDFs


