Tutorial: Using Custom Columns for quantity takeoffs
Revu lets you add several kinds of Custom Columns to the Markups list that can perform a variety of functions, including using custom formulas. To illustrate how this works, this tutorial will show you the different types of Custom Columns you can add and provide an example that demonstrates how you can set these up to calculate material cost subtotals.
There are six different types of Custom Columns available:
| Type | Description | Example |
|---|---|---|
| Checkmark | Presents a Yes/No checkbox |

|
| Choice | Creates a dropdown menu of user-defined selections (optional values tied to choices can be used in formulas) |

|
| Date | Applies a formatted, dynamic date field |

|
| Formula | Calculates field values with a user-defined equation tied to the content of other columns |

|
| Number | Adds a number field that can be used for setting up formulas |

|
| Text | Adds a text field (cannot be used as a value for formulas, even if a number is entered) |

|
To help you get started, this tutorial will focus on how to work with the Formula and Choice columns.
When dealing with either of these types of columns, it's important to have the end result in mind before you begin. For example, when preparing to set up a Formula column, think about what your equation is going to require. In the first example below, a generic "Column A" is added to "Column B" to make up "Column C." Before that can work, "Column A" and "Column B" need to exist, and if they don't, they need to be created.
The same principle can be applied to Choice columns as well. In the second example below, you're going to create a Choice column for building materials in order to calculate material cost subtotals, so you will need a list of materials and their base costs.

At a basic level, Custom Column formulas perform a mathematical operation on two (or more) columns. For example, you might have a number in a "Column A" and another number in a "Column B". You could then create a "Column C" with a formula that adds those two numbers for you; the sum of "Column A" and "Column B" will automatically be inserted as the value of "Column C."
Before getting started, have a clear idea of what the formula is and what variables are going to be used in the calculation. Some variables are standard (for example, measurements like Length, Area, and Volume), and others can be provided by Custom Columns. However, if a Custom Column is going to be used in a formula, it must be created first, or else it won't be available as a variable when it comes time to define the formula.
In the "Column A" + "Column B" = "Column C" example, "Column A" and "Column B" are Number-type Custom Columns; if one or the other didn't already exist, you'd have to create them before you created "Column C." Then, to set up "Column C," you'd do the following:
-
On the Markups list toolbar, go to Markups List > Columns > Manage Columns. The Manage Columns dialog appears.

-
Select the Custom Columns tab. Existing Custom Columns (if any) are listed.

-
Select Add. The Add Column dialog appears.

-
In the Name field, enter a name for the column (in this example, enter "Column C").
-
From the Type list, select Formula. The fields available under Options automatically update.

-
Select the Expression field and start typing the first part of your equation (in this example, start typing "Column A"). As soon as you start typing, a dropdown menu appears with available selections.

-
Double-click the first Variable of your equation (in this example, use "Column A"). It will automatically be added to the Expression field, properly formatted.
-
Enter a valid operator (in this example, enter "+") after the Variable.
The valid operators are:
- Addition (+)
- Subtraction (-)
- Multiplication (*)
- Division (/)
- Exponential (^)
- Modulus (%)
- Negation (-)
-
Start typing the second part of your equation. The same dropdown menu appears. Double-click the second Variable of your equation and it will be added to the Expression field as well. The example ends up looking like this:

-
Select OK. The Add Column dialog closes, leaving the Manage Columns dialog. Select OK again. "Column C" is automatically added to the current PDF and its value is the sum of "Column A" and "Column B."
One common use of Custom Columns in Revu is to calculate material costs. To do this, you need a Choice-type Custom Column that lists materials and stores their base costs, plus a Formula-type Custom Column for the cost calculation. This example is also going to take advantage of another feature in Revu that automatically filters what choice items you see for a given markup depending on its subject, as you'll see below.
Please note: while we're relying on the ability of a Choice-type Custom Column to store associated numeric values (in this case, the base cost of each material), these columns are quite useful without them. Any time you have a situation in which the value of a field should be one of a finite set of options, a Choice-type Custom Column is a great way to ensure consistency and ease of use.
-
On the Markups list toolbar, go to Markups List > Columns > Manage Columns. The Manage Columns dialog appears.
-
Select the Custom Columns tab. Existing Custom Columns (if any) are listed.

- The first thing to add is a column to track what building materials are used:
Select Add. The Add Column dialog opens.
In the Name field, enter a name for the column (for example, "Material").
From the Type list, select Choice. The fields available under Options automatically update.

To add a choice item, select Add. The Manage Choice Item dialog opens.

Enter the name of the material in the Item field. This will be the name that users will see when choosing a material, so make it something meaningful and recognizable.
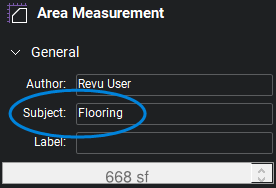
- To take advantage of Revu's ability to automatically filter choices for you in the Markups list, enter a Subject that matches the Subject of the markup the material applies to. For example, let's say that you're going to create flooring materials. When you define a floor area with the Area markup, give it a Subject (for example, "Flooring") in the Properties panel:
Now, if you also set up your material to have the same subject...

...then when you go to choose something from the Material menu for your Flooring markup, you're only going to see Flooring materials.
 Choice items that have no Subject will show up for any markup, so technically you would see materials that have a Subject equal to "Flooring" or that have no Subject at all.
Using this feature, you can create as long a list of materials as you need for your project. Users will always be able to select building materials in the same place (the "Material" column), but the list of choices will be manageable and appropriate to the markup.
Select Assign Numeric Value and enter the base cost of the material in the field next to it.

Select OK.
To add more materials, repeat steps D through H.
Choice items can also be imported from a Comma Separated Value (CSV) file, which can be very convenient if you already have a list of materials and costs saved in a CSV file. To import this data, select Import and select the desired CSV file. Note that the file must be saved in the .csv format with its data in the following columns:- Column A = Item
- Column B = Subject (optional)
- Column C = Numeric value (optional)
When you've entered all your materials, select OK to close the Add Column dialog.
- Now create a Formula-type Custom Column to calculate the total cost of materials when performing an Area takeoff:
Under the Custom Columns tab in the Manage Columns dialog, select Add. The Add Column dialog opens.
In the Name field, enter a name for the column (for example, "Cost").
From the Type list, select Formula. The fields available under Options automatically update.
Select the Expression field and start typing the first part of the equation. For this calculation, you will be multiplying the standard markup measurement of "Measurement" and your custom "Material" column, but it doesn't matter which one is first, so start with "Measurement". As soon as you start typing, a dropdown menu appears with likely selections.
Double-click the first Variable of your equation (in this example, "Measurement"). It will automatically be added to the Expression field, properly formatted.
Enter a valid operator (in this example, enter "*") after the Variable.
The valid operators are:
- Addition (+)
- Subtraction (-)
- Multiplication (*)
- Division (/)
- Exponential (^)
- Modulus (%)
- Negation (-)
Start typing the second part of your equation. The same dropdown menu appears. Double-click the second Variable of your equation and it will be added to the Expression field as well. The example ends up looking like this:

Notice that in this example, since this is a cost calculation, the Format is set to Currency and a Currency Symbol was picked. This isn't necessary to make the calculation work, so it's up to you whether you do the same.
Select OK. The Add Column dialog closes.
-
Select OK on the Manage Columns dialog. "Material" and "Cost" columns are automatically added to the current PDF. Once a "Material" is selected for a markup, "Cost" is automatically calculated based on the selection.
