Batch crop and page setup
Bluebeam Revu includes a batch cropping tool that allows you to remove unwanted parts of a PDF page.
The Batch Page Setup feature in Revu allows you to resize pages in multiple PDF files. In addition to scaling a drawing up or down, this tool can also be used to add borders to PDFs (for example, for binding purposes).
Both of these features modify the PDF files, therefore we recommended that you make copies of the PDFs before proceeding.
PDFs don't need to be open in Revu when you run the process. If a document is open in Revu, any changes resulting from the process are made to the document, but the document won't be saved or checked in (if relevant); you must save and check in the document manually. If a document isn't open in Revu, and it isn't checked out/locked by another user, Revu applies and saves the document changes automatically (without opening the document).
-
Go to Batch > Crop & Page Setup to open the Batch: Crop & Page Setup dialog.
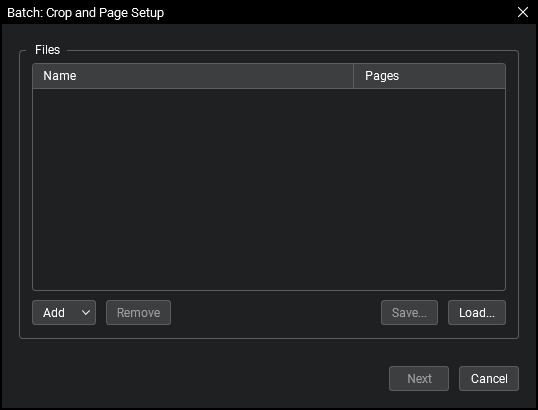
- To use a previously saved batch of PDFs, select Load and select the desired file.
-
Revu automatically adds active PDFs to the process. To add more PDFs, select Add and use one or more of the following methods:
- Files: Adds individual files from a network or local drive. Selecting this option causes the Open dialog to appear. Navigate to the appropriate location and select the desired files.
- Open Files: Adds all files currently open in Revu.
- Open Set: Adds all files contained in the current Set.
- Folder: Adds all files in a selected folder on a network or local drive, but not files contained in any of its subfolders. Selecting this option causes the Select Folder dialog to appear. Navigate to the desired folder and select it.
- Folder and Subfolders: Adds all files in a selected folder on a network or local drive as well as all files within any of its subfolders. Selecting this option causes the Select Folder dialog to appear. Navigate to the desired folder and select it.
- By default, any document in the Files list will be affected. To remove a document from the Files list, select it then select Remove.
-
PDFs are processed in the order they appear in the Files list. Drag and drop files to change the order.
-
To specify which pages of a PDF will be processed, select it, then select the Pages menu and select one of the following options:
- All Pages: Sets the range to all pages.
- Current: Sets the range to the current page only.
- Custom: Sets the range to a custom value. When you select this option, replace any text left in the field with the page or pages to be printed directly. To enter a custom range:
- Use a dash between page numbers to define those two pages and all pages in between.
- Use a comma to define pages that are separated.
For example: 1-3, 5, 9 will include pages 1, 2, 3, 5 and 9.
- Current View: Limits the process to the current zoom.
- Even Pages: Limits the process to only even pages.
- Odd Pages: Limits the process to only odd pages.
- Landscape Pages: Limits the process to only landscape-oriented pages.
- Portrait Pages: Limits the process to only portrait-oriented pages.
- To save this batch for future use, select Save and save the batch to a local or network drive.
-
Select Next to display the Crop and Page Setup dialog box with the Page Setup tab selected.

- To change the paper size, select an option from the Media Size dropdown menu. The paper size setting corresponds with the paper size that the drawing is to be printed on, even if it is not to be printed. If you enable Auto Scale, the drawing will automatically scale up or down to fit the new media size, as appropriate.
Media Size allows you to select Custom Page Size to define a custom size, specify Portrait or Landscape orientation, and set the Widthand Height fields. - Adjust the Scale manually, as desired.
- To adjust the drawing on the page along the X or Y axis, set the Offset X or Y values appropriately.
- To rotate the drawing on the page, set the Rotation. To set the Rotation according to a line on the drawing:
- Select Get Line.
- Drag the desired line on the drawing.
- To reset the Offset, Scale, and Rotation settings, select Clear.
- To center the drawing, select Center.
- To fit the drawing to the media, select one of the alignment options from the Fit to Media dropdown menu.
- Click OK.
PDFs don't need to be open in Revu when you run the process. If a document is open in Revu, any changes resulting from the process are made to the document, but the document won't be saved or checked in (if relevant); you must save and check in the document manually. If a document isn't open in Revu, and it isn't checked out/locked by another user, Revu applies and saves the document changes automatically (without opening the document).
-
Go to Batch > Crop & Page Setup to open the Batch: Crop & Page Setup dialog.
-
Add PDFs to be processed using one (or more) of the following methods:
- Files: Adds individual files from a network or local drive. Selecting this option causes the Open dialog to appear. Navigate to the appropriate location and select the desired files.
- Open Files: Adds all files currently open in Revu.
- Open Set: Adds all files contained in the current Set.
- Folder: Adds all files in a selected folder on a network or local drive, but not files contained in any of its subfolders. Selecting this option causes the Select Folder dialog to appear. Navigate to the desired folder and select it.
- Folder and Subfolders: Adds all files in a selected folder on a network or local drive as well as all files within any of its subfolders. Selecting this option causes the Select Folder dialog to appear. Navigate to the desired folder and select it.
-
Revu processes PDFs in the order they appear in the Files list. Drag and drop files to change the order.
-
To specify which pages of a PDF are used, select one of the following from its Pages menu:
- All Pages: Sets the range to all pages.
- Current: Sets the range to the current page only.
- Custom: Sets the range to a custom value. When you select this option, replace any text left in the field with the page or pages to be printed directly. To enter a custom range:
- Use a dash between page numbers to define those two pages and all pages in between.
- Use a comma to define pages that are separated.
For example: 1-3, 5, 9 will include pages 1, 2, 3, 5 and 9.
- Select OK to open the Crop and Page Setup dialog box.
-
Select the Crop Pages tab.
-(crop-tab)-dialog-box.png)
- Select Crop Box from the Select Box dropdown list.
- Set the Top, Bottom, Left, and Right margins by entering the appropriate values in their respective fields.To adjust all margins equally, select Set Proportional. If values were previously entered for the margins when you selected Set Proportional, all the margins are automatically set to be equal to the largest value.
- Select OK.
After cropping a region of a PDF page, the page automatically shrinks to the size of the cropped region, which results in a smaller page. You can reset the page size if needed. See Page Setup for Multiple PDFs above for more information.