Custom hatch patterns
Hatch patterns can be used to fill enclosed markups (for example, rectangles, ellipses and polygons) and measurements (like area and volume). Revu comes preloaded with several default hatch patterns and a hatch pattern editor allowing users to create their own patterns. Additionally AutoCAD patterns (.pat files) may be imported into Revu. Hatch patterns are collected in sets for easy organization. After a new hatch pattern is created, it will appear in the Hatch lists in the Properties toolbar, Appearance Settings toolbar and the Properties panel.
Hatch pattern sets hold related hatch patterns in order to make them easier to find when choosing a hatch pattern for a markup. Hatch pattern sets can be exported, much like Line styles or Tool Sets, and shared on a network drive or imported by another Revu user.
Hatch patterns are managed with the Manage Hatch Pattern Sets dialog. This procedure creates a blank PDF and a rectangle markup in order to access it, but it's just one of many ways to get to it, including from the Properties toolbar or Properties panel of an existing shape markup, or from the Appearance Settings toolbar.
To create a new hatch pattern set, follow these steps:
- Create a blank PDF.
- Create a rectangle markup anywhere on the PDF.
-
On the Properties toolbar, go to Hatch > Manage.
If the Properties Toolbar is not currently visible, go to Tools > Toolbars > Properties Toolbar to show it.

-
In the Manage Hatch Pattern Sets dialog, select Add.
- In the Add Hatch Pattern Set dialog, select New.
- Enter a name for the hatch pattern set in the Title field. As you enter the name, the hatch pattern's file name is automatically populated in the Location field.
- To change the default save location of this hatch pattern set, select
 and select the desired local or network folder.
 - To save the location of this hatch pattern set relative to your current Profile, select Relative Path. To save the full path instead, clear this box. For more information about choosing between Relative or Full Paths, see Understanding relative vs full paths.
-
Select OK. The Hatch Pattern Editor appears.
- Add hatch patterns to the hatch pattern set, if desired. See Create a new hatch pattern in an existing set below (skip to step 6). Otherwise, select OK.
- Discard the PDF created for this procedure.
Hatch patterns can be used to fill enclosed markups and measurements. Revu comes preloaded with several default hatch patterns, but if desired you can create a variety of custom patterns to suit nearly any need.
Hatch patterns are managed with the Manage Hatch Pattern Sets dialog. This procedure creates a blank PDF and a rectangle markup in order to access it, but it's just one of many ways to get to it, including from the Properties toolbar or Properties panel of an existing shape markup, or from the Appearance Settings toolbar.
To create a new hatch pattern in an existing set, follow these steps:
- Create a blank PDF.
- Create a rectangle markup anywhere on the PDF.
-
On the Properties toolbar, go to Hatch > Manage.
If the Properties Toolbar is not currently visible, go to Tools > Toolbars > Properties Toolbar to show it.
-
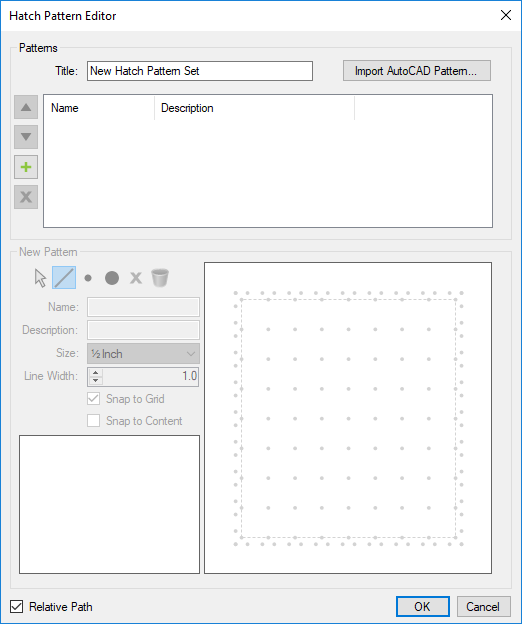
Select the desired hatch pattern set and select Modify. The Hatch Pattern Editor appears.
- In the Add Hatch Pattern dialog, enter a name for this hatch pattern in the Name field and select OK. The Hatch Pattern Editor reappears with the new hatch pattern listed.
- Select the new hatch pattern and edit it using the New Pattern controls, as desired. The grid in the lower-right corner represents one hatch tile in which you can draw the desired pattern using lines and/or dots. As you draw your hatch pattern, the lower-left field will preview it for you. The available controls are:
 Select: Select an existing element of the hatch pattern.
 Line: Draw a line in the hatch pattern tile.
 Small Dot: Place a small dot in the hatch pattern tile.
 Large Dot: Place a large dot in the hatch pattern tile.
 Delete: Delete a selected hatch pattern element.
 Clear: Clear all hatch pattern elements and start again.
- Name: Enter a name for this hatch pattern.
- Description: Enter a brief description of this hatch pattern, if desired.
- Size: Set the size of the grid in the hatch pattern tile.
- Line Width: Set the line width of the hatch pattern.
- Snap to Grid: Force line end points and dots to snap to points on the grid.
- Snap to Content: Force line end points and dots to snap to other elements in the hatch pattern tile.
- Select OK to dismiss each of the dialogs. The new hatch pattern is ready for use.
- Discard the PDF created for this procedure.
Existing custom hatch patterns can be modified to meet current needs. Changing a hatch pattern has no effect on markups that have already been created using it.
Hatch patterns are managed with the Manage Hatch Pattern Sets dialog. This procedure creates a blank PDF and a rectangle markup in order to access it, but it's just one of many ways to get to it, including from the Properties toolbar or Properties panel of an existing shape markup, or from the Appearance Settings toolbar.
To modify an existing hatch pattern, follow these steps:
- Create a blank PDF.
- Create a rectangle markup anywhere on the PDF.
-
On the Properties toolbar, go to Hatch > Manage.
If the Properties Toolbar is not currently visible, go to Tools > Toolbars > Properties Toolbar to show it.
-
Select the hatch pattern set that contains the desired hatch pattern and select Modify. The Hatch Pattern Editor appears.
- Select the desired hatch pattern and make the desired adjustments. See Create a new hatch pattern in an existing set for more information about what each control does.
- Select OK to dismiss each of the dialogs.
- Discard the PDF created for this procedure.
Hatch pattern sets can be imported and exported, much like Line style sets or Tool Sets. Imported hatch pattern sets are copies of existing hatch pattern sets intended for the use of the local user only. If the local user makes any changes to the hatch pattern set, nobody else is affected by the change. To access a shared hatch pattern set (one that is used by multiple users across a network), see Share a hatch pattern.
Hatch patterns are managed with the Manage Hatch Pattern Sets dialog. This procedure creates a blank PDF and a rectangle markup in order to access it, but it's just one of many ways to get to it, including from the Properties toolbar or Properties panel of an existing shape markup, or from the Appearance Settings toolbar.
To import or export a hatch pattern set, follow these steps:
- Create a blank PDF.
- Create a rectangle markup anywhere on the PDF.
-
On the Properties toolbar, go to Hatch > Manage.
If the Properties Toolbar is not currently visible, go to Tools > Toolbars > Properties Toolbar to show it.
-
To import a hatch pattern set, select Import, then select the desired .bhx file and select Open. The selected hatch pattern set is automatically imported.
Double-clicking a .bhx file in Explorer will also automatically import it. - To export a hatch pattern set, select it and select Export, then select a folder into which to save it and select Save.
- Select OK.
- Discard the PDF created for this procedure.
AutoCAD pattern (.pat) files can be imported into existing hatch pattern sets. You can import AutoCAD patterns into the default hatch pattern set or use a custom hatch pattern set.
Hatch patterns are managed with the Manage Hatch Pattern Sets dialog. This procedure creates a blank PDF and a rectangle markup in order to access it, but it's just one of many ways to get to it, including from the Properties toolbar or Properties panel of an existing shape markup, or from the Appearance Settings toolbar.
To import an AutoCAD pattern into a hatch pattern set, follow these steps:
- Create a blank PDF.
- Create a rectangle markup anywhere on the PDF.
-
On the Properties toolbar, go to Hatch > Manage.
If the Properties Toolbar is not currently visible, go to Tools > Toolbars > Properties Toolbar to show it.
-
Select the hatch pattern set into which you wish to import the AutoCAD pattern and select Modify. The Hatch Pattern Editor appears.
- Select Import AutoCAD Pattern.
- IN the Open dialog, select the desired AutoCAD pattern (.pat) file and select Open. The pattern is imported.
- Select OK to dismiss each of the dialogs.
- Discard the PDF created for this procedure.
Shared hatch pattern sets are used my multiple Revu users collaboratively. The hatch pattern set remains in its original location and can be accessed by several users at once. If the hatch pattern set is changed (for example, if new hatch patterns are added or existing hatch patterns are modified), each user is affected by those changes. Users attempting to modify shared hatch pattern sets are subject to normal folder permissions on the shared file.
Hatch patterns are managed with the Manage Hatch Pattern Sets dialog. This procedure creates a blank PDF and a rectangle markup in order to access it, but it's just one of many ways to get to it, including from the Properties toolbar or Properties panel of an existing shape markup, or from the Appearance Settings toolbar.
To add a shared hatch pattern set, follow these steps:
- Create a blank PDF.
- Create a rectangle markup anywhere on the PDF.
-
On the Properties toolbar, go to Hatch > Manage.
If the Properties Toolbar is not currently visible, go to Tools > Toolbars > Properties Toolbar to show it.
-
Select Add.
- In the Add Hatch Pattern Set dialog, select Existing.
- If you know the path to the shared hatch pattern set, enter it in the Location field. Otherwise, select to navigate to it.
- To save the location of the shared hatch pattern set relative to your current Profile, select Relative Path. To save the full path instead, clear this box. For more information about choosing between Relative or Full Paths, see Understanding relative vs full paths.
- Select OK to dismiss each of the dialog boxes.
- Discard the PDF created for this procedure.