Starting a Studio Session workflow
When starting a Studio Session, you can upload Session documents, establish universal permissions, and invite attendees. In some cases, this will be sufficient for the Session and there will be no need to go any farther. Common actions taken after a Session has been created include setting up individual and group permissions, inviting new attendees, and uploading additional documents.
If you don't already have an account on a Studio Server (either one your organization is running or one of Bluebeam's open, cloud-based servers), you need to establish one first. If you've ever signed into a Studio Project or Sessionbefore, you already have one of these (see Studio FAQs for information about resetting your password, if needed). For more information about creating a Studio account, see Manage Studio accounts for more information.
These procedures cover starting a new Studio Session from scratch. If you want to start a Session using documents from a Studio Project, see Adding Project Files to a Studio Session.
When you start a Studio Session you'll configure the Session permissions and will be given the opportunity to add documents and invite users as well. Permissions can be changed, documents can be added, and users can be invited after the Session has been created as well.
You need a validated Studio account to create a Studio Session. If you have not established one yet, do that first.
- From the Studio panel, go to
 Add >
Add >  New Session. If you have not already created an account, the Create Studio Account dialog box appears. Create a Studio Account before proceeding.
 - In the Start Studio Session dialog, enter a name for this Session in the Session Name field. The name does not have to be unique.
-
Select Add to select PDFs to include in the Session, or select Add Open Files to add the files that are currently open in Revu. Files can be added later, as well. See Manage a Session below for more information.
Adding a PDF with a Legend to a Session will cause the Legend to appear as a Snapshot for as long as it is in the Session. Once the PDF is taken out of the Session, the Legend will resume normal functionality and will automatically update to represent changes made to the PDF while it was in the Session. - Select the desired options from the Permission list. These will apply universal permissions to all attendees. Select Save, Print, Markup, Markup Alert, or Add Documents to allow attendees those permissions by default or clear them to remove those permissions from attendees by default.
Universal permissions are automatically applied to all attendees who are not subject to individual or group permissions, which can be set up after the Session has been created. See Defining Access and Permissions in Studio Sessions for more information about permissions in Studio Sessions.
- To restrict access to the Session by email address, select Restrict Attendees by Email Address. You will have the opportunity to add allowed attendees on the next screen, or you can do it after the Session has been created (see Manage a Session below for more information). To allow any user with the Session ID to join the Session, clear this option.
- To set an expiration date for the Session, select Session Expires and enter the desired expiration date and time. Expiration dates must be in the future; Revu will not allow a back-dated expiration date.
-
Select OK to save the settings and upload the files. The Invite Users dialog appears.
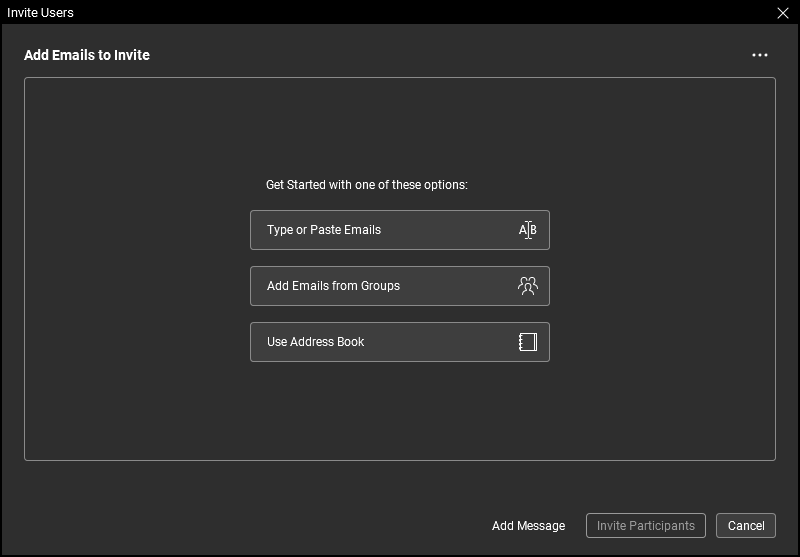
Inviting somebody to a Session automatically adds them as an Allowed Attendee in the Session Settings (see Set attendee access in a Studio Session for more information about attendee access). In addition, the invitee is also sent an email containing information about the Session, as well as a link allowing them to automatically connect to the Session. If you do not wish to do this, select Cancel; the Session will be created without invitees. You can send invitations later (see Invite attendees to the Session) or add attendees without sending invitations (see Set attendee access in a Studio Session).
- There are a few ways to add emails to the invite:
- Type or Paste Emails: Select this option to directly enter emails or copy and paste a list from another source. Lists can be separated by commas, semicolons, spaces, have names in brackets in between them, and be a mixture of different formatting styles; Revu will analyze the list and extract recognizable email addresses.
- Add Emails from Groups: Select this option to add emails from existing Studio Groups. Entire Groups can be selected, adding all the users within that Group, or users can be selected individually from one or more Groups.
- Use Address Book: Select this option to add emails from your email application's address book. The email application must be MAPI compliant for Revu to access its address book. The address books from web-based email like Gmail and Yahoo cannot be accessed.
-
After adding email addresses from a source, the Invite Users dialog displays a list of proposed invitees sorted alphabetically and by domain.

Review this list for accuracy and completion. Email addresses can be removed and others added:
- To remove an email address, select it and select Remove. To remove all the email addresses under a certain domain, select the associated
 Remove Domain icon. You will be asked for confirmation when removing a domain.
 - To add more email addresses, select one of the options from the Add Emails menu. Each of the methods described above is available.
- To remove an email address, select it and select Remove. To remove all the email addresses under a certain domain, select the associated
- When you're satisfied with the invite list, select Invite Participants. Emails are sent to each address in your invite list from the Studio server.
-
When in a Session, select
 Session Settings.
 -
From the Session Settings dialig, select the Permissions tab.
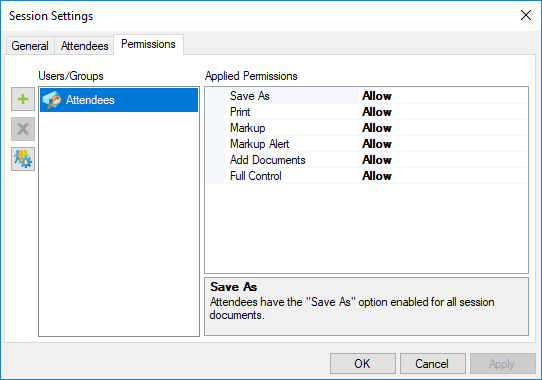
The default group, Attendees, will be shown, as well as any other users or Groups that have been previously added. The Attendees group applies to all users in the Session, and its initial permission settings are configured when the Session is created. It cannot be deleted. Most permissions for the Attendees group are set to Deny when the Session is created; a recommended best practice is to give additional permissions to specific users and Groups rather than allow greater access to the Attendees group.
- To add individual users or Groups:
- Select
 .
. In the Add Users/Groups dialog, select the desired user or group and select OK. Only the owner's Groups are shown as they are the only ones that can be used in the Session. By default, when users and Groups are added, they inherit the permissions of the Attendees group.
If you are the Session owner and would like to create a new Group for this Session or change the membership of one currently being used, select
 Manage Groups. See Studio Groups for more information about creating and managing groups. Users with Full Control permissions can also use Manage Groups to manage their own groups, but they will not be able to use those groups in this Session nor will they be able to alter any of the owner's Groups.
When creating Groups, keep in mind that Revu will allow somebody to be in multiple Groups within the same Session or Project; when this occurs, that person's permissions will default to whichever is the most restrictive. As such, adding somebody who is already in a Group to a second Group might not have the desired effect, either by not granting expected permissions (because the first Group's are more restrictive) or by imposing undesired restrictions (because the second Group's are more restrictive).
- Select
- To change the permissions for a user or Group:
- Select the desired user or Group in the Users/Groups list.
- Select the desired permission in the Applied Permissions list.
- Select a permission setting from the dropdown list.
- When defining permissions for the Attendees group, the options are Deny or Allow.
- When defining permission for all other users and Groups, then options are blank, Deny or Allow. Selecting blank will cause the user or Group to inherit the permission defined for the Attendees group.
- The Full Control permission is powerful and setting it to Allow gives the user or Group of users administrator powers. The effects of this are:
- All permissions for administrators are set to Allow.
- Administrators can rename the Session.
- Administrators can delete the Session.
- Administrators can manage attendee Access.
- Administrators can manage Permissions for other users.
- Administrators have full permissions to any folder, regardless of the folder's default permissions.
There are some limits on what administrators can do, however:
- Administrators cannot block the Host.
- Administrators do not have access to the Host's (or any other administrator's) Groups.
- To remove a user or Group, select them and select
 .
. - Select OK.
When setting permissions, there are two sets of hierarchies to keep in mind: Permission Sets and Permission States.
- A Permission Set describes how a user came to have their permissions: Were they assigned to the user specifically (Individual permissions)? Did the user pick them up by virtue of belonging to a certain Group (Group permissions)? Or did the user default to the general permissions because neither of the previous two conditions were met (General permissions)?
- A Permission State describes whether the user is permitted to perform a certain task (Allow) or not (Deny). For individual users and Groups, permission states can either be specifically selected (Explicit) or they can be left blank, causing them to default to whatever the corresponding permission state is for the Everyone group (Inherited).
Permission States work within Permission Sets and generally come into play only to resolve conflicts that arise when a user is a member of two or more Groups that have conflicting permissions (see examples 4 and 5 below for further illustration). It is generally recommended that people not be added to multiple Groups, but in the event that it is necessary, Hosts and administrators should coordinate to ensure that the proper permissions are granted.
Hierarchies
The hierarchies are:
Permission Sets
- Individual permissions (that is, those set up for a specific user) have primary importance.
- Group permissions (that is, those set up for a Group you have created) have secondary importance.
- General permissions (that is, those set up for the default Everyone group) have the least importance.
Permission States
- Explicit Deny (that is, a permission that is specifically set to Deny) has primary importance.
- Explicit Allow (that is, a permission that is specifically set to Allow) has secondary importance.
- Inherited State (that is, any permission—whether it is Deny or Allow—that is inherited from the default Everyone group) has the least importance.
Examples
With these hierarchies in mind, here are a couple examples that illustrate how a user's actual permissions are determined:
- User Alice has individual permissions set up and the Send Invitations permission is set to Deny. User Alice also belongs to Group A and the permissions for Send Invitations for Group A is set to Allow. Alice will not be able to send invitations to the Project.
- Her individual permissions overrule the Group A permissions.
- User Bob has individual permissions set up and the Send Invitations permission is set to Allow. User Bob also belongs to Group A and the permissions for Send Invitations for Group A is set to Deny. Bob will be able to send invitations to the Project.
- His individual permissions overrule the Group A permissions.
- User Charlie has individual permissions set up and the Send Invitations permission is set to Allow. User Charlie also belongs to Group A and the permissions for Send Invitations for Group A is set to <blank>. The Send Invitations permission for the Everyone group is set to Deny. Charlie will be able to send invitations to the Project.
- His individual permissions overrule the Group A permissions.
- User Alice does not have individual permissions set up, but she is part of Group A that has the Send Invitations permission set to Allow and she is also part of Group B that has the Send Invitations permission set to Deny. Alice will not be able to send invitations to the Project.
- The explicit Deny permission from Group B overrules the explicit Allow permission from Group A.
- User Bob does not have individual permissions set up, but he is part of Group A that has the Send Invitations permission set to Allow and he is part of Group B that has the Send Invitations permission set to <blank>. The Send Invitations permission for the Everyone group is set to Deny. Bob will be able to send invitations to the Project.
- The explicit Allow permission from Group A overrules the inherited Deny permission from Group B.
-
Select
 Invite at the
top of the Attendees section of the Studio panel. The Invite Users dialog appears.
Invite at the
top of the Attendees section of the Studio panel. The Invite Users dialog appears.
- There are a few ways to add emails to the invite:
- Type or Paste Emails: Select this option to directly enter emails or copy and paste a list from another source. Lists can be separated by commas, semicolons, spaces, have names in brackets in between them, and be a mixture of different formatting styles; Revu will analyze the list and extract recognizable email addresses.
- Add Emails from Groups: Select this option to add emails from existing Studio Groups. Entire Groups can be selected, adding all the users within that Group, or users can be selected individually from one or more Groups.
- Use Address Book: Select this option to add emails from your email application's address book. The email application must be MAPI compliant for Revu to access its address book. The address books from web-based email like Gmail and Yahoo cannot be accessed.
-
After adding email addresses from a source, the Invite Users dialog displays a list of proposed invitees sorted alphabetically and by domain.
Review this list for accuracy and completion. Email addresses can be removed and others added:
- To remove an email address, select it and select Remove. To remove all the email addresses under a certain domain, select the associated Remove Domain icon. You will be asked for confirmation when removing a domain.
- To add more email addresses, select one of the options from the Add Emails menu. Each of the methods described above is available.
- To remove an email address, select it and select Remove. To remove all the email addresses under a certain domain, select the associated
- When you're satisfied with the invite list, select Invite Participants. Emails are sent to each address in your invite list from the Studio server.
- Join the Session.
- Select
 Add File in the Documents section of the Studio panel.
If the desired PDF is already open in Revu, you can also right-click it and select Add to open Studio Session to add it directly.
-
Navigate to and select the desired file or files and select Open.
In order to upload or download a file in Studio, the system clock of the local machine must be set up correctly so that it is in sync (within 15 minutes) with UTC; otherwise, any attempt to upload or download a file in Studio will result in an error. Update the system clock of the local machine so that it is correct for the time zone specified in its Date and Time settings and try the upload or download again.