Work with Profiles
Profiles provide an easy way to store the toolbar, menus, and other display settings within Revu. Profiles can also be used to shape the User Interface of Revu for particular job functions within an organization. For example, a simplified interface for users who view but do not need to edit PDFs can be created by turning off most of the toolbars and tabs within Revu and maximizing viewing space. A profile like that could be easily tweaked by turning back on some basic markup toolbars and tabs, without the more advanced editing functions, to create a profile for users who need some basic markup capabilities.
Revu comes preloaded with several Profiles that are geared toward specific jobs and functions, including:
Revu: For users who prefer a basic, streamlined interface. Appropriate for most users.
Revu Advanced: For users who would benefit from a more robust interface. Users upgrading from Revu 2017 or earlier might find this layout more familiar.
Quantity Takeoff: For estimators and specifiers who need to view plans and specs, conduct quantity takeoffs or add markups to their PDF files.
Field Issues: For users completing a punch process.
Go to Revu >  Profiles to see a list of available Profiles. The Profile that is currently active will be checked. To change Profiles, select another one from the menu. Once selected, the Revu interface will update based on the settings defined in the new Profile.
There are several functions available from the Manage Profiles dialog, including renaming existing profiles, adding new profiles, importing and exporting profiles, and deleting profiles.
To open the Manage Profiles dialog, go to Revu> Profiles > Manage Profiles.
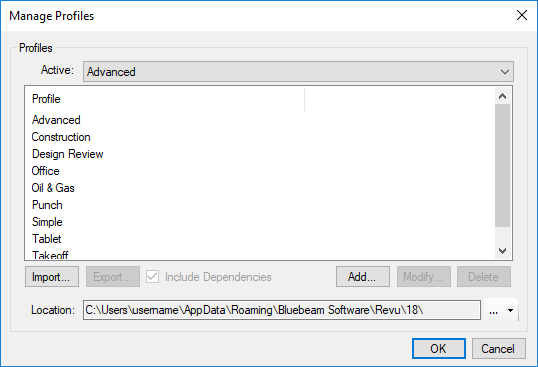
Active: Switch between active profiles by selecting from this dropdown list.
Import: Select to import an existing profile saved on a local or network drive. See Importing and Exporting Profiles for more information about importing Profiles.
Export: Select to export a selected profile. This option is only available when a profile is selected from the Profile list. See Import and export Profiles for more information about exporting Profiles
Include Dependencies: Embeds tool sets, bookmark Structures (Complete only), hatch patterns, and line style sets in the exported Profile.
Add: Select to name the current configuration and add it as a profile. See Create custom Profiles for more details.
Modify: Select to rename a selected profile. This option is only available when a profile is selected from the Profile list.
Delete: Select to delete a selected profile. This option is only available when a profile is selected from the Profile list.
Location: Define the location of shared, centralized profiles. Select ![]() to the right of the field to browse to the centralized location. Any new or modified profiles stored in this location will be immediately available. They cannot, however, be permanently modified by individual users; any changes a user makes to a shared profile only affect that user and are lost when Revu is closed.
to the right of the field to browse to the centralized location. Any new or modified profiles stored in this location will be immediately available. They cannot, however, be permanently modified by individual users; any changes a user makes to a shared profile only affect that user and are lost when Revu is closed.
When going offline, you can continue to use the shared profile that was active when you went offline. You would not receive updates to the profile until you went back online, however. Similarly, other shared profiles would be available to an offline user, but might have reduced functionality (notably, some tool sets might be unavailable).
In addition to the default Profiles that come with Revu, you can create Profiles that are tailored specifically to your needs.
To create a custom Profile, follow these steps:
- Configure the Revu interface as desired, arranging toolbars, tabs, panels, etc. This configuration will be the custom Profile.
-
Go to Revu>
Profiles > Manage Profiles.
- Select Add.
- Enter the name of the custom Profile in the Name field and select OK. The Add Profile dialog closes and the new Profile is added to the Profiles list and selected as the active Profile.
- Select OK to close the Manage Profiles dialog.
To save changes to a Profile:
- Go to Revu > Profiles and select the desired profile.
- Make any desired changes to the Revu interface.
- Go to Revu > Profiles >
 Save Profile. The old profile interface is replaced with the current configuration.
Changes to a Profile are also saved automatically when Revu is closed.