Ellipse Sketch tool
Like the Ellipse tool, the Ellipse Sketch tool places an elliptical markup on the document; however, you input the height and width measurements, as well as the rotation, directly for exact control over the shape. Once placed, Ellipse Sketch tool markups behave much like Ellipse markups.
Before placing any Sketch markup on a drawing, make sure that it is calibrated to the correct scale.
The information input to create an ellipse using the Ellipse Sketch tool depends on the Default Ellipse Mode setting selected in the Sketch Tools Preferences. The procedure below assumes the following:
-
The Sketch tool preference setting is Normal; when the preference is set to Radius, you can enter only the radius to create a circle.
-
You're creating the ellipse by entering values in the measurements dialog, rather than by dragging the cursor.
-
Go to Tools > Sketch to Scale >
 Ellipse Sketch to Scale. The mouse cursor in the main workspace changes to the Ellipse Sketch tool cursor and displays the measurements dialog.
 The Ellipse Sketch tool cursor has two modes: Circle (which has only one input for radius) and Ellipse. Press CTRL on the keyboard to switch between them. The default mode can be set in the Sketch Preferences.
 - In the PDF, click where you want to place the first point. The text cursor is automatically placed in the Width field.
- Enter the width of the ellipse and press the Tab key on your keyboard.
- Enter the length of the ellipse and press the Tab key on your keyboard.
- Enter the rotation of the ellipse and press the Enter key on your keyboard.
Attach a note to nearly any markup that does not have a text box of its own by double-clicking the markup to open the Note pop-up window. Notes attached to markups are functionally similar to the Note Tool.
You can add an action to almost any markup. Right-click the markup and select Edit Action.
Select a markup to reveal its control handles. Each handle controls a different aspect of size and orientation.
Rotate the markup: Drag the orange handle outside the markup (default: 15° increments; hold Shift for 1° increments)
Resize a segment or change its angle: Drag the appropriate yellow handle.
- Hold Ctrl while dragging a yellow control handle to curve the lines attached to it. See Working with Curved Markups for more information.
Scale the markup up or down: Drag the appropriate purple handle.
See Editing Markups for more information.
You can change the appearance of the Ellipse Sketch tool markup, including its line and fill color, hatch pattern, line width and style, and opacity.
To change the appearance of an Ellipse Sketch tool markup, select the markup and select the Properties panel. Go to Window > Panels > Properties to show the Properties panel if it is hidden. Several properties will also be available on the Properties toolbar when the markup is selected.
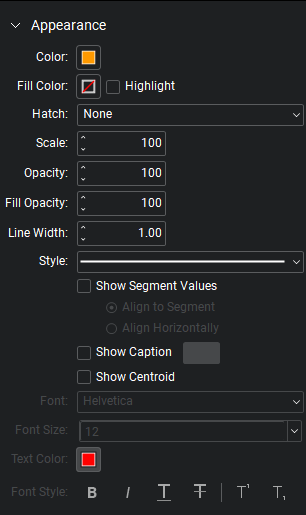
Color: Sets the line color.
Fill Color: Sets a fill color.
Highlight: Makes the fill color and/or hatch pattern transparent so underlying content shows through.
Hatch: Sets a hatch pattern. The associated color selector sets the line color of the hatch pattern.
Scale: Sets the scale of the hatch pattern, from 50 (half the default scale) to 200 (twice the default scale).
Opacity: Sets opacity level of the line and endpoints, from 0 (invisible) to 100 (opaque).
Fill Opacity: Sets the fill and hatch pattern opacity, from 0 (invisible) to 100 (opaque).
Line Width: Sets the line thickness in points. A setting of 0 effectively renders the line invisible.
Style: Determines the line pattern. In addition, there are several advanced line styles and you can create Custom Line Styles.
Show Segment Values: Shows all measurements available for the markup. When enabled, select an alignment for the measurements, either equal to the angle of the segments or horizontally.
Show Caption: Toggles the markup to show or hide the markup caption (as seen in the Preview Window).
Show Centroid: Marks the geometric center of the markup.
Font: Sets the font used for the selected text. Available fonts are divided into three regions:
- The first region shows all fonts used in the currently selected text element.
- The second region lists the standard PDF fonts that are supported by all PDF viewers. These fonts don't need to be embedded in the PDF when used, thereby cutting down on file size.
- The third region shows all other available fonts. When used, these fonts need to be embedded in the PDF.
Font settings are retained in the PDF and will substitute as needed if the original font is unavailable.
Font Size: Sets the font size for text. You can choose a size from 2 to 72 points in the list, or enter any value from 1 to 144 points manually. You can also use decimal values with one digit after the decimal point.
Text Color: Sets the color of text.
The Font Style settings control the formatting of the text. Options include Bold, Italic, Underline, Strikethrough, Superscript and Subscript. Generally, any combination of these styles can be applied to format the text.