Curved markups
There are many tools in Revu that support curves, including Polygon, Polyline, Cloud markups as well as Area and Perimeter measurements. These markups can be created using straight or curved lines, but even when straight lines are used each acute or obtuse angle creates control points that can be curved. In addition, control points can be added anywhere along any line and also used to create curves.
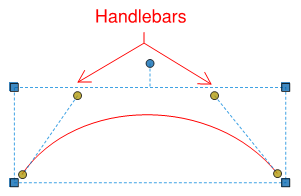
Each control point that defines the markup can be turned into a Bézier curve. A single Bézier curve is defined by a start point, an end point, and two control points. These control points are shown as handlebars in Revu.
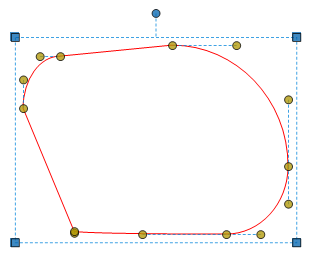
Curved segments can be chained together in order to create more complicated shapes. There are many different ways that the segments can be joined.

If the handlebars on either side of a point are parallel, then the curves will be connected smoothly. If the handlebars are not parallel, the curves will come to a point. A handlebar doesn't have to exist on both sides of a point; in such cases the curve is connected to a straight line segment. Connected line segments have no handlebars.

There are two ways to create curved markups: drawing the markups with curves or adding curves to a straight-line markup. Each method is demonstrated below.
In Revu, shapes are normally drawn by selecting points that define the shape. When the shape is being created with straight lines, each selection defines a corner. Revu can be configured to draw the shape with curves so that, after selecting each "corner," you drag to define the curve before selecting the next point. The following example demonstrates how to create a curved shape using the Polygon tool.
- Go to Revu >
 Preferences.
 -
On the Tools > Markup page, select Drag Curves from the Drag Behavior for Shapes dropdown menu.
- Select OK.
- Go to Tools > Markup >
 Polygon.
 - Select and hold to add the first point.
-
While holding, drag the mouse to define the handlebar.

- Release the mouse and select again to define the first curved line segment.
- Select again to add another curved line.
-
Continue until the shape is complete.

- To complete the shape, press ENTER, double-click, or select the origin point.
- After the shape is completed, select individual points and adjust to get the desired shape.
A polygon that has been drawn with straight lines can be converted to have curves afterward. Polygonal cutouts behave slightly differently, see Cutout Tool: Working with the Control Points and Curves for more information.
- Go to Tools > Markup > Polygon.
-
Draw the desired shape.

-
Right-click anywhere on a line segment and select Convert to Arc.

The selected line segment is converted to a curve.
 To convert only part of a line segment, add a control point to split the line segment as desired. Curves are created between two control points, so adding control points allows you to convert exact lengths.
 -
Drag any of the revealed handlebars to adjust the curve.
-
Convert each desired point to a curve in the same way. Not all control points need to be curved; straight and curved segments can be mixed to create the desired shape.
To modify curves, select the markup, then drag the handlebars to change the shape of the curve. Moving the point itself around will move the point and the handlebars in tandem. If the handlebars on either side of a point are parallel, they will still be parallel when any one of them are moved.
In addition to moving the points and handlebars, Revu also supports adding, subtracting, and changing the type of control points. This can be done through the Control Point Toolbar, through the context menu, or with the keyboard.
Locate the Control Point toolbar on your interface. If the toolbar is currently hidden, go to Tools > Toolbars and select it to show it. See Control Point toolbar for more information about this toolbar.
To access the Control Point context menu, right-click a control point and go to Control Point.

SHIFT: Holding down the SHIFT key accomplishes different tasks depending on what is clicked:
- While selecting a control point, it causes the point to be removed.
- While selecting a position on a line without a control point, it causes one to be added.
- While moving handlebars, it causes them to snap in 45° increments.
CTRL: Holding down the CTRL key accomplishes different tasks depending on what is clicked:
- While selecting a control point, it causes the point to be converted (straight to curve or curve to straight).
- While selecting a handlebar, it allows the handlebars to be moved independently, allowing for the creation of curved segments that come to a point.
- While dragging a control point, it causes the line segments to be connected smoothly.