Takeoffs and measurements
There are several ways to access measurement tools in Revu, including the Measurements Panel, Measure Toolbar, and the Tools menu.The Measure tool is another good way to take multiple related measurements from a PDF file. Measurements can persist as markups, allowing for processing and summarization through the Markups list, which is also useful for estimation and takeoffs, or be temporary. This article assumes that you are using the Tools menu to access measurement tools, but using any of the other methods will work the same.
Before taking a measurement, calibrate the drawing to a known value. This ensures measurements will be accurate even if scaling occurred at the time of PDF creation.
Length measurements, which calculate a single, linear measurement, are among the most common. For a multi-segment line, like an open perimeter, see Measure a open perimeter below.
To take a length measurement, follow these steps:
-
Go to Tools > Measure >
 Length or press SHIFT+ALT+L. The Length measurement mode is engaged.
 - Enter a description of the measurement in the Subject field on the Measurements panel. This description will appear on the Markups list.
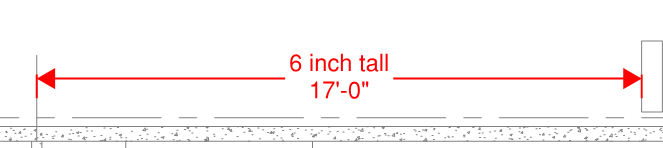
- To add text that will appear on the markup, enter it in the Label field of the Measurements panel. In the example below, the text "6 inch tall" was entered.
- Select the end points of the desired length.
Tips:
- When you've set the page scale, a preview of key measurement values appears in the lower-right corner as you place measurements to ensure precision. Hide or recall it as needed by selecting the X or the measure icon.
- Hold Shift to draw lines at horizontal, vertical, or 45° angles.
- Length arrows will automatically appear inside
 extension lines when there is enough room. If not, arrows will move outside the lines
 .
.
Revu typically takes standard measurements in straight lines, but you can add arcs to those lines in order to measure curved areas easily. You can also configure Revu to draw using curves automatically in the Markup preferences. The example below outlines the basic procedure using an Area measurement. Refer to the Work with curved markups section for more detail.
To take a curved measurement, follow these steps:
-
Go to Tools > Measure >
 Area or press SHIFT+ALT+A. The Area measurement mode is engaged.
 - Enter a description of the measurement in the Subject field on the Measurements panel. This description will appear on the Markups list.
- To add text that will appear on the markup, enter it in the Label field of the Measurements panel.
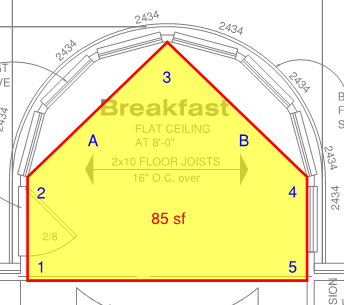
Select to define several points around the area. In the following example, five points have been used, numbered 1-5.
- Right-click on the line near point A and select Convert to Arc.
Right-click on the line near point B and select Convert to Arc.
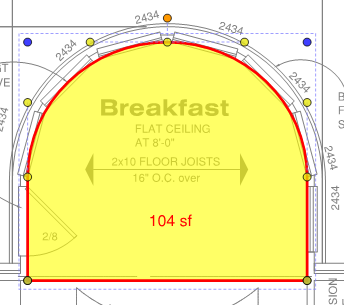
- Drag the yellow control points to adjust the arc as necessary.
The measurement is updated as you edit the markup shape.
Tips:
- Hold Shift to draw lines at horizontal, vertical, or 45° angles.
- Drag to place a rectangular shape. Holding Shift while doing so will force the rectangle into a square.
Perimeter measurements are often used to calculate the total length of all sides of a given shape. Though they can appear similar to an Area Measurement, they are not closed shapes, and thus they can be used to calculate the length of a multi-segment line, such as when estimating cable or wiring runs.
To measure an open perimeter, follow these steps:
-
Go to Tools > Measure >
 Perimeter or press SHIFT+ALT+P. The Perimeter measurement mode is engaged.
 - In the Measurement Properties section of the Measurements panel, the Depth field becomes active. This allows for additional calculations, such as Wall Area, on the Markups list, if desired. Enter the desired value and select the units of measure from the associated menu.
- Enter a description of the measurement in the Subject field on the Measurements panel. This description will appear on the Markups list.
- To add text that will appear on the markup, enter it in the Label field of the Measurements panel.
- Select each point of the desired shape. To remove the last control point, press BACKSPACE.
- Press ENTER after placing the last point.
Tips:
- Hold Shift to draw lines at horizontal, vertical, or 45° angles.
- Drag to place a rectangular shape. Holding Shift while doing so will force the rectangle into a square.
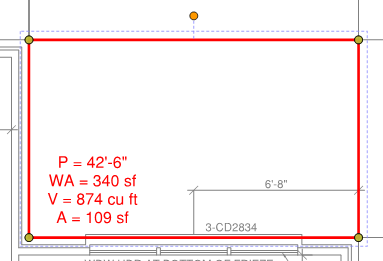
Several measurement markups have the ability to show more measurements than they do by default, including Area, Perimeter, and Volume measurements. This can enable a single measurement to serve multiple estimation functions for the same area of a drawing.
- Perimeter measurements can show Perimeter and Wall Area when the Depth is defined.
- Area measurements can show Area and Perimeter as well as Wall Area and Volume when the Depth is defined.
- Volume measurements can show Volume, Area, Perimeter, and Wall Area.
To show all measurements, follow these steps:
- Right-click the desired markup and select Properties. The Properties panel for the markup appears.
- Enable Show All Measurements on the Properties panel.
Depending on what type of measurement you selected, the following measurements appear:
- P = Perimeter
- A = Area
- WA = Wall Area
- V = Volume
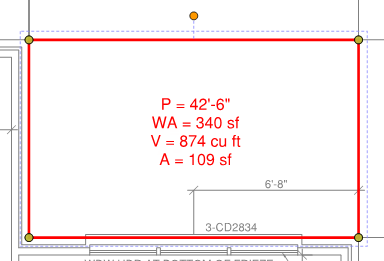
When an Area or Volume measurement is taken, the values are shown in the center of the measurement. With Perimeter measurements, the values are shown along the last line segment placed. To reposition these values, hold the SHIFT key while you drag to the desired location. Here, the measurements of an Area have been repositioned to the lower corner of the markup.
Revu tracks measurement totals in a few places, most notably in the Markups List and the Dynamic Properties toolbar.
The Markups List will show a running measurement total of all measurements of the same type within a document. This total is shown at the top of the Measurement column.

This total is readily available to users that have the Markups List panel open and automatically updates as new measurements are added. It always calculates the totals of all measurements of the same type on the document; it is not used to get measurement totals for only some measurements nor for measurements of different types. For that, use the Dynamic Properties Toolbar as described below.
The Dynamic Properties Toolbar shows different information depending on what is currently active in Revu. In the case of measurements, this includes a Totals subpanel.

This subpanel can be detached from the toolbar by selecting Detach while it's shown, which will cause it to float in the main workspace. While detached, you can move it to a convenient location and later reattach it by selecting Reattach.
This subpanel is different than the real-time measurement window that automatically appears when placing a measurement. That window shows real-time values for only the measurement being placed, whereas the Totals subpanel will show measurement totals for any measurements currently selected in the document, including those of different types, though this should be done judiciously to avoid confusing totals.
You can define separate units of measurements for length, area, and volume, as well as set custom units of measurement as the default. To learn more, see Use different units of measurement within a drawing.