Polygon tool
The Polygon tool creates a shape with any number of sides as a markup. Unlike a polyline markup, polygons are closed shapes and, thus, can be filled. Polygons can also utilize curves and arcs.
- Select the Polygon tool using one of the following methods:
- Go to Tools > Markup >
 Polygon.
 - Select on the Shapes toolbar.
- Press SHIFT+P on the keyboard.
- Go to Tools > Markup >
- Select each point of the desired shape. To remove the last point placed, press BACKSPACE.
-
To close the polygon, do one of the following:
- Select the first point again to close the shape.
- Press Enter twice or press C on the keyboard to automatically close the shape by connecting the last point placed to the first point placed.
- Double-click when placing the last point to automatically close the shape by connecting the last point placed to the first point placed.
Tips:
- Hold Shift to draw lines at horizontal, vertical, or 45° angles.
- Drag to place a rectangular shape. Holding Shift while doing so will force the rectangle into a square.
To remove markups from your PDF, do one of the following:
- Select the markup on the PDF or from the Markups list.
- Press Delete on your keyboard, or right-click and select
 Delete.
Control points define where line segments meet in a multi-segment markup. Add or remove control points to adjust the shape. See Working with Control Points for more information.
Convert line segments to curves or arcs at control points to match complex shapes. See Working with Curved Markups for more information.
Attach a note to nearly any markup that does not have a text box of its own by double-clicking the markup to open the Note pop-up window. Notes attached to markups are functionally similar to the Note Tool.
You can add an action to almost any markup. Right-click the markup and select Edit Action.
Markups may display indicator icons below and to the right of the markup (or grouped markups). These include:
 Action: Shows that an action is defined for this markup. Select to trigger the action.
 Capture: Shows that the markup has embedded media (typically an image or video). Select this icon to open a preview window.
 Reply: Shows one or more replies exist in the Markups list. Hover to preview replies or select to jump to the markup's entry. Turn off the ability to see reply indicators in the View menu.
Select a markup to reveal its control handles. Each handle controls a different aspect of size and orientation.
Rotate the markup: Drag the orange handle outside the markup (default: 15° increments; hold Shift for 1° increments)
Resize a segment or change its angle: Drag the appropriate yellow handle.
- Hold Ctrl while dragging a yellow control handle to curve the lines attached to it. See Working with Curved Markups for more information.
Scale the markup up or down: Drag the appropriate purple handle.
See Editing Markups for more information.
The appearance of the Polygon markup is configurable, including line and fill color, hatch pattern, line width and style, and opacity.
To change the appearance of a Polygon markup, select the markup and select the Properties panel. Go to Window > Panels > Properties to show the Properties panel if it is hidden. Several properties will also be available on the Properties toolbar when the markup is selected.
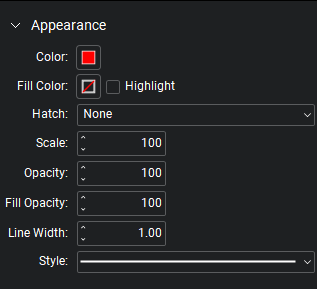
Color: Sets the line color.
Fill Color: Sets a fill color.
Highlight: Makes the fill color and/or hatch pattern transparent so underlying content shows through.
Hatch: Sets a hatch pattern. The associated color selector sets the line color of the hatch pattern.
Scale: Sets the scale of the hatch pattern, from 50 (half the default scale) to 200 (twice the default scale).
Opacity: Sets opacity level of the line and endpoints, from 0 (invisible) to 100 (opaque).
Fill Opacity: Sets the fill and hatch pattern opacity, from 0 (invisible) to 100 (opaque).
Line Width: Sets the line thickness in points. A setting of 0 effectively renders the line invisible.
Style: Determines the line pattern.