Use Smart Review to find discrepancies in drawing sets
Applies to:
- Revu 21
Smart Review performs advanced AI analysis that detects incomplete designs, scope gaps, and discrepancies within a drawing set. Document health checks provide actionable insights for accurate bidding and improved project efficiency.
The following checks help teams catch problems early and avoid financial risks, delays, and disputes:
-
Document health checks
-
Sheet is blank
-
Sheet missing from set
-
Sheet missing from index
-
Sheet number not unique
-
Referenced sheet is missing
-
-
Gridline coordination
-
Tag not consistent
This check identifies inconsistent distances between structural and architectural gridlines across sheets in the drawing set.
-
-
Architectural
-
Door tag not in schedule
-
Door tag not in plans
-
Door tag not unique in view
-
Door tag not unique in schedule
-
Missing door schedule
-
For additional information about Smart Review, see our frequently asked questions.
Before you begin
Make sure your files are optimized for this feature by following these best practices.
Start a Smart Review analysis
To start using Smart Review, follow these steps:
- In Revu, select Batch > Smart Review.
- Enter a name for your Smart Review analysis.
- Under Files, select Add to upload your drawing set using one of the following options:
- Files: Adds individual files from a network or local drive. Selecting this option causes the Open dialog to appear. Navigate to the appropriate location and select the desired files.
- Open Files: Adds all files currently open in Revu.
- Open Set: Adds all files contained in the current Set.
- Folder: Adds all files in a selected folder on a network or local drive, but not files contained in any of its subfolders. Selecting this option causes the Select Folder dialog to appear. Navigate to the desired folder and select it.
- Folder and Subfolders: Adds all files in a selected folder on a network or local drive as well as all files within any of its subfolders. Selecting this option causes the Select Folder dialog to appear. Navigate to the desired folder and select it.
- Select Continue.
Your browser will open Bluebeam on the web, where your files are processed and your results appear. If you haven't signed in to Bluebeam on the web, you'll be prompted to sign in. The processing time depends on the file size and the number of sheets in your project.
View your Smart Review results
The Smart Results page in Bluebeam on the web lists all your Smart Overlay and Smart Review results. Select any Smart Review analysis you created to view analysis results.
Analysis Overview
By default, Smart Review opens the Analysis Overview dashboard, which provides an at-a-glance view of all issues found.
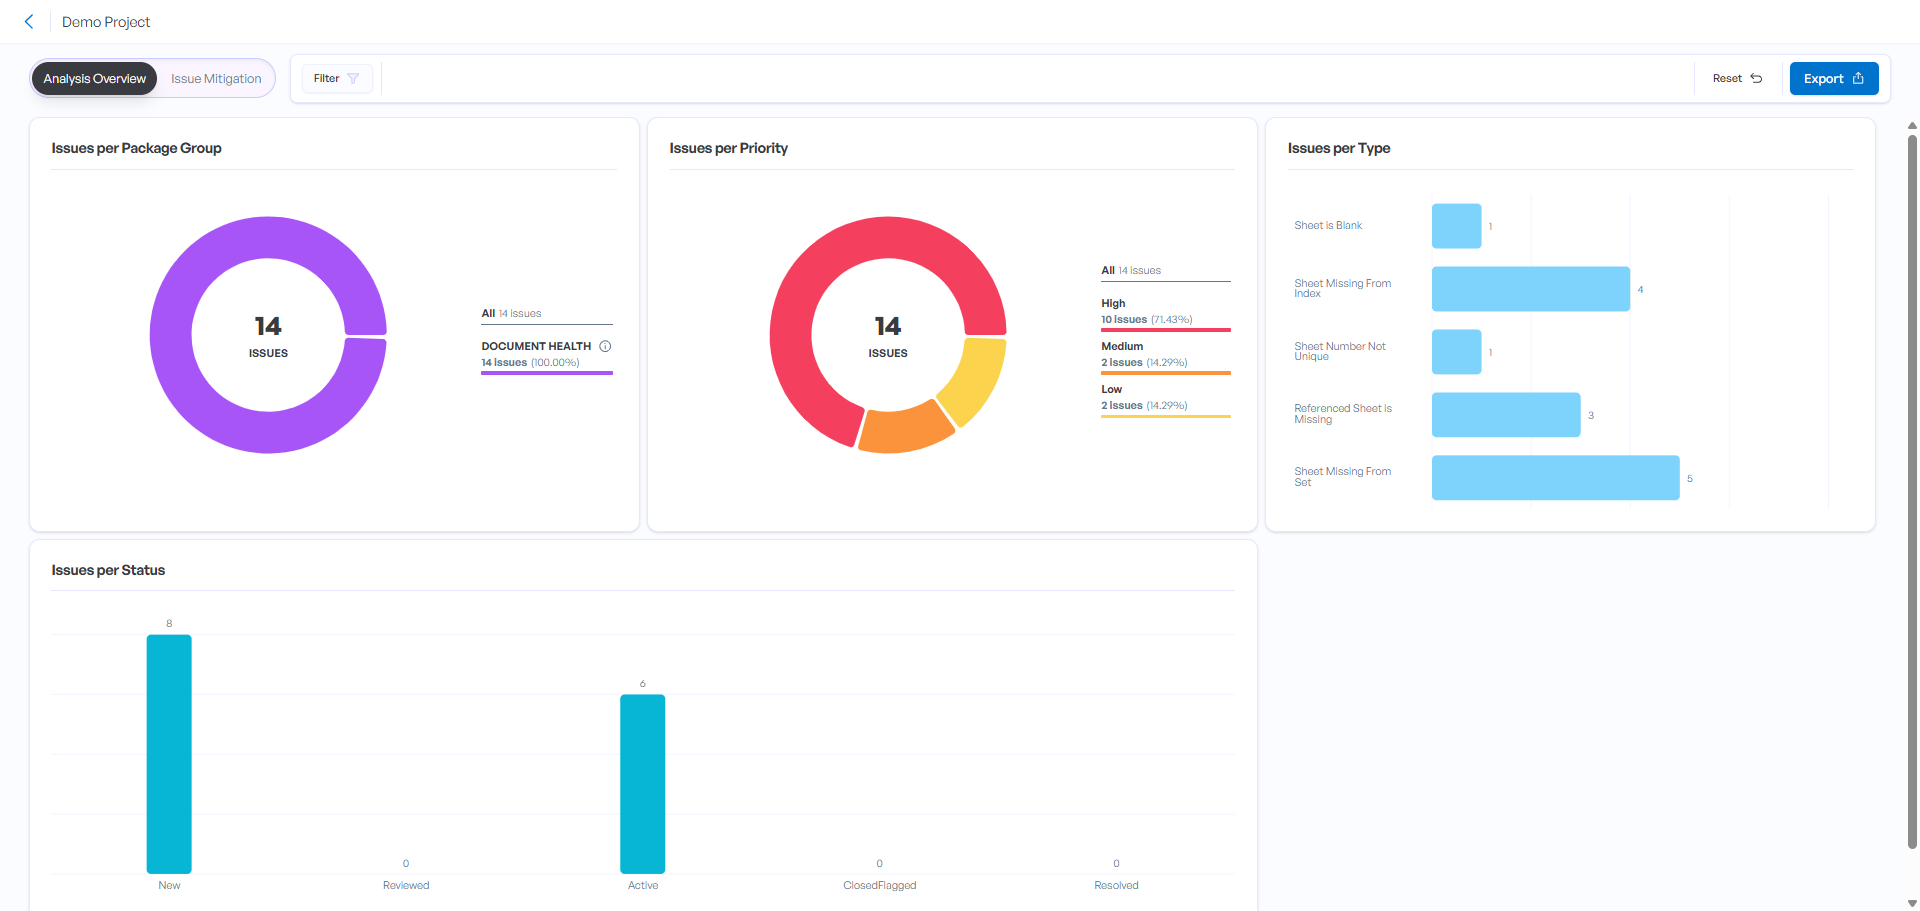
Discovered issues are displayed in the following categories:
-
Document Health
-
DWG Scale
-
Sheets
-
-
All
-
High
-
Medium
-
Low
-
Sheet is blank
-
Sheet missing from set
-
Sheet missing from index
-
Sheet number not unique
-
Referenced sheet is missing
-
Tag not consistent
This check identifies inconsistent distances between structural and architectural gridlines across sheets in the drawing set.
-
Door tag not in schedule
-
Door tag not in plans
-
Door tag not unique in view
-
Door tag not unique in schedule
-
Missing door schedule
-
New
-
Reviewed
-
Active
-
Closed/Flagged
-
Resolved
Select Issue Mitigation to view the details of the displayed issues.
Filter
You can use the filter function to have the dashboard display specified issues by one or more of the following issue categories:
-
Package Group
-
Status
-
Priority
-
Package
-
Type
-
Label
You provide the Label value from the Issue Mitigation page by using the Actions dropdown list.
Issue Mitigation
The Issue Mitigation page lets you view the details of the issues Smart Review discovered and see where the issues are located within the referenced sheets.
When you select an issue on the left pane to view issue details, the corresponding location in the PDF appears in the main pane of the page.
Select the checkbox for the issues and select the Actions dropdown list to make the changes to the following items:
-
Change Status
-
Change Priority
-
Add and Remove Labels
You provide the value for the Label category. For example, you can enter team members' names to assign the issue to them.
Sort and filter
Select ![]() Filter to sort and filter issues.
Filter to sort and filter issues.
You can sort listed issues by the following categories:
-
Priority
-
Type
-
Package
-
Issue ID
-
Sheet Number
-
Status
You can also filter issues to narrow the list for relevance to specific disciplines or teams. Specifically, you can select one or more of the following issue categories:
-
Package Group
-
Status
-
Priority
-
Package
-
Type
-
Label
You provide the Label value from the Issue Mitigation page by using the Actions dropdown list.
Export options
Smart Review lets you export discovered issues to a PDF and/or to a Microsoft Excel spreadsheet that you can open in Revu and/or Excel, respectively, from your Downloads folder. When you open the PDF in Revu, issues appear in the Markups List. Use the table below to map Smart Review categories to columns in the Markups List.
| Smart Review Category | Revu Markups List Column |
|---|---|
| Description | Comments |
| Package | Package |
| Type | Type |
| Priority | Risk Level |
| Label | Label |
You can export from both the Analysis Overview page and the Issue Mitigation page, but each page provides slightly different export options.
If you select Export from the Analysis Overview page, you can select one or more of the following options for export and issue mitigation in Revu:
-
Current Overview (PDF) generates a PDF of the Analysis Overview dashboard.
-
Issue Table (XLS) generates an Excel spreadsheet listing all issues.
-
Analyzed Drawings (PDF) generates a PDF of the drawing(s) that appear in Smart Review that you can open in Revu and use the Markups List to find and view issue details.
Exported drawings won't be flattened when you open them in Revu.
If you select Export from the Issue Mitigation page, you first specify whether Smart Review exports the full report or selected issues. Next, export using one or both of the following options for export and issue mitigation in Revu:
-
Issue Table (XLS) generates an Excel spreadsheet listing all issues and their details.
-
Analyzed Drawings (PDF) generates a PDF of the drawing(s) that appear in Smart Review that you can open in Revu and use the Markups List to find and view issue details.
Exported drawings won't be flattened when you open them in Revu.
How-To
Revu 21
Max
Smart Review