Batch Link
Batch Link automatically creates navigational hyperlinks within a specified group of documents based on user-defined criteria. Batch Link can be run against multiple PDFs or a single, multi-paged PDF.
Batch Link searches PDFs for text specified by the user and then creates links to user-defined destinations. There are built-in tools to auto-generate both search terms and destinations, or users can manually enter them.
PDFs need to have searchable text for Batch Link to work on them.
Batch Link can be run against any number of PDFs or a single, multi-paged PDF. There is no need for these documents to be grouped; the user can select individual documents or entire folders (including, subfolders if desired) from a variety of locations.
PDFs don't need to be open in Revu when you run the process. If a document is open in Revu, any changes resulting from the process are made to the document, but the document won't be saved or checked in (if relevant); you must save and check in the document manually. If a document isn't open in Revu, and it isn't checked out/locked by another user, Revu applies and saves the document changes automatically (without opening the document).
To run Batch Link:
- Go to Batch >
 Link > New.
 - Add PDFs to be processed using one or more of the following methods:
- To add all PDFs that are currently open in Revu, select Add Open Files.
- To select files from a local or network drive, select Add.
- To add all PDFs that are in a folder on a local or network drive, select Add Folder. Select Add subfolders to automatically add subfolders as well.
- To manually enter the path to a PDF or a folder, right-click inside the Path list and select Insert New.
- By default, any item added to the Path list will be selected for processing. Uncheck the box to the left of any item to exclude it from processing.
- It is possible to include both the path to a specific document and to that document's parent folder. When that happens, there are specific behaviors governing what is processed when one is checked and the other is not:
- If the path to the document is selected and the path to its parent folder is not, the document will be processed but nothing else in the folder will be.
- If the path to the document is not selected but the path to its parent folder is, all PDFs in the folder, except that document, will be processed.
- It is possible to include both the path to a specific document and to that document's parent folder. When that happens, there are specific behaviors governing what is processed when one is checked and the other is not:
- Select Next.
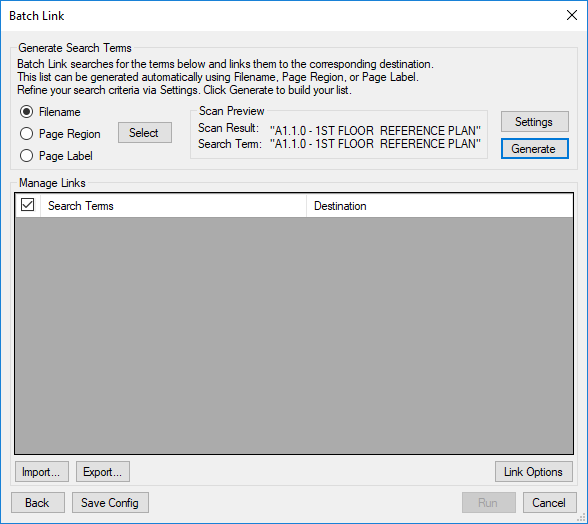
- To import a set of search terms and destinations that were previously saved as a CSV file (see Saving and Using Saved Batch Link Configurations), select Import. Otherwise, use one of the following options to generate search terms and destinations:
- Filename: Uses the file name for each PDF included in the batch process as a Search Term with the Destination being the page itself.
- Page Region: Uses the text found within user-defined regions as a Search Term with the Destination being the page itself. To define a region:
- Select Select to replace the dialog with a crosshair cursor.
Drag to define a region within the PDF.
The data in this region should be located in the same place on each PDF. After you define the region, the AutoMark dialog appears.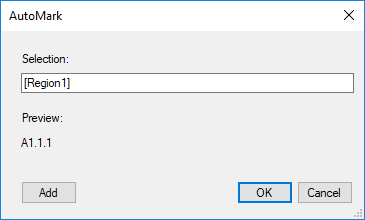
- To add another region:
- Select Add to replace the dialog with a crosshair cursor.
- Drag to define another region, which is added to the Selection field in the AutoMark dialog.
You may add as many regions as you need. Review the sample page label displayed under Preview. If desired, select the Selection field to add text before, after, or between [Regions]. - After you define all regions, select OK to close the AutoMark dialog and return to the previous dialog.AutoMark is most suitable for documents that are vector-based, are the same size and have the same registration. AutoMark might not work as expected if the pages are different sizes, if some of the pages are not searchable, or if the scans are not properly registered.
Page Label: Uses the predefined page label for each PDF included in the batch process as a Search Term with the Destination being the page itself.
- Click Settings. The Search Terms Settings dialog box appears.
- Select a combination of Filter Mode and Filter Character to automatically filter search terms, as desired.
- Filter Mode: First from start: Keeps all text from the start of the Scan Result to the first occurrence of the Filter Character.
Filter Mode: First from end: Keeps all text from the last occurrence of the Filter Character to the end of the Scan Result.
- Filter Character: Select one of the available characters or manually enter one.
- Select OK.
See the Preview for an example of the results.

- Click Generate. The Manage Links list is automatically populated.
- Select any Search Term or Destination to edit it. To manually enter a Search Term and Destination, right-click inside the Manage Links list and select Insert New to add a new row. There are four types of hyperlinks that are supported and each requires specific syntax. Based on the type of hyperlink desired, use the appropriate syntax as shown below:
Type of Hyperlink Syntax Link to file <filename> Link to page in file page <#> in <filename> Link to place1 in file place "<place name>" in <filename> Link to URL web <url> 1 It is recommended, but not mandatory, that the place name be surrounded by quotes (") as in the example.
- Click Link Options. The Link Options dialog box appears.
- Select any or all of the desired Search Options.
- Select Use relative paths to create links that use relative paths or leave this box unchecked to use full paths instead.
- To place rectangular highlights over hyperlinks placed by Batch Link, select Highlight Links and choose a color by selecting the box immediately to its right.
- Choose an Overlap behavior that will determine what the process will do when it attempts to place a hyperlink where one already exists.
- To set appearance properties for the links that will be placed, select Include Appearance Properties and choose the desired appearance properties.
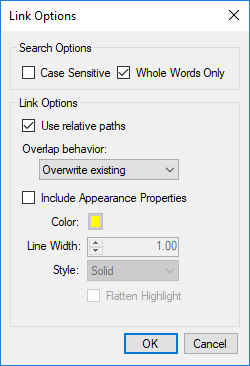
- Color indicates the color of the outline, highlight, or fill of the links.
- Line Width sets the width of the outline of the links, when applicable.
- Style sets the style of the outline or places highlights or fills instead of outlines.
- Select Highlight to place a highlight markup over the links.
- Select one of the other options to create an outline or fill effect that will be visible when the PDF is viewed, but will not show up in the Markups list or when the PDF is printed.
- Flatten Highlight: Select to automatically flatten the highlight markup placed over the links when Highlight is chosen as the Style.
- Select OK.
- To save the current list of search terms and destinations, click Export.
- To save the current Batch Link configuration, including selected PDFs, search terms and destinations, as well as settings and link options, click Save Config.
- Click Run. The Batch Link Summary report opens (see Batch Link Summary below for more information regarding the report).
- Open the Set to be processed.
- Go to Batch > Link > Current Set.
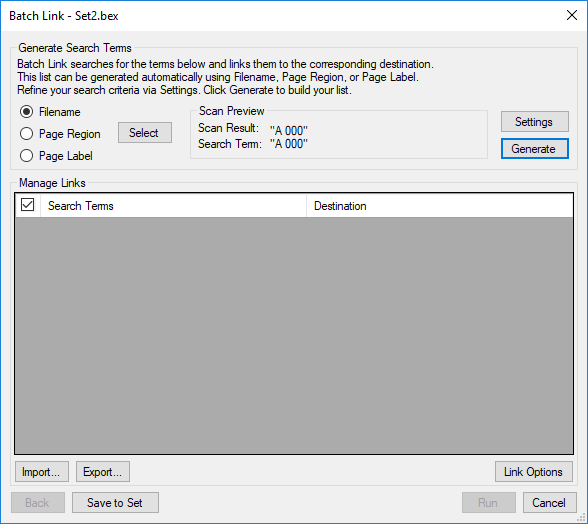
- To import a set of search terms and destinations that were previously saved as a CSV file (see Saving and Using Saved Batch Link Configurations), click Import. Otherwise, use one of the following options to generate search terms and destinations:
- Filename: Uses the file name for each PDF included in the batch process as a Search Term with the Destination being the page itself.
- Page Region: Uses the text found within user-defined regions as a Search Term with the Destination being the page itself. To define a region:
- Select Select to replace the dialog with a crosshair cursor.
Drag to define a region within the PDF.
The data in this region should be located in the same place on each PDF. After you define the region, the AutoMark dialog appears.- To add another region:
- Select Add to replace the dialog with a crosshair cursor.
- Drag to define another region, which is added to the Selection field in the AutoMark dialog.
You may add as many regions as you need. Review the sample page label displayed under Preview. If desired, select the Selection field to add text before, after, or between [Regions]. - After you define all regions, select OK to close the AutoMark dialog and return to the previous dialog.AutoMark is most suitable for documents that are vector-based, are the same size and have the same registration. AutoMark might not work as expected if the pages are different sizes, if some of the pages are not searchable, or if the scans are not properly registered.
Page Label: Uses the predefined page label for each PDF included in the batch process as a Search Term with the Destination being the page itself.
- Click Settings. The Search Terms Settings dialog box appears.
- Select a combination of Filter Mode and Filter Character to automatically filter search terms, as desired.
- Filter Mode: First from start: Keeps all text from the start of the Scan Result to the first occurrence of the Filter Character.
Filter Mode: First from end: Keeps all text from the last occurrence of the Filter Character to the end of the Scan Result.
- Filter Character: Select one of the available characters or manually enter one.
- Select OK.
See the Preview for an example of the results.
- Click Generate. The Manage Links list is automatically populated.
- Select any Search Term or Destination to edit it. To manually enter a Search Term and Destination, right-click inside the Manage Links list and select Insert New to add a new row. There are four types of hyperlinks that are supported and each requires specific syntax. Based on the type of hyperlink desired, use the appropriate syntax as shown below:
Type of Hyperlink Syntax Link to file <filename> Link to page in file page <#> in <filename> Link to place1 in file place "<place name>" in <filename> Link to URL web <url> 1 It is recommended, but not mandatory, that the place name be surrounded by quotes (") as in the example.
- Click Link Options. The Link Options dialog box appears.
- Select any or all of the desired Search Options.
- Select Use relative paths to create links that use relative paths or leave this box unchecked to use full paths instead.
- To place rectangular highlights over hyperlinks placed by Batch Link, select Highlight Links and choose a color by selecting the box immediately to its right.
- Choose an Overlap behavior that will determine what the process will do when it attempts to place a hyperlink where one already exists.
- To set appearance properties for the links that will be placed, select Include Appearance Properties and choose the desired appearance properties.
- Color indicates the color of the outline, highlight, or fill of the links.
- Line Width sets the width of the outline of the links, when applicable.
- Style sets the style of the outline or places highlights or fills instead of outlines.
- Select Highlight to place a highlight markup over the links.
- Select one of the other options to create an outline or fill effect that will be visible when the PDF is viewed, but will not show up in the Markups list or when the PDF is printed.
- Flatten Highlight: Select to automatically flatten the highlight markup placed over the links when Highlight is chosen as the Style.
- Select OK.
- To save the current list of search terms and destinations, click Export.
- To save the current Batch Link configuration, including selected PDFs, search terms and destinations, as well as settings and link options, click Save to Set.
- Click Run. The Batch Link Summary report opens (see Batch Link Summary below for more information regarding the report).
Batch Link configurations can be saved as XML files at any time after file selection is done. Any configurations that have been set (PDF selection, Search Term Settings, Search Terms, Destinations and Link Options) will be saved and can be reused at a later time (for example, to update hyperlinks after document revisions come in). These XML files can be used to initiate a Batch Link process.
Configurations for Sets are an exception: instead of saving full configurations to a separate XML file, configurations for Sets are saved directly to the Set's .bex file and opened automatically along with the Set.
Alternately, just search terms and destinations can be exported to a CSV file. This can be useful when a list of search terms and destinations needs to be audited or edited and it would be easier to do it in a spreadsheet application. These CSV files can then be imported into a Batch Link process without affecting any other settings.
Entire Batch Link configurations can be saved as an XML file, or just the Search Terms and Destinations can be exported to a CSV file. Both options are available from the second page of the Batch Link wizard.
- To save all the current Batch Link settings as an XML file, click Save Config.
- To save just a set of search terms and destinations as a CSV file, click Export.
Saving configurations for Sets is different than for PDFs that are not in a Set. Instead of having the option to save an XML configuration file, Set configurations are saved directly into the .bex file and become the default for that Set. Search terms and destinations can be imported and exported normally.
- To save a Batch Link configuration directly to the current Set, click Save to Set.
Existing XML configurations can be used to start Batch Link. Only XML configurations can be used to initiate Batch Link.
To run Batch Link using an XML configuration:
- Go to Batch >
 Link > Open. Browse to the desired configuration file and open it. The Batch Link wizard opens with the pre-loaded data from the configuration file.
- Alternatively, recently used configurations are listed on the same menu for faster access. Click any of these configurations, as desired.
Existing CSV configurations can be used to import search terms and destinations. Only search terms and destinations will be imported; all file selections, filter options, and link options will be retained. If there are existing search terms and destinations, they will be overwritten.
To import search terms and destinations:
- Start a new Batch Link process and select files and folders to be linked, as described in Running Batch Link.
- Alternatively, initiate Batch Link using an existing configuration.
- Click Next to proceed to the second page of the Batch Link wizard.
- From the second page of the Batch Link wizard, click the Import button. Browse to the desired configuration file and open it. The saved search terms and destinations are imported, overwriting any existing search terms and destinations. No other settings are affected.
After Batch Link has been run, a Batch Link Summary dialog box appears and reports the results of the process.
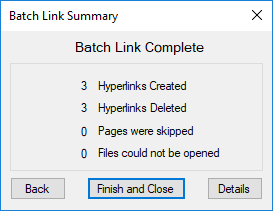
The following information is provided:
- Hyperlinks Created: The number of new hyperlinks created by the process.
- Hyperlinks Deleted: The number of old hyperlinks that were deleted (according to the Overlap Behavior defined in the Link Options) by the process.
- Pages Skipped: The number of PDF pages that were skipped by the process because they did not contain searchable text.
- Files that could not be opened: The number of PDFs that could not be opened by the process.
Click Details to view an expanded report of the Batch Link results.
Click Back to return to the Batch Link wizard and take the opportunity to correct any issues detected and re-run the process or save a configuration.
Tip: In the Batch Link wizard, click either the Search Terms or Destinations column header to bring all flagged issues to the top.
Click Finish and Close to close Batch Link.