Group markups
Multiple markups can be grouped to behave like a single markup. Grouping creates a single element that can be moved, edited, and copied and pasted at the same time and they can be added to the Tool Chest for reuse. Additionally, multiple groups can be grouped (or "nested").
Markups with embedded media cannot be grouped.
To group markups, do the following:
-
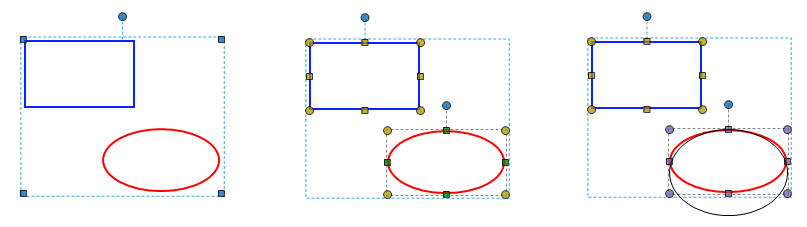
Hold down the Shift key and select two or more markups to be grouped.
The first markup selected will be the "dominant markup" unless another one is selected as described below. By default, the properties of this markup will determine which columns are displayed in the Markups list for the group. - Use one of the following methods to group the selected markups:
- In the Options section of the Properties panel, select Group.
- Right-click on one of the selected markups and select Group. This markup becomes the dominant markup with the properties described in the note above.
- Press Ctrl+G.
- In the Markups list, right-click on the row of one of the selected markups and select Group.
A group will appear as a Group item in the Markups list with a toggle arrow next to it.

Select the toggle arrow beside a Group item in the Markups list to expand or contract the group. When expanded, the individual markups in the group are shown.
By default, when markups are grouped, the values in the measurement columns (Count, Length, Area, Wall Area, and Volume) for the Group item will be the sum of those measurements for all the markups in the group, provided that all the markups in the group support that measurement. If one or more markups in the group do not support the measurement, the value for the Group item will be blank.
To set Revu to use the values of the "dominant markup" (that is, the first markup selected when creating the group) for the measurement values of the Group item instead of the sum of the markups in the group as described above, enable the Revert Group Column Measurements to Dominant Markup option in the Markups List Preferences.
Multiple groups can be grouped together, creating "nested groups." Nested groups maintain their hierarchy (that is, they are not flattened into a single group), making it possible to remove some or all parts of a nested group.
To create a nested group, do the following:
- Hold down the Shift key and select two or more groups to be grouped.
- Use one of the following methods to group the selected groups:
- In the Options section of the Properties panel, select Group.
- Right-click on one of the selected markups and select Group.
- Press Ctrl+G.
Markups can be grouped with existing nested groups. When this is done, the markups are automatically added to the topmost nesting layer.
To group markups with a nested group, follow these steps:
- Hold down the Shift key and select the nested group and one or more markups to be grouped with the nested group.
- Use one of the following methods to group the markups with the selected nested group:
- In the Options section of the Properties panel, select Group.
- Right-click on one of the selected markups and select Group.
- Press Ctrl+G.
Measurement values for Group items in nested groups behave the same as they do for un-nested groups except that higher level groups will contain the totals of all the groups nested under them. Note that, just as with un-nested groups, all the markups contained in a nested group must support a given measurement value in order for the sum of those measurements to show for the Group item.
A group can be moved and resized as single element in the same way you would move or resize a single markup, but the markups within the group can also be moved and resized within the group without ungrouping.
To move or resize the markups individually, follow these steps:
- Select the group.
- Press and hold Alt. The handles for each of the markups will appear while the key is held down.
- Drag the handle of any markup to resize it, or drag the markup to move it.
Colors of the individual markups in the group can be selectively changed using Change Color.
Individual markups that are in a group can be edited or removed without needing to be ungrouped.
- Select the group.
- In the Markups list, select the toggle arrow to the left of the Group item, which will be highlighted, to expand the group.
- Select the specific markup to be edited or removed
- Make any desired edits in the Properties panel or right-click the markup to be removed from the group and select Remove Selected from Group.
The process for ungrouping varies depending on whether the group in question is nested or not.
This process will ungroup all markups in an un-nested group. To remove only some of the markups without breaking up the rest of the group, see Editing or Removing Markups in a Group.
- Select the group.
- Use one of the following methods to ungroup the markups:
- In the Options section of the Properties panel, select Ungroup.
- Right-click on one markup in the group and select Ungroup.
- Press Ctrl+Shift+G.
- In the Markups list, right-click the group's row and select Ungroup.
Nested groups are generally ungrouped one layer at a time, starting with the topmost layer. For example, if a nested group contains two groups, and those two groups are each nested groups (so, the group is nested three levels deep), then ungrouping this group would "break" the topmost grouping layer, resulting in two separate groups, each containing nested groups, as illustrated in the image below.

To ungroup from the topmost nesting layer, follow these steps:
- Select the nested group.
- Use one of the following methods to ungroup the nested groups from the topmost nesting layer:
- In the Options section of the Properties panel, select Ungroup.
- Right-click on one markup in the group and select Ungroup.
- Press Ctrl+Shift+G.
- In the Markups list, right-click the group's row and select Ungroup.
It is possible, however, to remove individual groups or markups from a nested group. This method extracts any group or markup from the nested group, no matter what nesting level they exist on, and removes them from the nesting hierarchy entirely. When a group is removed in this way, it preserves its own grouping. Similarly, when a nested group is removed this way, it retains its own nesting hierarchy. See the illustration below for an example of removing an individual group from a nested group.

To remove a group or markup from a nested group, follow these steps:
- Select the nested group.
- In the Markups list, locate the entry for the selected group, which will be highlighted. Select the toggle arrow to the left of it to expand the list of groups in the nested group. Depending on how many layers the nested group has, it might be necessary to repeat this action to reach the individual group to be removed.
To remove a markup from a nested group, expand the group listings until the desired markup is revealed.
- Right-click the group or markup to be removed from the nesting hierarchy and select Remove Selected from Group.
A nested group can also have its nesting structure completely removed, resulting in the markups being in a single, unnested group, as illustrated below:

To remove the nesting structure of a nested group while keeping all the markups in a group, follow these steps:
- Select the nested group.
- In the Markups list, locate the entry for the selected group, which will be highlighted.
- Right-click Group and select Remove Group Nesting.