Mit Tags arbeiten
Tags in einem Set werden für viele Zwecke verwendet, von der Organisation der Blätter innerhalb eines Sets bis hin zur Erstellung individueller Zeichnungsprotokolle. Tags werden in der Regel definiert, wenn das Set erstellt wird, aber es ist manchmal notwendig, sie im Laufe der Lebensdauer des Sets zu ändern.
Sie können bestehende Tags innerhalb eines Set bearbeiten, nachdem sie erstellt wurden. Tags können einzeln oder in großen Mengen bearbeitet werden.
Tags bearbeiten:
- Gehen Sie zu Fenster > Seitenleisten >
 Sets oder drücken Sie ALT+2, um die Sets -Seitenleiste anzuzeigen.
 - Gehen Sie in der Symbolleiste der Seitenleiste „Sets“ zu Sets >
 Set öffnen und öffnen Sie das Set, dessen Tags Sie bearbeiten möchten.
 -
Wählen Sie
 Tags bearbeiten. Das Tags -Dialogfeld wird angezeigt, das die aktuell für das Set definierten Tags zeigt.
Tag-Spalten können in aufsteigender oder absteigender Reihenfolge sortiert werden, indem man auf die gewünschte Spaltenkopfzeile klickt.
- Um ein einzelnes Tag manuell zu bearbeiten:
- Wählen Sie die Zelle des Tags aus, das Sie bearbeiten möchten. Die aktuellen Tag-Daten werden im Feld oben im Dialogfenster angezeigt.
- Bearbeiten Sie die Tag-Daten wie gewünscht in dem Feld oben im Dialogfenster. Um die Tag-Daten zu löschen, wählen Sie
 aus.
aus.
- Um mehrere Tags manuell zu bearbeiten:
- Wählen Sie die Zellen der gewünschten Tags nach Bedarf mehrfach aus, indem Sie die Umschalttaste oder die Strg-Taste gedrückt halten oder durch Ziehen. Nur ähnliche Tags können ausgewählt werden (das heißt, Tags in derselben Spalte).
- Wenn jedes der ausgewählten Tags dieselben Daten enthält, werden sie im Feld oben im Dialogfenster angezeigt, andernfalls ist dieses Feld leer. Geben Sie die gewünschten Tag-Daten in dieses Feld ein.
- Um Tags automatisch neu zu erstellen:
- Wählen Sie die Zellen des Tags aus, das Sie bearbeiten möchten. Zellen können nach Wunsch durch Auswahl mit gedrückter Umschalttaste, Auswahl mit gedrückter Strg-Taste oder durch Auswählen und Ziehen mehrfach ausgewählt werden. Nur ähnliche Tags können ausgewählt werden (das heißt, Tags in derselben Spalte).
Select AutoMark. Das erste Blatt öffnet sich und das Dialogfeld Tags hinzufügen wird angezeigt.
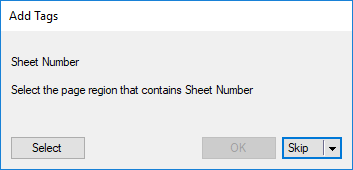
- Wählen Sie Auswählen und ziehen Sie ein Rechteck um den Bereich der Zeichnung, der die gewünschten Tag-Informationen enthält.
- Revu analysiert die Inhalte des definierten Bereichs, und das Dialogfeld „Tags hinzufügen“ wird erneut mit einer Vorschau der gefundenen Inhalte angezeigt. So wird der neue Tag für das aktuelle Blatt sein. Wenn es falsch oder unvollständig ist, wählen Sie Erneut auswählen und zeichnen Sie das Rechteck erneut.
- Wählen Sie auswählen OK , um die Tag-Region zu akzeptieren. Revu analysiert die übrigen ausgewählten Pläne und erstellt das Tag für jeden Plan neu.
- Wählen Sie OK , um die Änderungen zu akzeptieren, oder wählen Sie Abbrechen , um sie zu verwerfen.
Tags werden im Allgemeinen einem Set während der Set creation hinzugefügt, aber sie können auch einem Set hinzugefügt werden, nachdem es erstellt wurde. Wenn ein neuer Tag zu einem Set hinzugefügt wird, verarbeitet Revu ihn von allen derzeit im Set befindlichen Blättern und fügt ihn automatisch allen Blättern hinzu, die dem Set in Zukunft hinzugefügt werden.
- Gehen Sie zu Fenster > Seitenleisten > Sets oder drücken Sie ALT+2, um die Sets -Seitenleiste anzuzeigen.
- Gehen Sie in der Symbolleiste der Seitenleiste „Sets“ zu Sets > Set öffnen und öffnen Sie das Set, dessen Tags Sie bearbeiten möchten.
 Set ändern auswählen.
 - Wählen Sie im Dialogfeld Set die Optionen aus.
-
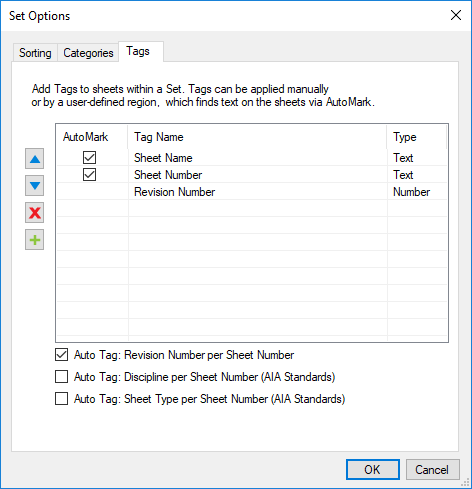
Im Dialogfeld Set-Optionen wählen Sie die Tags -Registerkarte.
-
auswählen
 .
. - Um eines der Standard-Tags hinzuzufügen, wählen Sie die Registerkarte "Standard" und wählen Sie das gewünschte Tag aus dem Menü.
- Um ein benutzerdefiniertes Tag hinzuzufügen, wählen Sie die Registerkarte Benutzerdefiniert, geben Sie dann den gewünschten Tag-Namen des Tags ein und wählen den entsprechenden Tag-Typ.
- Wählen Sie OK.
- Wählen Sie OK,um den Dialog **Set-Optionen** zu schließen.
- Wählen Sie OK aus, um das „Tags“-Dialogfenster zu schließen.
Tags können vollständig aus einem Set entfernt werden, nachdem es erstellt wurde. Bitte beachten Sie, dass dieser Prozess beschreibt, wie das Tag für alle Blätter im Set vollständig aus dem Set entfernt wird. Um die Tag-Daten aus einem oder mehreren Blättern eines Set zu entfernen, siehe oben Tags bearbeiten .
- Gehen Sie zu Fenster > Seitenleisten > Sets oder drücken Sie ALT+2, um die Sets -Seitenleiste anzuzeigen.
- Gehen Sie in der Symbolleiste der Seitenleiste „Sets“ zu Sets > Set öffnen und öffnen Sie das Set, aus dem Sie Tags entfernen möchten.
- Wählen Sie Set ändern. Das Set -Dialogfenster wird geöffnet.
- auswählen Options.
-
Im Dialogfeld Set-Optionen wählen Sie die Tags -Registerkarte.
- Wählen Sie den zu entfernenden Tag aus.
- auswählen
 .
.
- Wählen Sie OK,um den Dialog **Set-Optionen** zu schließen.
- Wählen Sie OK aus, um das „Tags“-Dialogfenster zu schließen.
Die Reihenfolge, in der Revu nach Tags in einem Set sucht, wird durch die Reihenfolge auf dem Registerkarte Tags der Set Optionen bestimmt und wird üblicherweise beim Erstellen des Sets festgelegt; diese Reihenfolge kann jedoch jederzeit geändert werden.
- Gehen Sie zu Fenster > Seitenleisten > Sets oder drücken Sie ALT+2, um die Sets -Seitenleiste anzuzeigen.
- Gehen Sie in der Symbolleiste der Sets-Seitenleiste zu Sets > Set öffnen und öffnen Sie das Set, in dem Sie die Tags neu anordnen möchten.
- Set ändern auswählen.
- Klicken Sie im Dialogfeld Set auf Optionen.
-
Im Dialogfeld Set-Optionen wählen Sie die Tags -Registerkarte.
- Wählen Sie den Tag aus, der verschoben werden soll.
- Ziehen Sie es per Drag & Drop an die gewünschte Position in der Liste.
- Wählen Sie OK,um den Dialog **Set-Optionen** zu schließen.
- Wählen Sie OK aus, um das „Tags“-Dialogfenster zu schließen.