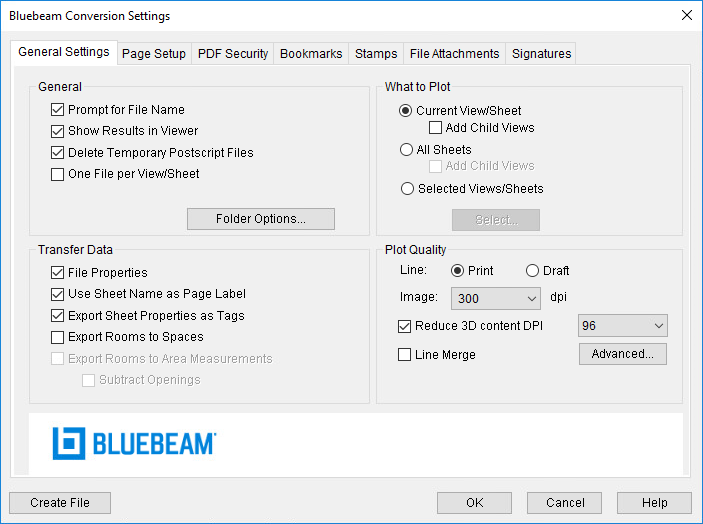
The Bluebeam Conversion Setting dialog has seven tabs:
The menu can be accessed by clicking the Change Settings button from the Bluebeam ribbon.
The main screen for controlling the creation of PDF files is the Conversion Settings dialog, which is shown below.

Each of the settings on this screen is described below.
Prompt for Filename: Controls whether or not to display the Save As dialog box to enter the file name and location. Otherwise, [drawing filename].pdf will be created in the same directory as the drawing file.
Show Results in Viewer: Controls whether or not to start the default graphic file viewer once the file has been created.
Delete Temporary Postscript Files: Controls whether or not to remove the temporary Postscript file after the file has been created.
One File per Page: Creates an output file for each sheet or view that is converted. The Output file list dialog box will appear before the PDF files are created, which allows you to configure the naming of the individual PDF files.
Folder Options: Opens the Folder Options dialog, which allows you to configure default output folder selection.
Current View/Sheet: Creates a file of the currently active view. Check Add Child Views to convert all child views of the active view or sheet.
All Sheets: Creates an output file of all sheets in the project. One PDF page will be created for each sheet in the current project. Check Add Child Views to also convert all child views of each sheet.
Selected Views/Sheet: Click Select to choose which sheets and views to convert. The Select View or Sheet Set dialog box will open.
File Properties: Transfers file properties as metadata in the PDF file.
Use Sheet Name as Page Label: Automatically use layout sheet names as the page labels of the PDF.
Export Sheet Properties as Tags: Creates Revu Tags in the PDF that match the Revit sheet properties.
Export Rooms to Spaces (Revit 2015 and above only): Creates Revu Spaces that match the existing Revit Rooms in the PDF.
Export Rooms to Area Measurements (Revit 2015 and above only): Creates Revu Spaces as described under Export Rooms to Spaces above and creates matching Area Measurement markups in the PDF as well. Only available when Export Rooms to Spaces is enabled.
Subtract Openings (Revit 2015 and above only): Creates Revu Spaces with Area Measurement markups as described under Export Rooms to Area Measurements above, but subtracts any holes or voids in the Revit Room from the Area Measurement markup in the PDF. This option is only available when Export Rooms to Area Measurements is enabled.
Line: The line quality setting defines the level of fidelity used to transfer the vector line data from the drawing/document to the output file. Selecting Print will create a higher-quality image, but a larger output file. Selecting Draft will create a smaller output file, typically useful for on-screen viewing and e-mailing. There may be some loss of quality, typically visible in areas that have line curves such as arcs or circles.
Image: Defines the resolution setting for images included in the output file. A larger number of dots-per-inch (dpi) will result in a higher quality image, but a larger output file. The Image setting does not affect vector data in the drawing.
Reduce 3D content DPI: Reduce the DPI of 3D data to reduce the file size of the PDF file.
Line Merge: Enables Line Merge. Refer to the Line Merge section for details related to the settings available for this option.
Advanced: Click the Advanced Settings button to adjust the default save settings, including file format type, anti-aliasing, image compression, resolution, and line merge.