Revu for iPad
Interface Map
Easily access, markup and collaborate on PDFs from anywhere.

Verify measurements directly from the field using built-in measurement tools.

Video Tutorials
 tabs automatically closes after use in order to maximize screen real estate. To access these features, tap on Tab Access
Export in Revu for Windows
- Open up the Tool Chest
 .
.
- Tap on Manage Tool Sets
 , select the tool set you want to export, and then tap the Export button.
- Place the exported tool set in your Box or Dropbox account.
Import in Revu for iPad
- In Revu for iPad, tap Document Manager
 to access the tool set from within your Box or Dropbox account.
- Tap a tool set file to instantly import it into the Tool Chest .
- Tap Tab Access
 and then the Tool Chest to access the tool set.
You can also import tool sets by opening them from file attachments in an email.
Use relative hyperlinks from Dropbox and Box
Relative hyperlinks that point to external files will still work with Dropbox and Box as long as all files and folders are copied with the same folder structure in which the links were created.
Contact Technical Support directly from the iPad app
If you have any questions, concerns, or are experiencing an issue with the app, you can contact our Technical Support team directly from the app.
- Click the Logging tab in Preferences.
- Select Send Log to Bluebeam.
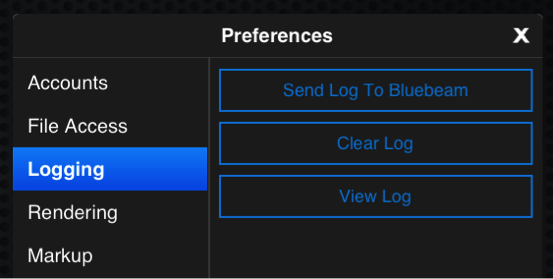
Fill out the email with a brief description of your issue. Submissions sent between 8am on Monday to 5pm on Friday Pacific Time will be answered within 24 hours.
Printing
Revu for iPad 3.8 and above
- Tap the Send To
 button.
- Tap AirPrint
 from the dropdown menu.
- Follow the directions from the AirPrint dialog box to print your document.
Revu for iPad 3.7 and below
If you have the iBooks app installed, you can tap the Send To![]() icon, select Flatten & Open In…
icon, select Flatten & Open In…![]() , and then choose iBooks to print through AirPrint.
, and then choose iBooks to print through AirPrint.
Speech-to-text dictation in Revu in iPad
Enable Siri and check to see that you have Internet connectivity. Then, tap the microphone on your keyboard while in Revu to add text to PDFs through dictation.
Disable Control Center while in Revu for iPad
- Go to Settings.
- Select Control Center and disable Access Within Apps.

FAQs
How do I connect to the Studio U.K. server?
For directions on connecting to the Studio U.K. server and more, please see our Bluebeam Studio U.K. FAQ for iPad
What can I do with Revu for iPad?
Revu for iPad includes some of the most popular features of Bluebeam Revu for Windows, enabling you to redline PDFs and collaborate with others on the go. Access PDFs through Dropbox, Box, iTunes, Studio Projects or WebDav, and redline PDFs with measurement or markup tools, including your existing tool sets. Additionally, collaborate with project partners across the globe anywhere, anytime, regardless of Internet access, and review the same PDFs together in real time using Bluebeam Studio.
Revu for iPad does not include all the features found in Revu for Windows. Our app is designed to provide users with the features they need to document issues and collaborate in the field, without compromising speed.
Some of the recommended things to set up on Revu Windows instead of Revu for iPad include:
- Custom Columns
- Custom Statuses
- Shareable Tool Sets
- Grouped Markups
- Hyperlinks
- Spaces
How do I sync a file/folder in Revu for iPad?
Syncing files in Revu stores them locally on your iPad and makes them available offline. Follow the steps listed below to sync a file or folder:
- Open the Document Manager
 and tap the Connection
  icon in the upper-left to make sure it's green.
- Tap Edit in the lower-right corner of the Document Manager.
- Select the files and folders you want to sync by tapping the empty circle located to the left of their names.
- Tap Set
 in the lower-right corner to mark the items for syncing.
- Tap Done, and then Sync in the lower-left corner when you're ready to download latest versions.
- Tap the Device
 icon in the upper left of the Document Manager to view the files you've downloaded.
Why do some files render much faster than others in Studio?
As of Revu for iPad 3.0, Studio is now powered by Studio GO. Studio GO is an instant rendering solution for large format single sheet document sets, with support for revisions. Large document sets should be broken up to get fast rendering speed. Please contact us if you'd like to provide any feedback about this feature, or Revu for iPad in general.
What does 'Purge Studio GO Data' do to my files?
The "Purge Studio GO Data" button will remove the extra data and space that Studio GO requires when caching your files. This is local to your device only and does not affect the server in any way.
Additionally, this does not affect the original PDFs themselves. They will still be available offline.
Why don't markups I've created on the iPad show up on other PDF apps for the iPad?
Revu for iPad was designed to fully support markups created in the Windows version of Revu. These markups could be more advanced than those originally supported by iOS. To display markups created in Revu (Windows or iPad) on other PDF viewers, flatten these markups from within Revu.
We also offer a free PDF viewer for both the Windows and iPad called Vu, which supports all markups created in Revu.
Why do some PDFs render slowly?
There are many reasons why some PDF files will render more slowly than others. One of the main reasons this occurs is because of the efforts made towards rendering all markups correctly and generating the Markups list. Some documents render slowly because of a large amount of vector content. To see instant rendering speeds, check out Studio GO in the What's New in Revu for iPad 3.0 Video.
Adjusting the rendering preferences may help improve rendering speed. Here is a brief explanation of what each function does:
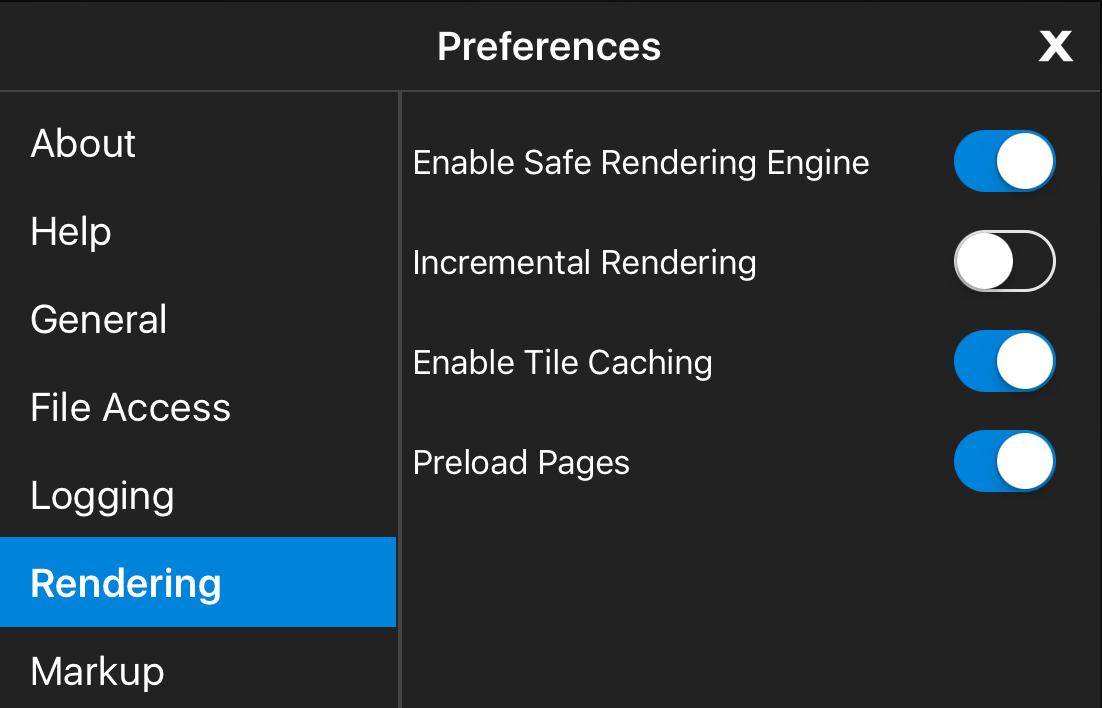
Enable Safe Rendering Engine
This option uses the built-in iOS PDF rendering library to render the PDF content. It is recommended to be turned on; however, some PDF content will only render correctly if it is turned off.
Incremental Rendering
This option allows the PDF to begin rendering parts of the file incrementally. When it is disabled, the PDF will not display until all objects have been loaded, which is most useful when viewing vector-based PDF drawings. If your document is a scan, turning this option off should speed up the total rendering time.
Enable Tile Caching
Tile Caching allows PDF regions off-screen to render and cache to memory. This improves panning performance but may slow down overall rendering time. We recommend you enable Tile Caching if you will be reviewing and scrolling through multi-page PDFs. When disabled, rendering will not start until the PDF has stopped moving.
Preload Pages
This option renders a placeholder image for the previous and next page of the file, making it appear to load much faster than if it were rendering normally. This option only works with Tile Caching turned on.
We understand that performance and rendering speed are important aspects of any application, and our developers are constantly working on ways to improve them.
Please contact Bluebeam Technical Support if you have files that are affected by slow performance which you can send in for testing.
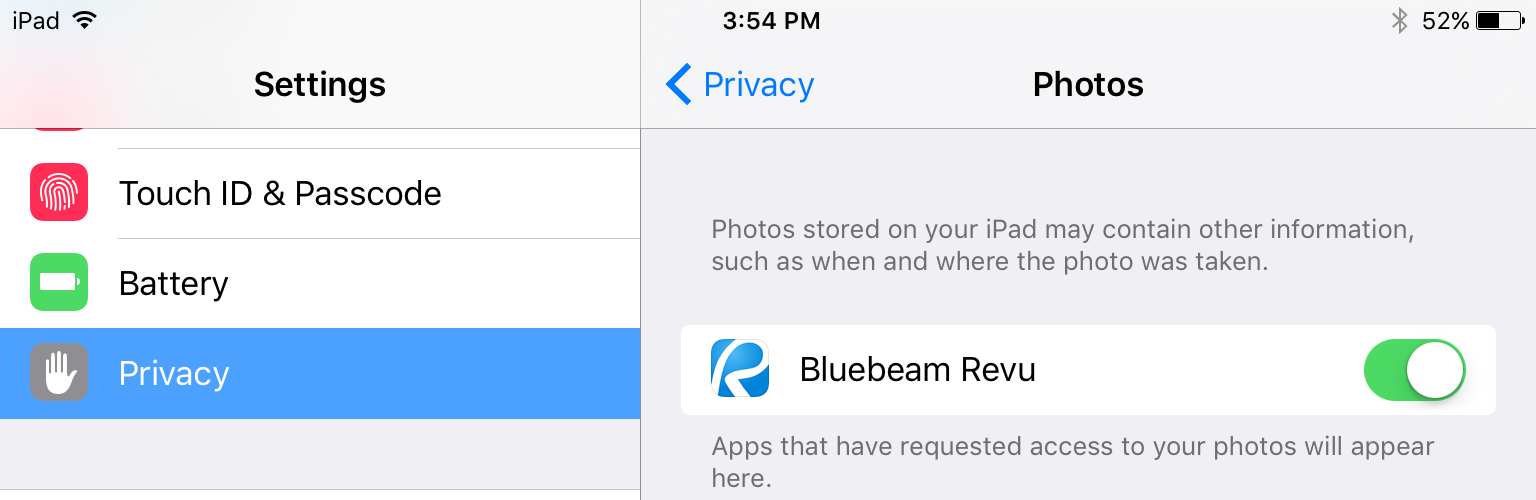
View your iPad photo library when adding an image to your PDFs
Simply enable Bluebeam Revu in the Privacy Settings for your photo library so that it can be accessed when adding images to PDFs using the Image tool.
To change the setting, go to iPad Settings > Privacy > Photos, and move the switch for Bluebeam Revu to the right.
How do I exit out of using a markup?
There are multiple ways to exit out of a markup tool.
The easiest way is to tap anywhere on the document that doesn't have a markup.
Can I finalize a Studio Session on Revu for iPad?
Currently it is not possible to finalize a Studio Session from Revu for iPad. Studio Sessions must be finalized from a full version of Revu.
What's this menu that keeps popping up when I try to open the Markups list?
Starting in iOS 7, a Control Center menu is activated by swiping up from the bottom edge of the screen. In Revu for iPad, this menu prevents users from invoking the Markups list with the same action. The Markups list can still be opened by tapping, rather than swiping, the bottom nub. Better yet, the Control Center can be disabled via iOS's Settings Menu > Control center > Access Within Apps (off).
Can I get a refund?
We're sorry if you are unhappy with your purchase of Revu for iPad. Please contact us if you're experiencing any issues, we're happy to help.
If your issues cannot be resolved, you can request a refund from Apple. Locate the email receipt for your iTunes Store purchase and click Report Problem to explain the issue in detail. Apple will then review and issue the refund per their discretion.
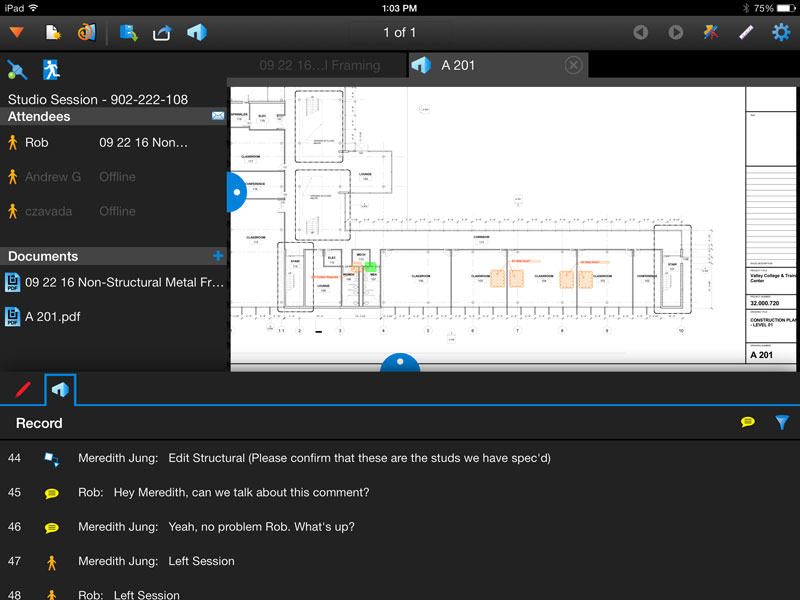
Where is the chat record located for a Studio Session?
Studio Session attendees can chat throughout their real-time PDF collaborations. To view the chat during a Studio Session, simply tap the Studio tab in the Markups list. To send a message, tap the Chat ![]() icon. Tapping a chat message in the list takes you to that attendee's view when it was originally typed.
icon. Tapping a chat message in the list takes you to that attendee's view when it was originally typed.
Can I purchase the iPad app in volume?
You can sign up to purchase Revu iPad through Apple's Volume Purchasing Program. Upon purchasing, you will receive a redemption code that can then be distributed to each user. Click here to learn more about Apple's Volume Purchase Program.