From July 12, 2022, Microsoft will no longer support SQL Server 2012, as such we’re adding functionality for Studio Enterprise servers to run on Microsoft SQL Server 2016. Here below are steps and best practices to help install or migrate your system’s Studio Enterprise database to Microsoft SQL Server 2016.
Preparing for SQL Server Installation & Migration
Install SQL Server 2016 on a new server with Windows Server 2016 OS. Ensure this server is configured with enough resources to meet or exceed current database resource needs.
- If the Studio Enterprise server is on-prem, the new SQL server should also be located on-prem.
- If the Studio Enterprise server is located on AWS, the new SQL server should also be located on AWS.
- The Express edition of SQL server is not supported.
- The database server will need to be on a different server than the application server.
- We do not recommend upgrading the SQL server in place, we instead recommend setting up a new server with Windows Server 2016 OS and SQL Server 2016, rather than upgrading the SQL version on the current SQL server. This should allow for an easy fallback if there are any issues.
Configure the SQL server per the guidelines detailed in the Studio Enterprise Installation and Configuration Guide. These steps can be found in the Installing and Configuring Microsoft SQL Server section.
Recommendations before you start
- Provision separate drives for: Data (MDF), Log (LDF), Tempdb and Backups.
- Use Windows Service Accounts on SQL engine and agent.
- Configure memory on SQL instance: SQL (80%), OS (20%)
- Create multiple data files for Tempdb according to the number of CPU cores.
- Configure maintenance plans for integrity check, index maintenance, update statistics & backups. Do so in accordance with best practices and guidance from your Database Administrators.
- The Studio Enterprise End of Life Guide has some additional SQL Server recommendations as well.
Migrating the Database
- Ensure a Database Administrator assists in migration.
- During off-hours or a scheduled outage, stop the Bluebeam Studio Job Queue and Bluebeam Studio Service on the app server.
- It’s recommended to perform a Back Up and then Restore Database operation to migrate the databases.
- For both BluebeamStudio and BluebeamCache: right-click the database, select Tasks >Back Up…> create a Full Backup to a desired backup location
- Ensure this location is accessible by the new SQL server or copy it to an accessible location, post-backup
- Right-click the databases on the new SQL server and select Restore Database…
- Under General > Device > select one database at a time
- Under Files tab > Relocate all files to folder > Ensure correct paths are selected > run Restore operation
- For both BluebeamStudio and BluebeamCache: right-click the database, select Tasks >Back Up…> create a Full Backup to a desired backup location
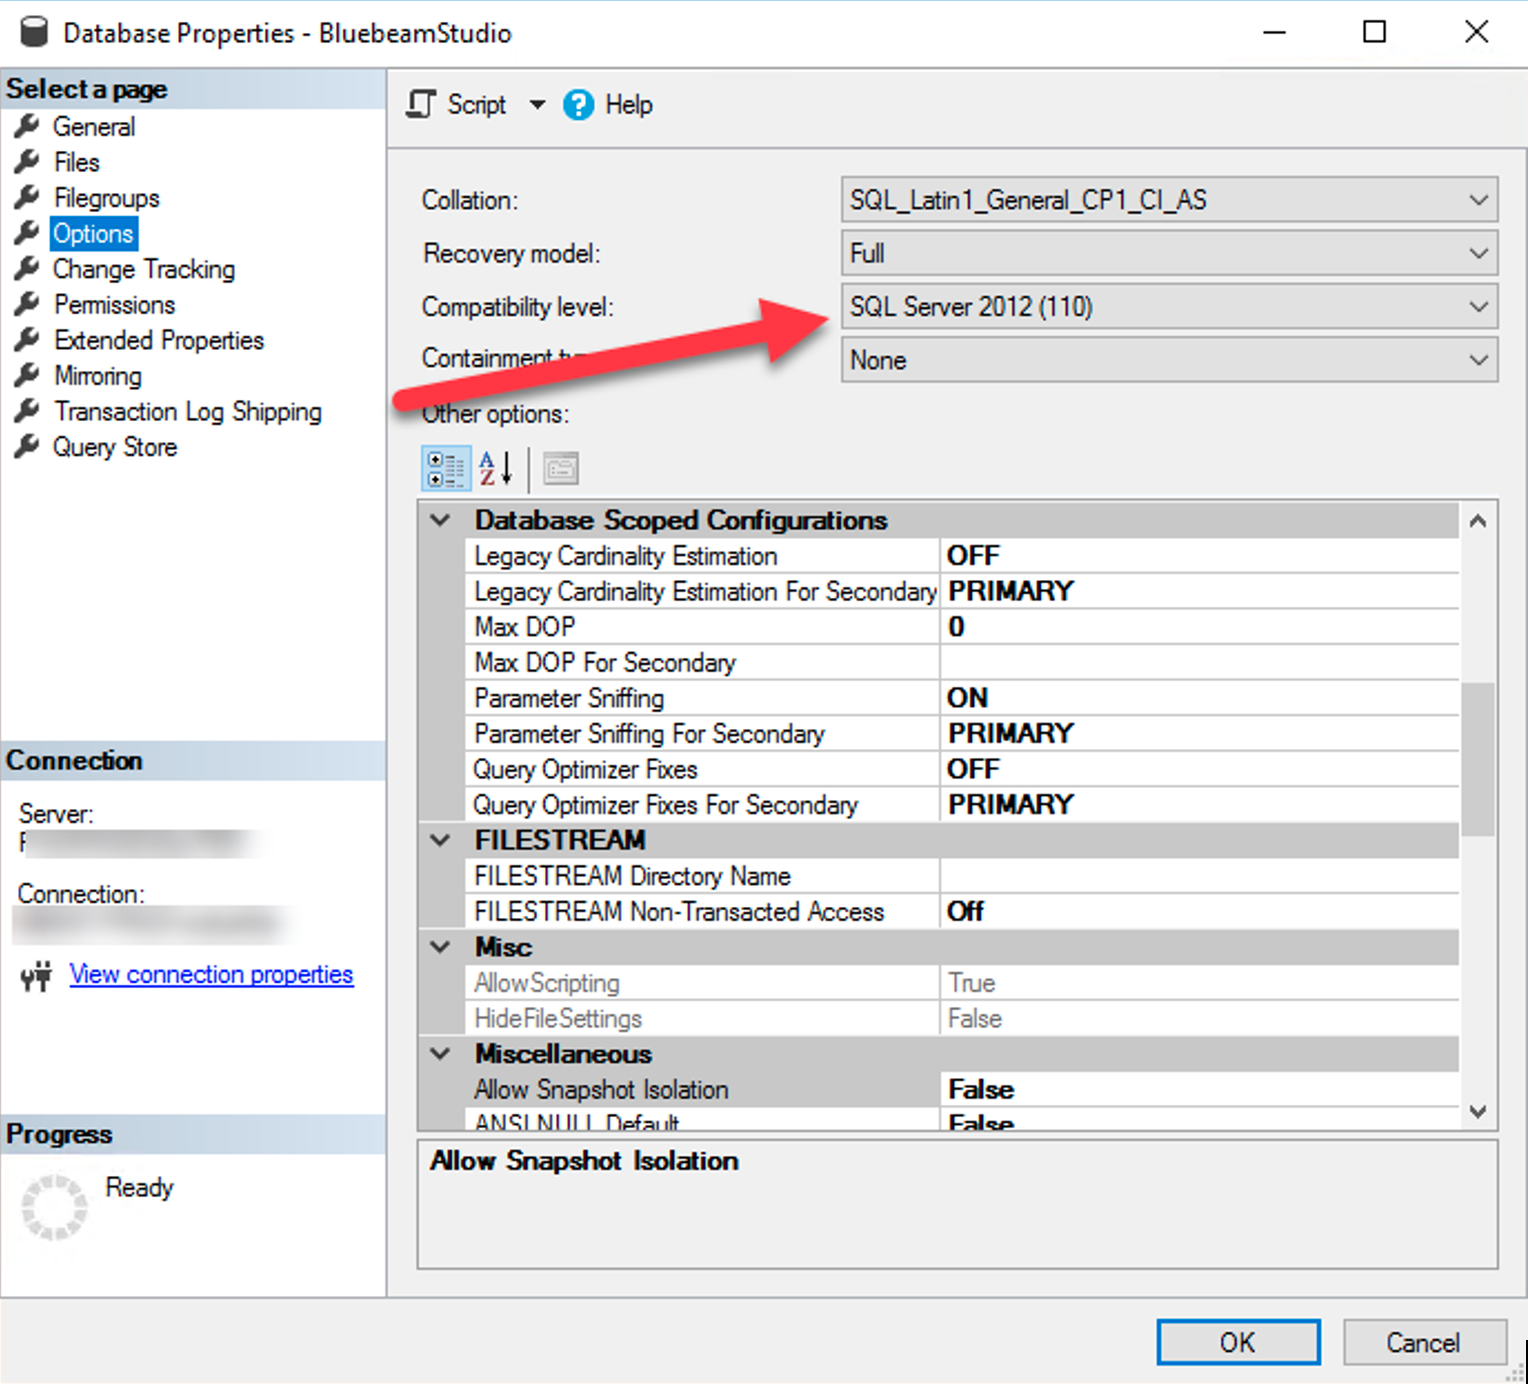
- In restoring the databases to SQL 2016, it should automatically set to Compatibility level to SQL Server 2012. It is still a good idea to double check this, as there may be issues if the Compatibility level is not properly set.
- To find the Compatibility Level, right-click the database and select Properties.
- Select the Options page and ensure Compatibility level is set to SQL Server 2012 (110).
Pointing SE to new SQL server
- In the Bluebeam Studio Enterprise Administrator, select Database Connection.
- Update SQL Server Hostname.
- Update SQL User/Password (if using SQL Authentication) or current Windows User/Password (if using Windows Authentication).
- Test the connection. If test is successful, start the Bluebeam services again.
- Select Apply or OK to confirm changes. At this point the services might restart.
- Test Revu Studio functionality by downloading, checking in, or uploading a Project, by downloading or uploading a Session, and verify Portal access.
Further Recommendations post-migration
- After migrating to SQL Server 2016, you may want to let the system run for a few days to monitor for bad query performance (checking for frequent deadlocks in either db or app logs). If needed, run the “exec sp_updatestats” command on both databases, during off-peak hours, to reduce latency.
- If Rebuild Index (should be done less frequently) is run due to fragmentation issues, then update stats doesn’t need to be run
- If there are still frequent deadlock issues after several days of usage and running the
“sp_updatestats” command does not help, try turning on Legacy Cardinality Estimator. - If your system has had the manual Studio Enterprise performance patch (3.1.1), you will need to send us your settings.xml file after migrating/pointing Studio Enterprise to the new SQL database so that we can update the Max Pool Size value.
- This can be found on the Studio Enterprise server:
C:\ProgramData\Bluebeam Software\Studio\settings.xml - The Studio Enterprise server will continue to work even though this value has not been updated, it will just have fewer allowed connections.
- Bluebeam support will update the settings.xml file as soon as they can and send it back. At that point the Studio Enterprise administrator can replace their current settings.xml file with the updated one. This will include a restart of the Studio Enterprise servers’ services. This should only take a few minutes to complete but there will be downtime while the services are restarting.
- We recommend keeping the old SQL server alive, but shut down, for some time after the cutover to ensure there is a possible fallback path if issues arise.
- This can be found on the Studio Enterprise server:
If your system does not have the manual performance patch, you may want to implement it after the database migration. Info on this performance patch below.
For Bluebeam to update your settings.xml file, please submit a support ticket here. If you are able to notify Bluebeam with the timeframe you are planning to perform the migration, and we will aim to have a turnaround time of 48 hours with the update to your settings.xml file. You can the use this support case to send the settings.xml once the migration is complete.
Performance Patch
This performance patch is a more manual process that involves running some SQL scripts and changing some files, but will help with some of the bottlenecks that can occur in Studio Enterprise 3.1.
This patch is designed to increase performance with the database; however, it will not be able to overcome environmental bottlenecks like firewalls, fragmented databases, or slow file transfer speeds over the internal network.
What is addressed in the Patch:
- Creation of new Indexes and Stored Procedures to address slow Session markup, markup resource, and chat history database tables. This will address issues where some SQL queries were taking too long to execute.
- Max Connection Pool in Settings.xml file will need to be increased to allow more concurrent connections. The default value of 100 will be increased to 1024.This is the total number of connections allowed by the Application Server to make on behalf of Studio users. Each connection retrieves data about a Session or Project requested by users; if the number of used connections is maxed out, users might be denied access to Studio until an available connection is free.
If you decide you would like update to the Studio Enterprise 3.1 Performance Patch, please provide the following Settings.xml file to us by emailing support@bluebeam.com.
- On Studio Enterprise Server:
C:\ProgramData\Bluebeam Software\Studio\settings.xml
Once we receive your Settings.xml file, we will update it on our end and return it to you with the full installation instructions.