
This article applies to:
- Revu 20
- Revu 2019
- Revu 2018
You can configure certain aspects of the Stapler job before running it by clicking Configure. This dialog might also appear as a Save As dialog when running the job if the “Prompt for file name” option has not been disabled in Settings.

You can set the following:
File Name: the name of the file that will be created.
Save as type: select from ten file types in addition to PDF. Supported formats include: PostScript, TIFF, Bitmap, JPEG, PNG, PSD, PCL, WMF, EMF, GIF.
Color Setting: Different file formats support different color depths. The color depth determines how many colors are used when images are saved. To select a different color depth, use the Color Setting menu.
For color images, use True Color, 256 Color or 16 Color. True Color uses more colors than the human eye can differentiate between (and more than any monitor/printer can display/print), so use it for the highest quality images. 256 Color and 16 Color will produce smaller files, but with less color precision. Monochrome is black and white, and Grayscale supports many different shades of gray. The only options that will appear are those supported by the Save as type selected.
If the Color Setting is set to fewer colors than the source file includes, unsupported colors will be replaced with their closest approximation. Photographs and rendered images should generally use True Color, while schematics and drawings with fewer colors can be represented well with 256 Color or 16 Color.
Append Mode: Allows you to add the new PDF to the beginning or end of an existing PDF, or to overwrite the existing PDF. Append mode only works with PDF files. The options are:
- Overwrite: replaces the existing file.
- Append: adds the new content to the end of the existing PDF.
- Prepend: adds the new content to the beginning of the existing PDF.
Image Compression
This section has two parts: a Compression Type and the JPEG Quality menu. Select either Photographs (JPEG) or Graphics (ZIP) when creating the file. Choosing Default will use whichever option is set up as default on your computer.
If the drawing you are converting to PDF is mostly comprised of photographs, the Photographs (JPEG) option will produce better results. If your drawing contains mostly graphics or monochrome images, then Graphics (ZIP) will produce the best results.
Note: Using the incorrect compression can significantly increase the size of the PDF file.
The JPEG Quality menu is only available when creating a JPEG image file. Note that a PDF file using the JPEG compression option does not constitute a JPEG image. The menu allows you to customize how precise the resulting images will be. There are five options: Minimum, Low, Medium, High, and Maximum.
Minimum will produce the smallest file but lowest image fidelity. Maximum will do the opposite; it will create the largest file with the highest fidelity. The options between Minimum and Maximum will produce images between those two extremes.
Resolution
This section controls image resolution. The first setting, Line, controls how precisely the software will transfer the line vectors from the original file to the image. Print will produce a higher-quality, larger file; Draft will create a lower-quality, smaller file.
The Image menu controls the image resolution by adjusting the dots-per-inch (dpi) the image will have. A higher dpi setting will create a better image, but will increase the file size.
Image Anti-Aliasing
Image Anti-Aliasing smoothes out an image. Aliasing is the effect that causes jagged lines in diagonal or curved objects due to the square pixels on computer screens and printers. Anti-Aliasing attempts to correct this by using intermediate colors between the line color and background color.
The Text menu sets how much anti-aliasing to use on text, while the Graphics menu sets how much anti-aliasing to use with vector graphics. Note that these settings do not affect photographs or other pre-rendered images.
Line Merge
The final advanced setting is Line Merge. Select Line Merge for solid colored lines to appear transparent when overlapping other colored lines and text beneath shaded areas to be visible.
The Blend Mode controls how to blend the lines together and the Opacity menu controls how opaque the top line will be. There are 12 different blend modes that can be used to control the transparency settings with line merge. 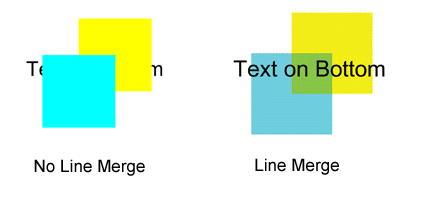
Post Processing
Select the Enable checkbox to activate a post processing operation as part of the PDF creation process. A second pass is performed on the PDF to correct certain conditions that may create non-optimal PDFs. Clicking the Manage button displays the PDF Post Processing Settings dialog.
Select the Version to save using the PDF version drop down menu.
- 1.4 Standard is the default
- 1.5 Compressed will compress any data streams that are not already compressed.
- PDF/A-1b will create a PDF file that is compatible with the PDF/A-1b archival standard
Set the Process Wipeouts, Text Masks and OLE objects option when creating PDFs from AutoCAD drawings that have text masks or wipeouts. This option is on by default for making PDFs from AutoCAD.
- Fix Striped Images minimizes where lines or stripes appear in images.
- Combine Adjacent Images stores images more efficiently in the PDF. This will also help to display certain images in PDFs created from AutoCAD correctly.
- Optimize Solid Color Image converts any solid color raster images to vector.
- Remove Text Clipping for those situations where text near the upper margins of a drawing appears clipped.
Page Rotation
Select a Page Rotation to rotate the orientation of the PDF file. Select 0 degrees for documents and most situations. Auto will use the last value saved.
More Information
Overview of the Bluebeam Stapler
Performing multiple jobs at once in the Bluebeam Stapler
How-To
Revu 20
Revu 2019
Revu 2018
Studio
Integrations & Plugins