Using an older version of Revu?
Applies to:
- Basics
- Core
- Complete
You may find it helpful to overlay sections of a drawing rather than compare entire PDFs. For example, electrical drawings for a unit in an apartment building can be superimposed over the architectural drawings to provide more useful details such as wall size, depth, length, etc. This method is also helpful for comparing markups on different drawing revisions.
In this article, we’ll go over how to compare and overlay areas of drawings using the Snapshot tool. For more information about using Compare Documents in Revu, please see this video.
Overlay drawing sections
- In Revu, open the two PDFs with the areas you’d like to compare.
- From the document tab, navigate to the drawing with the section that you want to overlay on top of the second version (architectural, revised, etc.).
- Go to Edit >
 Snapshot (G).
 - Click and drag a rectangle around the specific area you’d like to compare.
- Copy (Ctrl+C) the snapshot to your clipboard.
- From the Document tab, navigate to the second drawing, and paste-in-place (Ctrl+Shift+V) the snapshot over the same area.
If the areas aren’t perfectly aligned after pasting in place, click and drag the snapshot to change its position. You can resize the snapshot using the yellow control points if needed.
Highlight differences between drawing sections
You can compare an area at a glance with unique details from each drawing by color coding. To color code content from the snapshot of the source drawing, follow these steps:
- Select the snapshot and navigate to the
 Properties panel from the right sidebar menu.
 - Under Appearance, select Change Colors…
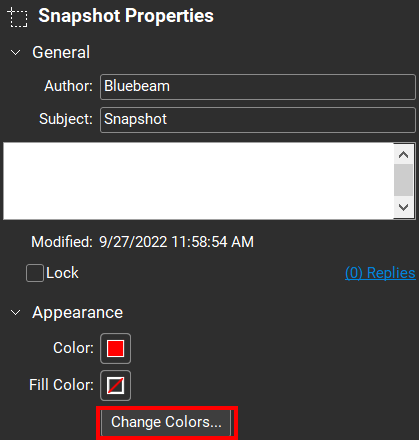
- In the Color Processing window, select the source color you’d like to change (usually black for black-and-white drawings).
- Select the second box, and choose the color for the source content.
- In the second row, select white for the Source Color and choose
 No Color for the second option to make the snapshot background transparent.
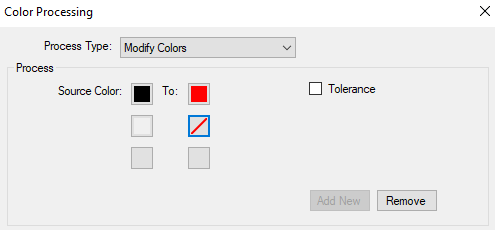
- When you finish modifying colors, select OK.
- From the
 Properties panel, adjust the opacity to less than 100 to better view overlapping content.
For more quick drawing management tips, see How to create an enlarged drawing with the Snapshot tool.
How-To
Markup
PDF Management