Angle measurement
The Angle measurement tool places specialized markups that calculate an angle.
Before you start, set the page scale for your document first. If you try to place a measurement on a page without a scale, you'll be prompted to set one.
- Go to Tools > Measure >
 Angle.
 - Click to define a point along the first ray.
- Click the vertex to define the second point.
- Click along the second ray to complete the angle.
When you've set the page scale, a preview of key measurement values appears in the lower-right corner as you place measurements to ensure precision. Hide or recall it as needed by selecting the X or the measure icon.
Tips:
- Hold Shift to draw lines at horizontal, vertical, or 45° angles.
- Hold Ctrl and drag an existing markup to automatically copy it
To remove markups from your PDF, do one of the following:
- Select the markup on the PDF or from the Markups list.
- Press Delete on your keyboard, or right-click and select
 Delete.
You can add an action to almost any markup. Right-click the markup and select Edit Action.
Markups may display indicator icons below and to the right of the markup (or grouped markups). These include:
 Action: Shows that an action is defined for this markup. Select to trigger the action.
 Capture: Shows that the markup has embedded media (typically an image or video). Select this icon to open a preview window.
 Reply: Shows one or more replies exist in the Markups list. Hover to preview replies or select to jump to the markup's entry. Turn off the ability to see reply indicators in the View menu.
Select a markup to reveal its control handles. Each handle controls a different aspect of size and orientation.
Rotate the markup: Drag the orange handle outside the markup (default: 15° increments; hold Shift for 1° increments)
Rotate the caption: Drag the orange handle directly over the caption.
Move the entire markup: Drag any part except the control handles.
Resize a segment or change its angle: Drag the appropriate yellow handle.
Scale the markup up or down: Drag the appropriate purple handle.
You can also enter rotation values in the Rotation field in the Layout section of the Properties panel. To reset a rotated caption, right-click it and select Reset Caption Position.
You can customize line color, style, width, opacity, font style, and caption visibility.
To change the appearance of an Angle measurement, select the markup and select the Properties panel. Go to Window > Panels > Properties to show the Properties panel if it is hidden. Several properties will also be available on the Properties toolbar when the markup is selected.
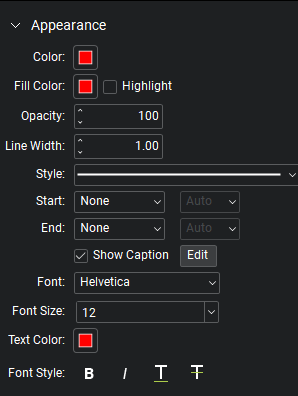
Color: Sets the line color.
Fill Color: Controls the fill color of the endpoints.
Highlight: Makes the fill color and line transparent so underlying content shows through.
Opacity: Sets opacity level of the line and endpoints, from 0 (invisible) to 100 (opaque).
Line Width: Sets the line thickness in points. A setting of 0 effectively renders the line invisible.
Style: Determines the line pattern. In addition, there are several advanced line styles and you can create Custom Line Styles.
Start and End: Controls the appearance of the endpoints for each side of the line. The diagram below shows samples of each type of endpoint.
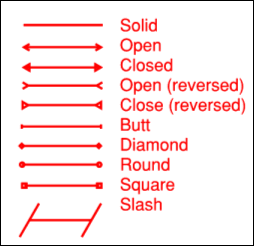
Each endpoint has an associated Scale that determines the size of the endpoint in relation to the Line Width. By default, it is set to Auto and will automatically adjust as the Line Width is changed.
Show Caption: Display caption text. Select Edit to choose which measurements to show.
Font: Sets the font used for the selected text. Available fonts are divided into three regions:
- The first region shows all fonts used in the currently selected text element.
- The second region lists the standard PDF fonts that are supported by all PDF viewers. These fonts don't need to be embedded in the PDF when used, thereby cutting down on file size.
- The third region shows all other available fonts. When used, these fonts need to be embedded in the PDF.
Font settings are retained in the PDF and will substitute as needed if the original font is unavailable.
Font Size: Sets the font size for text. You can choose a size from 2 to 72 points in the list, or enter any value from 1 to 144 points manually. You can also use decimal values with one digit after the decimal point.
Text Color: Sets the color of text.
Font Style: Control the formatting of the text. Options include Bold, Italic, Underline, and Strikethrough. Generally, any combination of these styles can be applied to format the text.