Dimensionswerkzeug
Das Dimensions-Tool platziert ein Dimensions-Markup (auch bekannt als "Leader-Linie") auf das PDF. Obwohl Dimensions-Markierungen Abmessungen darstellen können, sind sie keine echten Mess- oder Mengenermittlungswerkzeuge; für diese siehe das Messwerkzeug.
- Wählen Sie das Maßwerkzeug mit einer der folgenden Methoden aus:
- Gehen Sie zu Werkzeuge > Markierung >
 Abmessung.
 - Wählen Sie auf der Symbolleiste „Formen“ aus.
- Drücke Umschalttaste+L auf der Tastatur.
- Gehen Sie zu Werkzeuge > Markierung >
- Wählen Sie eine Stelle im PDF, um den Startpunkt hinzuzufügen, und ziehen Sie zum Endpunkt. Zum Platzieren der Markierung freigeben.
- Nach der Freigabe wird die Markierung automatisch vorbereitet, um eine Bildunterschrift zu erhalten. Geben Sie bei Wunsch eine Bildunterschrift ein.
- Drücken Sie die ESC-Taste oder klicken Sie außerhalb der Markierung, um den Vorgang abzuschließen.
Tipps:
- Ziehen Sie von links nach rechts, um die Bemaßungslinie über den Punkten anzuzeigen. Ziehen Sie von rechts nach links, um die Bemaßungslinie unter den Punkten anzuzeigen.
- Halten Sie die Umschalttaste gedrückt, um Linien horizontal, vertikal oder im 45°-Winkel zu zeichnen.
- Halten Sie die Strg-Taste gedrückt und ziehen Sie eine vorhandene Markierung, um sie automatisch zu kopieren.
Gehen Sie wie folgt vor, um Markierungen aus Ihrer PDF-Datei zu entfernen:
- Wählen Sie die Markierung in der PDF-Datei oder aus der Markierungsliste aus.
- Drücken Sie die Taste Entf auf Ihrer Tastatur oder klicken Sie mit der rechten Maustaste und wählen Sie
 Löschen.
Wählen Sie eine Markierung aus, um die entsprechenden Ziehpunkte anzuzeigen. Jeder Ziehpunkt steuert einen unterschiedlichen Aspekt der Größe und Ausrichtung.
Größe der Markierung ändern oder dessen Winkel anpassen: Ziehen Sie den entsprechenden gelben Ziehpunkt. Halten Sie die Umschalttaste gedrückt und ziehen Sie die Markierung nur horizontal, vertikal oder im 45°-Winkel.
Höhe der Markierung anpassen: Ziehen Sie den mittleren (Beschriftungs-)Ziehpunkt.
Nur die Beschriftung verschieben: Halten Sie die Umschalttaste gedrückt und ziehen Sie die Beschriftung. Um die Beschriftung auf ihre Standardposition zurückzusetzen, klicken Sie mit der rechten Maustaste darauf und auswählen Sie Beschriftungsposition zurücksetzen.
Die gesamte Markierung verschieben: Ziehen Sie einen beliebigen Teil, außer den Ziehgriffen.
Bildbeschriftung drehen: Ziehen Sie den orangefarbenen Ziehpunkt direkt über die Bildbeschriftung.
- Um die Beschriftung um 180° zu drehen, klicken Sie mit der rechten Maustaste auf die Markierung und wählen Sie Text umdrehen aus.
Weitere Informationen finden Sie unter Markierungen bearbeiten.
Sie können zu fast jeder Markierung eine Aktion hinzufügen. Klicken Sie mit der rechten Maustaste auf die Markierung und wählen Sie Aktion bearbeiten aus.
Markierungen können unterhalb und rechts neben der Markierung (oder gruppierten Markierungen) Symbolanzeiger anzeigen. Dazu gehören:
 Aktion: Zeigt an, dass für diese Markierung eine Aktion definiert ist. Wählen Sie diese Option, um die Aktion auszulösen.
 Bildaufnahme: Zeigt an, dass die Markierung eingebettete Medien enthält (in der Regel ein Bild oder ein Video). Klicken Sie auf dieses Symbol, um ein Vorschaufenster zu öffnen.
 Antwort: Zeigt an, dass in der Markierungsliste eine oder mehrere Antworten vorhanden sind. Bewegen Sie den Mauszeiger darüber, um eine Vorschau der Antworten anzuzeigen, oder wählen Sie die Option aus, um zu dem entsprechenden Eintrag der Markierung zu springen. Sie können die Anzeige von Antwortanzeigern im Menü Ansicht deaktivieren.
Das Aussehen der Bemaßungsmarkierung ist konfigurierbar, einschließlich ihrer Linien- und Füllfarbe, Linienbreite und -stil, Deckkraft und Schrifteigenschaften für die Beschriftung.
Um die Darstellung einer Abmessungsmarkierung zu ändern, wählen Sie die Markierung aus und wählen Sie die Seitenleiste Eigenschaften. Gehen Sie zu Fenster > Seitenleisten > Eigenschaften, um die Seitenleiste Eigenschaften anzuzeigen, falls sie ausgeblendet ist. Mehrere Eigenschaften sind auch in der Symbolleiste „Eigenschaften“ verfügbar, wenn die Markierung ausgewählt ist.
![]()
Farbe: Sets die Linienfarbe.
Füllfarbe: Steuert die Füllfarbe der Endpunkte.
Hervorheben: Macht die Füllfarbe und Linie transparent, sodass der darunterliegende Inhalt sichtbar wird.
Opazität: Setzt das Opazitätsniveau der Linie und Endpunkte von 0 (unsichtbar) bis 100 (undurchsichtig).
Linienstärke: Legt die Linienstärke in Punkten fest. Eine Einstellung von 0 macht die Linie effektiv unsichtbar.
Stil: Legt das Muster der Linie fest. Darüber hinaus stehen mehrere erweiterte Linieneigenschaften zur Verfügung, und Sie können benutzerdefinierte Linieneigenschaften erstellen.
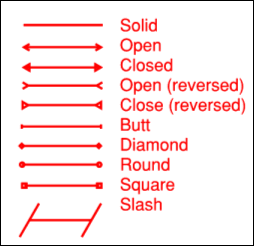
Start und End: Kontrolliert das Erscheinungsbild der Endpunkte auf jeder Seite der Linie. Das untenstehende Diagramm zeigt Beispiele für jeden Endpunkttyp.
Jeder Endpunkt hat eine zugehörige Skala , die die Größe des Endpunkts in Bezug auf die Linienbreite bestimmt. Standardmäßig ist er auf Auto eingestellt und passt sich automatisch an, wenn die Linienbreite geändert wird.
Bildbeschriftung anzeigen: Bildbeschriftungstext anzeigen. Wählen Sie Bearbeiten , um auszuwählen, welche Abmessungen angezeigt werden sollen.
Bildunterschrift Führungslinie anzeigen: Wählen Sie aus, um die Führungslinie der Bildunterschrift anzuzeigen.
Schriftart: Legt die Schriftart für den ausgewählten Text fest. Verfügbare Schriftarten sind in drei Bereiche unterteilt:
- Der erste Bereich zeigt alle Schriftarten an, die im aktuell ausgewählten Textelement verwendet werden.
- Im zweiten Bereich werden die Standard-PDF-Schriftarten aufgeführt, die von allen PDF-Viewern unterstützt werden. Diese Schriftarten müssen bei der Verwendung nicht in die PDF-Datei eingebettet werden, was die Dateigröße reduziert.
- Im dritten Bereich werden alle anderen verfügbaren Schriftarten angezeigt. Wenn diese Schriftarten verwendet werden, müssen sie in das PDF-Dokument eingebettet werden.
Die Schriftarteneinstellungen werden in der PDF-Datei beibehalten und bei Bedarf ersetzt, falls die ursprüngliche Schriftart nicht verfügbar ist.
Schriftgröße: Legt die Schriftgröße für Text fest. Sie können eine Größe zwischen 2 und 72 Punkten aus der Liste auswählen oder einen beliebigen Wert zwischen 1 und 144 Punkten manuell eingeben. Sie können auch Dezimalwerte mit einer Stelle nach dem Komma verwenden.
Textfarbe: Sets die Farbe des Textes fest.
Die Schriftstil-Einstellungen steuern die Formatierung des Textes. Optionen sind Fett, Kursiv, Unterstreichen, Durchstreichen, Superscript und Subscript. Im Allgemeinen kann jede Kombination dieser Stile zur Formatierung des Textes angewendet werden.