Bluebeam Gateway User Guide
What is the Bluebeam Gateway?
The Bluebeam Gateway is an online administrative portal available for Revu 20 & below licenses with active Maintenance. Gateway admins (also called license admins) can make changes to their Bluebeam accounts, manage other Gateway admins, and more.
The Gateway is arranged into two sections:
- Revu Licenses – View and manage your Perpetual, Enterprise and Open licenses.
- Gateway Admins – Set permissions for admins on the account.
You can navigate through these sections in the Table of Contents on the right. First, let’s go over accessing the Gateway and how to sign in.
Accessing the Gateway
The Bluebeam Gateway is fully accessible online at https://portal.bluebeam.com and admins can perform account-related tasks there.
Signing In
To sign in to the Gateway, you’ll need your Bluebeam ID (BBID), the same credentials used for signing into Bluebeam Studio.
To sign in to the Gateway:
- Go to https://portal.bluebeam.com
- Under Bluebeam ID, enter your BBID email and password.
Don’t have a Bluebeam ID? Click Create Account. - Click Sign In.
If you have multiple accounts
In the Gateway homepage, you’ll see an overview of your accounts and associated licenses. Use the search bar to quickly find the account you’re looking for.
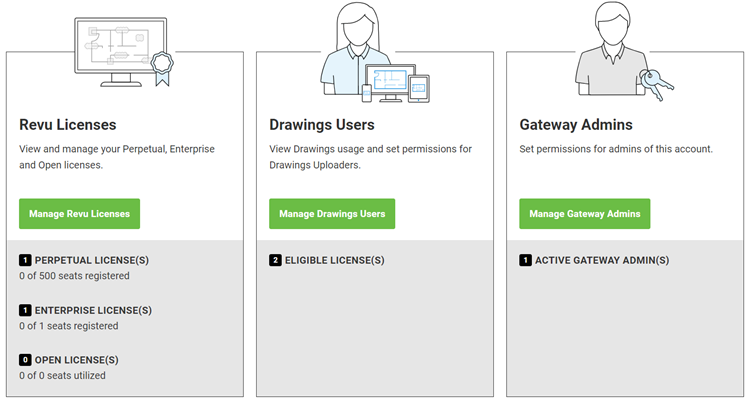
Account Summary
Clicking on an account will take you to the Account Summary page. This is where you’ll see Revu licenses and active Gateway admins. From here, you can manage the account by going to one of the sections discussed below.
Revu Licenses
Clicking Revu Licenses will take you to the Manage Licenses page, where you can select a tab (Perpetual, Enterprise, or Open) and view an account’s licenses. Switch between different license types by clicking the tabs at the top. If a tab isn’t visible, it means that license type isn’t associated with your account. To learn more about the different license types, see Revu 20 & Below Licensing FAQ.
Perpetual Licenses
In this tab, you’ll see a tabulated view of all Perpetual Licenses associated with your account. Each license is identified by its unique serial number and the table can be sorted by Registered Seats, Maintenance Expiration, Version, and more. To sort these results even further, click on an edition of Revu at the top. Clicking on a serial number will take you to the Details page for that license.
Search by computer name
If you don’t know the serial number for a license, you can search by its computer name. To do this, select the Computer Name option in the search bar.
Details page
The Details page is where you can see all information for your license, such as:
- Product Key
- Maintenance
- Available Seats
- Version
- IP Address
- Registered Date
Export License Information
You can use export all data for a license by clicking the Download the .csv link.
Enterprise License
In the Enterprise Licenses tab, you’ll see a tabulated view of all Enterprise Licenses associated with your account. Each license is identified by its unique serial number and sorted by Registered Seats, Maintenance Expiration, Version and more. To sort these results even further, click on an edition of Revu at the top. Clicking on a serial number will take you to that license’s Details page.
Search by computer name
If you don’t know the serial number for a license, you can search by its computer name. To do this, select the Computer Name option in the search bar.
Details page
The Details page is where you can see all information for an Enterprise License, such as:
- User
- Version
- Product Key
- Registered Seats
- Available Seats
- Maintenance
- Last Ping
Export License Information
You can extract all data for this license by clicking the Download the .csv link.
Registered tab
The Registered tab lists all computers currently registered to the selected license. You can also see other details such as IP address, the date the computer was registered, and Last Ping (the last time Revu was accessed on the device).
Clicking the checkbox next to each computer reveals the Revoke Computer button. Revoking a registered computer releases it from the license and forces the removal of all license info from that computer.
You can cancel a Pending revoke request by clicking Cancel Revoke in the following page. Once the status has changed to Successfully Revoked, machines will need to be re-registered manually.
Revoked Tab
This tab lists all unregistered computers, along with the Computer Name, Version number, Revoked Date, and Last Ping (the last time Revu was accessed on the device).
Open License
In the Open Licenses tab, you’ll see a tabulated view of all Open Licenses associated with your account. Each license is identified by its unique serial number and sorted by Seats that are Allowed or In Use, and the total number of Available Seats. Clicking on a Serial Number will take you to that license’s Details page. Learn more about how Seats are managed in the Revu Administration Guide.
Search by computer name
If you don’t know the serial number for a license, you can search by its computer name. To do this, select the Computer Name option in the search bar.
Details Page
The Details page is where you can see all information for a license, such as product keys for all versions, computer names, users, seats allowed, Maintenance status, and Last Ping (the last time Revu was accessed on the device).
The middle of this page shows a Usage Report section that includes a graph detailing the license’s usage history. The Devices on This License section displays information about devices that have accessed the Open License.
Export License Information
Click this link to download an Excel spreadsheet with license information.
Usage Report
The Usage Report allows you to visualize data trends and examine license access in greater depth. There are a few ways to filter the data:
- Active Users – When selected, this option displays the number of active users on the graph.
- Active and Denied Users – When selected, this option displays the number of Active and Denied users on the graph.
- Date dropdown – Use this dropdown to change the data that appears in the graph, and in the user data spreadsheet mentioned previously. You can select preset date ranges or use the Custom Date Range option.
- Export license information – Click Download the .csv to download an Excel spreadsheet containing detailed information about user access to the Open License. The date range included in this spreadsheet is determined by the dates displayed in the graph.
To create a custom date range:
- Click on the downward arrow above the graph. A dropdown menu will open.
- Select Custom Range at the bottom of the list. A dialog box will display over the graph.
- Click the date field on the left to select a start date.
- Once the calendar appears, select a date.
To select a different month, click the current month name to enter the monthly view.
To select a different year, click the back arrow when you’re in day view. - Next, click on the date field to the right and select an end date using the calendar.
- Click Apply.
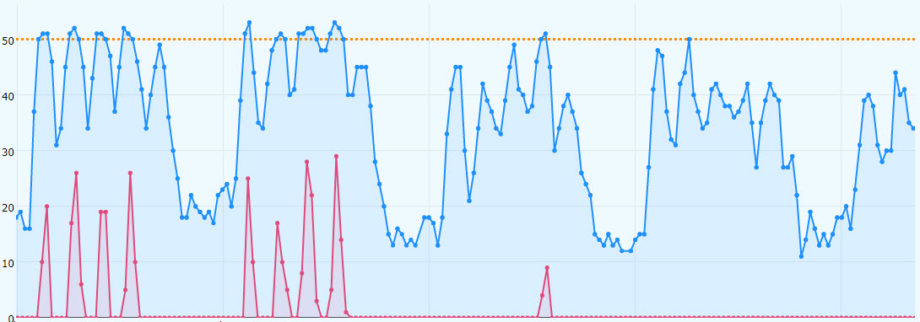
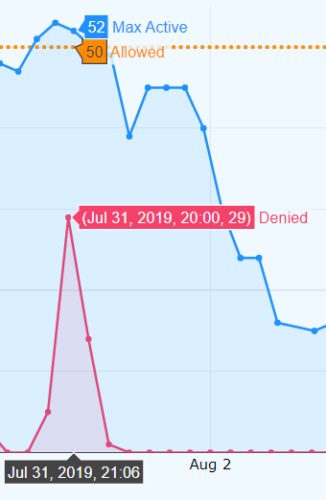
The graph illustrates trends based on three statistics:
- Allowed – The number of users allowed to access Revu at the same time. This number is represented by a yellow dotted line.
- Denied – The number of users denied access to Revu at a particular time, indicating that the number of Allowed users was exceeded. This number is represented by a red dot. Make sure the Show Denied checkbox is selected if you want to display this information.
- Max Active – The total number of users who accessed Revu at a particular time. This number is represented by a blue dot.
You can also interact with the graph to see more detailed information:
- Hover over the graph to see exact numbers for a particular time. A tooltip adjacent to the dot your cursor is on will display the exact numbers in their associated colors. A tooltip will also display the indicated time at the bottom of the graph.
- To view a smaller data set, click-and-drag over your intended range, then release. The graph will zoom in on that range. Double-click on the graph to zoom out.
Devices on This License
This portion of the license page lets you see all the devices that have access to the Open license or had access in the past. This information is organized into the following tabs: Active, Registered, and Revoked.
Active Tab
This tab displays a list of the computers that are currently running Revu and is where you can temporarily release a seat currently in use by one of the listed machines. Releasing a seat on your Open License allows another computer to open Revu, take the released seat, and use Revu with full functionality.
To release a seat, place a checkmark in the corresponding checkbox on the left and click Release Selected. Releasing a seat doesn’t revoke the license registration for the computer, and it will still appear on the Registered tab.
This is a temporary action and any computer released in this way will reacquire its seat within the next 20 minutes, so it’s important that Revu is opened on the new computer soon after the seat release occurs. Otherwise, the seat will be reclaimed by the original computer and there will be no available seats for other machines.
After the released seat is successfully acquired by a new computer, the original PC that was released will still be able to obtain a seat even if all seats are occupied. This ensures that a user is never in a position where they are unable to save their work. In this situation, you may notice there is a negative seat balance on your license. This will correct itself once another user closes Revu and releases their seat.
Registered Tab
This tab displays a list of registered computers, along with the product version number, IP address, original registration date, and Last Ping (the last time Revu was accessed on the device).
If you need to permanently unregister a computer, place a checkmark in the corresponding checkbox on the left, click Revoke Selected, and then click Revoke Devices on the next page that opens to confirm the revocation.
Revoked Tab
This tab displays a list of unregistered computers, along with the version number, revoke status, and the time when it was last used.
You can cancel a pending revoke request by clicking Cancel Revoke next to a device listed on the Revoked tab. Machines will need to be re-registered manually once the Revoke Status has changed to Successfully Revoked.
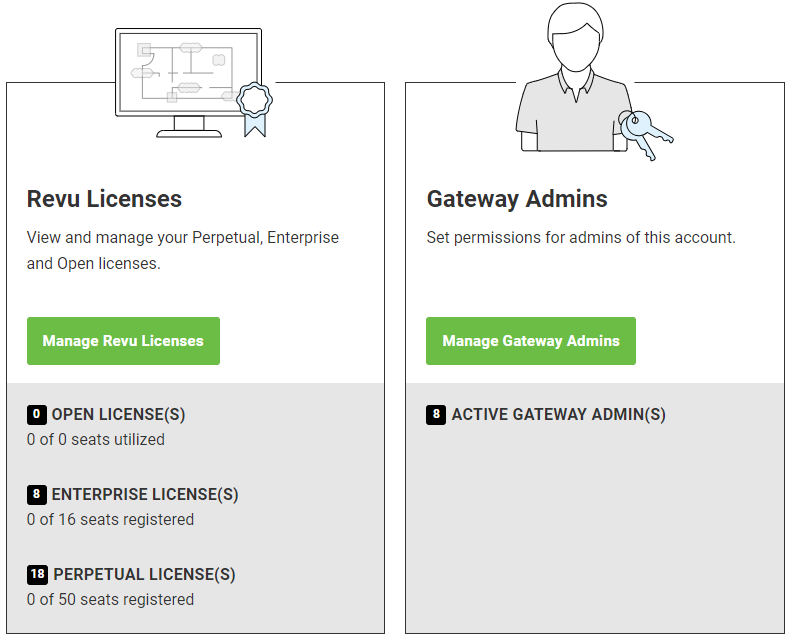
Gateway Admins
If you want to have a colleague help with your license administration, you can add them as a Gateway admin (also called a license admin). Admins are able to view all licenses within an account and manage other Gateway admins.
From the homepage, click Manage Gateway Admins. This takes you to the View and Manage Gateway Admins page that shows a tabulated view of Current Admins and Deactivated Admins.
Current Admins tab
To see the current Gateway admins for an account, select the Current Admins tab. This displays a tabulated list of admins. In this tab, you can also Invite or Deactivate an admin.
Invite a Gateway admin
To invite a new admin, click the Invite Gateway Admin button at the top. Enter the new admin’s BBID email and click Send Invite. The user will receive an email with next steps.
Deactivate a Gateway Admin
To deactivate an existing admin, search for their BBID email in the admin list and click Deactivate.
Deactivated Admins Tab
Select this tab to see a list of deactivated admins. To reactivate an admin, search for their BBID email and click Make Admin; they will receive an email with instructions on what to do next.
Additional Gateway Features
You can access additional features in the Gateway footer, such as:
- Reset Password – This takes you to a BBID reset password page.
- Change Email – This takes you to a BBID change email page.
- Contact Us – This brings you to the Contact Us page, where you can send a message to our Account Services or Technical Support team.
- Download Revu – This takes you to the Updates and Installation page, where you can download our latest product updates.
Bluebeam, Revu, and Bluebeam Studio are trademarks or registered trademarks of Bluebeam, Inc. Microsoft, SharePoint, and Windows are either registered trademarks or trademarks of Microsoft Corporation in the United States and/or other countries.
AutoCAD is a registered trademark of Autodesk in the United States and/or other countries.
© 2019 Bluebeam, Inc. All Rights Reserved.
All other trademarks or registered trademarks are the property of their respective owners.
Setup
Gateway
Licensing & Registration