Overlay Pages
The overlay process in Revu lets you compare two or more PDFs by converting each document to a different color and stacking them on top of each other as layers in a new PDF. Each layer is transparent and blends with the layers below it. Where the colors are stacked directly over each other, they blend to create a darker color, making it easier to see which elements have changed and which ones have remained the same from revision to revision. There is also a batch version of Overlay.
In the example below, an overlay was created from two revisions of a drawing, with the first revision converted to red and the second to green. When the same line existed in both drawings, they stacked to create a dark, nearly black line, indicating areas where no changes had been made from the one revision to the next.
Where something was in the second revision that was not in the first, a green line appeared.
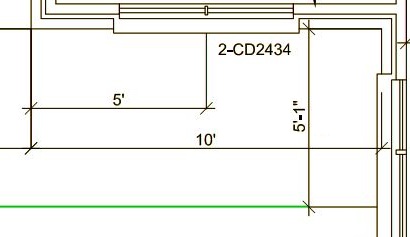
Where something was present in the first revision and was not in the second, a red line appeared.
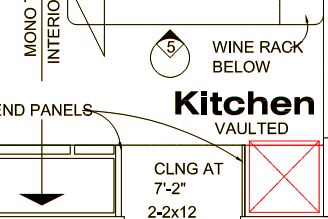
This made it easy not only to see changes made from one drawing to the next, but to know what had been added and what had been removed.
In general, when you run an overlay comparison Revu assumes that you wish to include the active PDF and makes it simple to include other PDFs that are currently open, so you might want to open the PDFs you plan to overlay first. It's not required, however.
-
Go to Document >
 Overlay Pages. The Overlay Pages dialog box appears and the active PDFs (if any) are automatically added to the list.
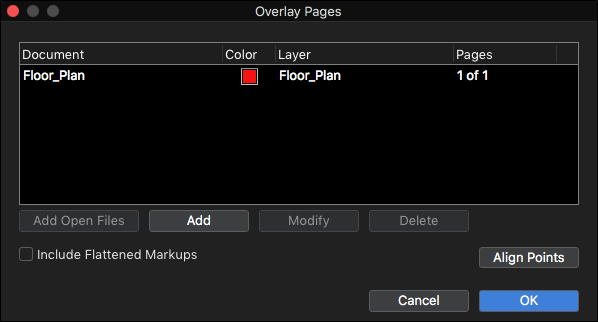
- If one or more PDFs are open, the active PDF is added automatically.
- If there are fewer than two PDFs open, the Open dialog box appears instead. See Adding a PDF to the overlay below.
- To add the other PDFs currently open in Revu to the overlay, click Add Open Files.
- To remove a PDF from the overlay, select it and click Delete.
-
PDFs that are not currently open in Revu can be added to the overlay, if desired.
 Adding a PDF to the overlay
-
Click Add. The Open dialog box appears.
-
Select the desired PDF for a local or network drive and click Open. The Add Layer dialog box appears.
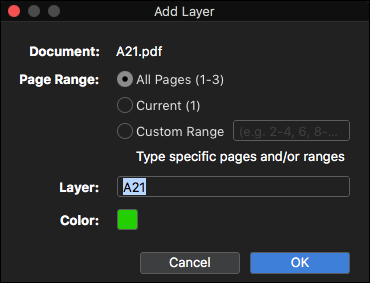
- Set the pages to be overlayed from the Page Range options:
- All Pages: Sets the range to all pages.
- Current: Sets the range to the current page only. The current page number will appear in parentheses, for example, Current (2) if page 2 is the current page.
- Custom: Sets the range to a custom value. To enter a custom range:
- Use a dash between page numbers to define those two pages and all pages in between.
- Use a comma to define pages that are separated.
For example: 1-3, 5, 9 will include pages 1, 2, 3, 5 and 9.
- Enter the name of the layer for this overlay in the Layer field.
- Click the Color button to choose a color to which this layer is to be converted.
- Click OK.
-
-
The overlay settings (for example, color) for a PDF in the overlay can be changed before the overlay is run, if desired.
 Modifying a PDF in the overlay
-
Select the desired PDF and click Modify. The Edit Layer dialog box appears.
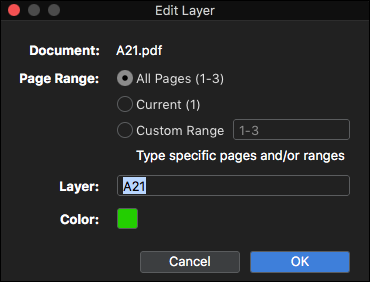
- Set the pages to be overlayed from the Page Range options:
- All Pages: Sets the range to all pages.
- Current: Sets the range to the current page only. The current page number will appear in parentheses, for example, Current (2) if page 2 is the current page.
- Custom: Sets the range to a custom value. To enter a custom range:
- Use a dash between page numbers to define those two pages and all pages in between.
- Use a comma to define pages that are separated.
For example: 1-3, 5, 9 will include pages 1, 2, 3, 5 and 9.
- Enter the name of the layer for this overlay in the Layer field.
- Click the Color button to choose a color to which this layer is to be converted.
- Click OK.
-
-
If the drawings are not identical in terms of scale and position on the page (for example, if you are comparing scans or a scaled drawing to an original) you will need to align them before running the overlay.
 Aligning PDFs in the overlay
- Click Align Points. A dialog box opens explaining how to align points. Click OK to dismiss it.
-
On the first drawing, click three points that will act as anchor points between the drawings. It is recommended to use points near the edges of the drawing.
Tip: Enable Snap to Content on the Status bar to help you get a precise definition.
- On the second drawing, click the three points that are analogous to the ones you clicked on the first. You must select them in the same order you did in the first. The alignment is set when you clicked the third point.
- Click OK. The overlay is created and opened in Revu as a separate PDF.