Managing and Creating Columns in the Markups List
The data displayed in the Markups list is highly customizable. Users have control over which columns are shown and in what order and can create custom columns, including columns that perform user-defined calculations.
You can control which columns appear in the Markups list.
Six types of custom columns are supported. You may add as many of each type as desired.
The Checkmark custom column is a column with a check box.
- On the Markups List toolbar, go to Markups List > Columns > Manage Columns. The Manage Columns dialog box appears.
-
Click Add. The Add Column dialog box appears.

- Enter a display name for the column in the Name field.
-
Select Checkmark from the Type list.
- Set the Default value as Unchecked (default) or Checked, as desired.
- Click OK.
The Choice custom column is a column with a list of defined values from which users can select.
- On the Markups List toolbar, go to Markups List > Columns > Manage Columns. The Manage Columns dialog box appears.
-
Click Add. The Add Column dialog box appears.

- Enter a display name for the column in the Name field.
-
Select Choice from the Type list. All current choice items are listed in the Options list.
-
You can either import choice items from a CSV file or create and modify them manually:
 Importing choice items from a CSV file
- Click Import. An Open dialog box appears.
- Navigate to and select the desired CSV file, then click Open.
- CSV data should be arranged in the following order:
- Column A = The name of the item. This is the name that will appear in the list for selection in the Markups list. (Required)
- Column B = The subject for the item. This links to the Subject property of a markup, allowing for selective filtering of the list based on the markup. (Optional)
- Column C = Numeric value of the choice, if applicable. (Optional)
- CSV data should be arranged in the following order:
- To set one of the imported choice items as the default selection for the column, select it and click Modify, then check Default.
 Creating choice items manually
-
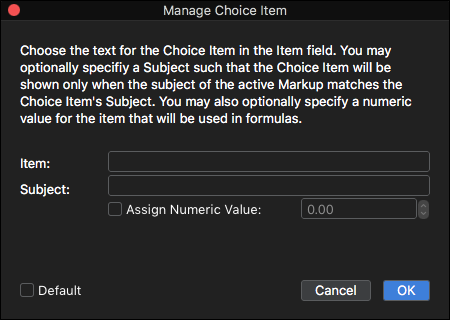
Click Add. The Manage Choice Item dialog box appears.

-
Set the choice item's details:
- Item The name of the item. This is the name that will appear in the list for selection in the Markups list. (Required)
- Subject The subject for the item. This links to the Subject property of a markup, allowing for selective filtering of the list based on the markup. (Optional)
- To give the choice a numeric value (required if it is to be used in a formula), check the Assign Numeric Value box and enter the value in the number field to the right.
- If this choice should be the default selection for the column, check the Default box.
- Click OK.
 Modifying an existing choice item
- Select the desired choice item and click Modify. The Manage Choice Item dialog box appears.
-
Change the choice item's details as desired:
- Item The name of the item. This is the name that will appear in the list for selection in the Markups list. (Required)
- Subject The subject for the item. This links to the Subject property of a markup, allowing for selective filtering of the list based on the markup. (Optional)
- To give the choice a numeric value (required if it is to be used in a formula), check the Assign Numeric Value box and enter the value in the number field to the right.
- If this choice should be the default selection for the column, check the Default box.
- Click OK.
- Click OK.
The Date custom column is a date-format column.
- On the Markups List toolbar, go to Markups List > Columns > Manage Columns. The Manage Columns dialog box appears.
-
Click Add. The Add Column dialog box appears.

- Enter a display name for the column in the Name field.
-
Select Date from the Type list.
- Select a date format from the Format list.
- Select a default value for the column from the Default list:
- None: No date will be added when the markup is created
- Current : The current date will be added by default when the markup is created
- Custom: A specific, predefined date will be added when the markup is created. To define the custom date, enter it in the Custom field.
- Click OK.
The Formula custom column is a column with a defined mathematical operation that is performed on values from other columns in the Markups list. Both standard and custom columns can be used in this mathematical operation.
- On the Markups List toolbar, go to Markups List > Columns > Manage Columns. The Manage Columns dialog box appears.
-
Click Add. The Add Column dialog box appears.

- Enter a display name for the column in the Name field.
-
Select Formula from the Type list.
- Enter the formula in the Expression field. Formulae can consist of the following elements:
- Variables: Includes column names like Area, Count, Length, MeasurementMeasurement is a default column that is important when defining formulas. The Measurement column contains only the numeric value of the primary measurement of a markup and does not contain the unit descriptor. The measure markups like Length, Width, and Area contain an unit descriptor like in, cm, or sq ft. This makes these columns more readable in the Markups list, but also makes them unusable in a formula. The Measurement column removes the unit so only the value remains. The Measurement column also contains the value no matter what type of measure markup was used. The Measurement column will automatically contain the value of a Length, Area, or Count., Volume, and so on. Any new custom columns created will be added to this list
- Constants: Includes the value of e, value of pi, and so on.
- Functions: Includes acos, asin, atan, ceiling, cos, floor, ln, log, round, sin, sqrt, and tan.
Operators: Includes:
- Addition (+)
- Subtraction (-)
- Multiplication (*)
- Division (/)
- Exponential (^)
- Modulus (%)
- Negation (-)
When you start typing in the Expression field, a list of available Variables, Constants, Functions, and Operators appears. Select the desired elements, one at a time, to build your formula.
You can also manually manipulate your formula, if necessary. For example, adding parentheses changes the order of operations, as in this formula: ( [Price] - [Discount] ) * [Quantity].
See Tutorial: Custom Columns for Takeoffs and Estimations for a thorough walkthrough detailing the creation of some common kinds of formula.
- Select the display characteristics of the numerals from the Format list. The options are: Normal, Currency, or Percentage.
- Select the number of decimal places (between 0 and 6) of numeric values from the Decimal Places list.
- Select the currency type (if Currency has been selected as the Format) from the Currency Symbol list.
- Check Include In Totals to include the result of the formula when calculating the section divider in the Markups list.
- Click OK.
About the Measurement column in formulae:
Measurement is a default column in Revu that is important when defining formulas. The Measurement column contains only the numeric value of the primary measurement of a markup and does not contain the unit descriptor.
The measure markups like Length, Width, and Area contain an unit descriptor like in, cm, or sq ft. This makes these columns more readable in the Markups list, but also makes them unusable in a formula. The Measurement column removes the unit so only the value remains.
The Measurement column also contains the value no matter what type of measure markup was used. The Measurement column will automatically contain the value of a Length, Area, or Count.
The Number custom column is a numeric-format column.
- On the Markups List toolbar, go to Markups List > Columns > Manage Columns. The Manage Columns dialog box appears.
-
Click Add. The Add Column dialog box appears.

- Enter a display name for the column in the Name field.
-
Select Number from the Type list.
- Select the display characteristics of the numerals from the Format list. The options are: Normal, Currency, or Percentage.
- Select the number of decimal places (between 0 and 6) of numeric values from the Decimal Places list.
- Select the currency type (if Currency has been selected as the Format) from the Currency Symbol list.
- Check Include In Totals to include the result of the formula when calculating the section divider in the Markups list.
- Enter the minimum allowable value in the Minimum field. (Optional)
- Enter the maximum allowable value in the Maximum field. (Optional)
- Enter a default value in the Default field. (Optional)
- Click OK.
The Text custom column is a text-format column.
- On the Markups List toolbar, go to Markups List > Columns > Manage Columns. The Manage Columns dialog box appears.
-
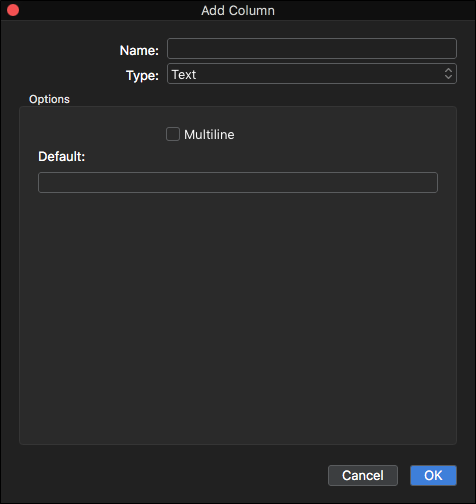
Click Add. The Add Column dialog box appears.

- Enter a display name for the column in the Name field.
-
Select Text from the Type list.
- To wrap text so that it appears on multiple lines if it is longer than the available space in the Markups list, select Multiline.
- Enter default text to be added with every new markup in the Default field.
- Click OK.
Custom columns can be removed and reordered from the Manage Columns dialog box. Additionally, custom columns can be added to all documents using the column template. On the Markups List toolbar, go to Markups List > Columns > Manage Columns. The Manage Columns dialog box appears.
Reordering the List:
Select a column, then drag and drop it to the desired position in the list. A line appears as you are moving the column to help you with placement.
Deleting a Custom Column:
Select the desired column and click Delete.