Measure Tool
The Measure tool creates measurements in any of several measurement modes. Measurements can persist as markups, allowing for processing and summarization through the Markups list, which is useful for estimation and takeoffs, or be temporary, which is useful for quickly measuring something without creating a visual record on the PDF.
When the Measure Tool is activated, the last measurement mode used is automatically selected. This makes it easier to employ your most commonly used measurement mode.
If you have not yet set the page scale, you will be prompted to do so when you place the first measurement.
For details on each measurement mode, see their individual sections (listed in Related topics below).
Temporary measurements are often used for quick measurements or to add up several measurements without leaving a visual record on the PDF.
Before measuring, always be sure the document is properly calibrated.
-
Click
 Measure Tool on the Measure toolbar or press M on the keyboard. The Measurements panel becomes active and the most recently used measurement mode is enabled.
- If desired, change the measurement mode on the Measurements panel toolbar.
-
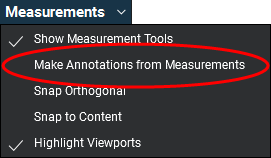
In the Measurements menu on the Measurements panel toolbar., ensure Make Annotations from Measurements is not checked.

- Now make the measurement (for details on how to perform Length, Area, Perimeter, Diameter, Angle, Radius (either Center-out or Three-point methods), Volume, and Count measurements, please see the sections dedicated to each of those modes).
If you have not yet set the page scale, you will be prompted to do so when you place the first measurement.
The measurement will appear as a blue line along with the value. It will disappear when you take another action in Revu (click away, take another measurement, press ESC, and so on).
Measurements can be left on the PDF as markups, allowing you to measure many items on the same document and process the results in a variety of ways later, including through the Markups list.
For more information about using the Measurement tool for takeoffs, see Takeoffs and Measuring.
Before measuring, always be sure the document is properly calibrated.
-
Click
 Measure Tool on the Measure toolbar or press M on the keyboard. The Measurements panel becomes active and the most recently used measurement mode is enabled.
- If desired, change the measurement mode on the Measurements panel toolbar.
-
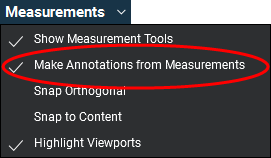
In the Measurements menu on the Measurements panel toolbar, ensure Make Annotations from Measurements is checked.

- Now make the measurement (for details on how to perform Length, Area, Perimeter, Diameter, Angle, Radius (either Center-out or Three-point methods), Volume, and Count measurements, please see the sections dedicated to each of those modes).
If you have not yet set the page scale, you will be prompted to do so when you place the first measurement.
The measurement will appear as a markup and show up in the Markups list. You can change the appearance of the measurement on the Properties panel.